
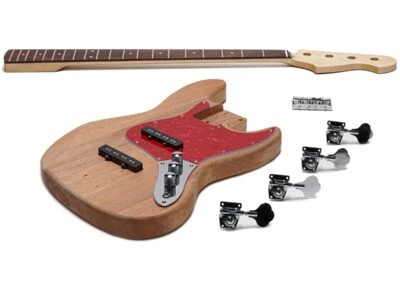
Building a bass guitar from a kit can be a great way to customize your instrument while gaining valuable experience in guitar assembly and maintenance. While the prospect of building a bass guitar from a kit can seem daunting, it can be accomplished with the right tools, knowledge, and patience. Today, we will provide a step-by-step guide to building a bass guitar.
Step 1: Gather Your Tools and Materials
Before beginning the assembly process, gathering all the necessary tools and materials is important. The specific tools required may vary depending on the bass guitar kit used, but common tools needed include screwdrivers, pliers, wire cutters, and a soldering iron.
Step 2: Sanding and Finishing
Before assembly, the body and neck of the bass guitar may require sanding and finishing. Sanding should be done gradually, starting with a coarse grit and moving to a finer grit to ensure a smooth finish. The wood can be sealed using oil, lacquer, or another desired finish.
Step 3: Neck Assembly
Next, the neck can be attached to the body using the provided screws. Ensuring that the neck is aligned properly and the screws are tightened securely is important.
Step 4: Installing Hardware and Electronics
After the neck is attached, the hardware and electronics can be installed. This includes the bridge, tuners, pickups, and wiring. The kit should come with instructions for the specific installation process, but it is important to take the time to ensure that everything is installed correctly and functioning properly.
Step 5: Wiring and Soldering
The procedure of wiring and soldering a bass guitar can be one of the trickiest parts of construction. It is crucial to adhere to the kit's instructions and to take the time to make sure that all connections are solid and the wiring is nice and well-organized.
Step 6: Final Assembly
Once all the components are installed and wired correctly, the bass guitar can be assembled. This includes attaching the pickguard, knobs, and other hardware. It is necessary to take the time to ensure that everything is aligned properly and tightened securely.
Step 7: Set Up and Testing
After assembly, the bass guitar should be set up and tested. This includes adjusting the truss rod, bridge, and string height to ensure the bass is comfortable playing and produces a quality sound. Testing should be done to ensure that all electronics are functioning properly and that the bass guitar is in tune.
The Final Thought
Building your own bass guitar can be a rewarding and challenging experience that can provide valuable knowledge and skills in guitar assembly and maintenance. By sticking to the above steps and ensuring that everything is installed correctly, you can create a custom bass guitar unique to your style and preferences. Therefore, if you want to invest in custom bass guitars, SOLO Music Gear has got you covered, as they offer a wide variety of bass guitar kits for both beginners and experienced builders. For detailed information, you can visit this website- Solomusicgear.com.


Sign in to leave a comment.