Home renovation projects are exciting, but selecting the right tiles can feel overwhelming. With countless materials, colors, sizes, and finishes available, making the perfect choice requires careful planning. This comprehensive guide will walk you through every step of buying tiles for your home renovation, ensuring your space is both stylish and functional.
1. Understanding Tile Types in Depth
Tiles have become one of the most versatile and widely used materials for home design and construction. Whether you're considering flooring, walls, or even outdoor spaces, the variety of tiles available today offers endless possibilities. Understanding the different tile types, their subtypes, technical specifications, and installation tips is crucial for making informed decisions that will influence the aesthetics, functionality, and durability of your space.
Ceramic Tiles
Ceramic tiles are a staple in homes across the globe, known for their versatility, affordability, and wide range of styles. These tiles are typically made from clay that is fired at a high temperature, making them durable and resistant to moisture. However, they can be classified into several subtypes that cater to different needs and preferences.
Subtypes of Ceramic Tiles:
- Glazed Ceramic Tiles: These tiles have a protective coating that makes them stain-resistant and easy to clean. The glaze gives them a glossy, smooth finish, making them ideal for walls and areas with light to moderate traffic. The glazed surface also provides a wide array of design options, from solid colors to intricate patterns.
- Unglazed Ceramic Tiles: These tiles lack the glossy finish and instead retain a natural texture, giving them a more rustic, earthy look. They are often used in areas where traction is essential, such as kitchens or bathrooms. Unglazed tiles are typically more slip-resistant than glazed tiles.
- Quarry Tiles: Quarry tiles are thicker and denser than regular ceramic tiles, making them an excellent choice for high-traffic areas. These tiles are often used in outdoor spaces, kitchens, or commercial settings where durability and slip resistance are crucial.
Technical Specifications:
- PEI Rating: The Porcelain Enamel Institute (PEI) rating determines the suitability of a tile for various applications. Ceramic tiles usually have a PEI rating of 1-3 for walls (non-traffic areas) and 3-5 for floors (moderate to heavy traffic areas).
- Water Absorption Rate: Ceramic tiles typically have a water absorption rate of 3-7%. This makes them suitable for most indoor environments, though higher water absorption rates may be a concern in areas like bathrooms and kitchens where moisture levels are high.
Installation Tips:
When installing ceramic tiles, it's important to use the correct grout. For narrower joints, a non-sanded grout is recommended to prevent scratching of the tile surface. Additionally, ensure proper leveling during installation to avoid uneven surfaces that could lead to tripping hazards.
Porcelain Tiles
Porcelain tiles are a subtype of ceramic tiles but are made from a more refined clay and fired at higher temperatures, making them denser and more durable. These tiles are widely regarded for their superior performance and ability to withstand heavy foot traffic and various environmental conditions.
Through-Body vs. Glazed Porcelain Tiles:
- Through-Body Porcelain Tiles: These tiles maintain their color throughout the entire thickness of the tile, which means that if they chip or get scratched, the underlying color will match the surface. This makes them an ideal choice for high-traffic areas where wear and tear are a concern.
- Glazed Porcelain Tiles: Unlike through-body tiles, glazed porcelain tiles have a surface layer that offers a wide range of finishes, textures, and designs. These tiles are perfect for creating unique, stylish spaces and are often used for walls or decorative accents.
Technical Specifications:
- PEI Rating: Porcelain tiles are highly rated for high-traffic areas and heavy-duty use. They typically have a PEI rating of 4-5, which makes them ideal for both residential and commercial spaces.
- Water Absorption: One of the defining characteristics of porcelain tiles is their low water absorption rate, usually less than 0.5%. This makes them perfect for use in wet areas, such as bathrooms, kitchens, and even outdoor spaces where exposure to moisture is frequent.
Innovations in Porcelain:
Recent innovations in porcelain tile production have led to digital printing technologies that allow for hyper-realistic designs. This means that porcelain tiles can now mimic the appearance of natural materials like wood, stone, and even marble, offering a cost-effective and low-maintenance alternative to these more expensive materials.
Natural Stone Tiles
Natural stone tiles are made from materials that are quarried directly from the earth. These tiles offer a unique, luxurious aesthetic and are perfect for those seeking a more organic, timeless look for their space. However, the natural characteristics of stone tiles mean that they require specific care and maintenance.
Types of Natural Stone Tiles:
- Marble: Known for its elegance and luxurious appeal, marble is often used for countertops, floors, and accent walls. However, marble is prone to scratching and etching, especially in high-traffic areas. To prevent this, it’s best to use a honed finish rather than a polished one, particularly in kitchens.
- Granite: Granite is one of the hardest natural stones, making it ideal for countertops and areas that require a durable surface. It resists scratching and staining but can be expensive, especially when considering custom cuts and designs.
- Slate: Slate has a unique textured surface that adds a natural, rustic look to any space. It’s often used for outdoor walkways, patios, and even flooring. Slate tiles are slip-resistant, making them a safe choice for wet or high-traffic areas.
- Travertine: This stone is characterized by its beautiful, earthy tones and textured surface. Due to its porosity, travertine tiles can require extra sealing to prevent moisture absorption. They are often used in bathrooms, kitchens, and even outdoor spaces.
- Limestone: Limestone is a soft, porous stone that requires care when used in high-moisture areas. It’s important to avoid acidic cleaners that can erode the surface. Limestone is ideal for creating a soft, neutral look in spaces like living rooms and entryways.
Glass Tiles
Glass tiles are known for their vibrant, reflective qualities, which can brighten up any room. These tiles are often used in backsplashes, accent walls, and bathroom showers. Their glossy finish makes them easy to clean, but they can also show smudges and water spots more easily than other materials.
Backing Options:
- Mesh-Mounted: Many glass tiles are mounted on mesh backing, which makes them easier to install as a single unit rather than individual tiles. This can save time during installation and result in a smoother, more even surface.
Light Reflection:
Glass tiles are perfect for spaces with limited natural light. Their reflective properties help to bounce light around the room, making them ideal for small or dimly lit areas. Using glass tiles in places like bathrooms and kitchens can brighten up your space while adding a modern, sleek look.
Cement Tiles
Cement tiles are a versatile choice for those looking for bold, custom designs. These tiles are made by mixing cement with pigments and then pressing the mixture into molds. Cement tiles offer an excellent way to incorporate unique patterns and colors into your space.
Sealing:
Cement tiles are porous, which means they require sealing before installation to prevent staining. A penetrating sealer should be applied to the surface to protect it from dirt, moisture, and oils. After sealing, grout should be applied carefully to avoid smearing the tile surface.
Custom Designs:
One of the biggest advantages of cement tiles is the ability to create custom patterns and designs. Many artisans specialize in crafting bespoke cement tiles that reflect individual tastes, making them an ideal choice for those looking to add a personal touch to their flooring or wall design.
Vinyl Tiles
Vinyl tiles have gained popularity due to their affordability, ease of installation, and versatility. These tiles are available in a variety of styles, including options that mimic the look of hardwood, stone, or ceramic tiles.
WPC vs. SPC:
- WPC (Wood Plastic Composite): This type of vinyl tile features a waterproof core that makes it ideal for use in high-moisture areas. WPC tiles are softer and more comfortable underfoot, which makes them a great choice for residential spaces.
- SPC (Stone Plastic Composite): SPC vinyl tiles are more rigid than WPC tiles, offering better durability and stability. These tiles are ideal for high-traffic areas and can be used in both residential and commercial settings.
Peel-and-Stick Options:
Vinyl tiles are available in peel-and-stick formats, making them an ideal option for DIY projects. These tiles are easy to install and can be a cost-effective solution for temporary spaces or areas that don’t require heavy-duty materials.
2. Tile Size, Shape, and Layout Strategies
The size, shape, and layout of tiles can dramatically alter the appearance and function of a room. Selecting the right dimensions and arrangement is key to achieving the desired aesthetic, as well as ensuring durability and ease of maintenance. There are various trends and strategies that designers and homeowners are exploring to make the most of their tile spaces.
Large Tiles (24”x48”)
Large-format tiles are currently one of the most popular choices for both floors and walls. These tiles create a sleek, modern look by minimizing grout lines, making spaces appear larger and more open. In spaces such as bathrooms or living rooms, large tiles help create a clean and seamless appearance.
Advantages of Large Tiles:
- Minimized Grout Lines: With fewer grout lines, large tiles create a more uniform surface, which is particularly desirable in spaces with expansive floors or walls. The fewer the grout lines, the less maintenance is required, and the surface is easier to clean.
- Time and Cost Efficiency: Because fewer tiles are needed to cover a large area, the installation time is reduced, and labor costs may be lower. Additionally, there is less cutting required for installation, further streamlining the process.
Installation Tips for Large Tiles:
- Leveling Clips: When installing large tiles, use leveling clips to ensure an even surface. These clips help prevent lippage, which is the uneven alignment of tile edges that can be a safety hazard and affect the overall aesthetic.
- Proper Subfloor Preparation: To support the weight and size of large tiles, ensure the subfloor is clean, smooth, and stable. Large tiles can amplify imperfections in the subfloor, which may lead to future problems, including tile cracking or uneven wear.
Subway Tiles
Subway tiles have been a timeless choice for decades, offering a classic look that can be used in virtually any space. Their rectangular shape and clean lines make them ideal for walls, particularly in kitchens and bathrooms.
Layout Variations:
- Herringbone Pattern: A popular twist on the standard subway layout, herringbone is a diagonal arrangement that adds visual interest and a sense of movement to the space. The zigzag pattern can be used on walls, floors, and even as a border or accent piece.
- Vertical Subway Tiles: Traditional subway tiles are laid horizontally, but a vertical arrangement gives the space a more modern, dynamic feel. This layout elongates the room, making it appear taller and more spacious.
Installation Tips:
- Consistency in Grout: Whether you choose a classic horizontal layout or an artistic herringbone arrangement, consistency in grout color and width is crucial to maintaining a balanced, cohesive design. Lighter grout shades work well with white subway tiles, while contrasting darker grout can create a more dramatic, contemporary look.
Hexagon Tiles
Hexagon tiles have seen a resurgence in recent years, offering a bold geometric shape that can add a touch of sophistication and interest to any space. These tiles work well in both traditional and modern designs, creating a visual contrast that draws attention.
Pairing with Grout:
- Contrasting Grout: To amplify the geometric impact, pair hexagonal tiles with contrasting grout colors. For example, dark grout with light tiles or vice versa can enhance the shape of each individual tile while highlighting the overall pattern.
- Subtle Grout: For a more subdued effect, choose a grout color that closely matches the tile color. This will help create a seamless, continuous look that allows the hexagons to blend in with the surrounding space.
Installation Tips:
- Plan the Layout: Hexagonal tiles can be tricky to install because they involve a unique pattern. It's important to plan the layout ahead of time, marking reference lines and ensuring a symmetrical arrangement. Consider starting from the center of the room to ensure an even distribution.
Borders and Inserts
Borders and inserts are a great way to define areas, enhance the visual interest of a space, and add a personalized touch to your design. Using smaller mosaic tiles, decorative patterns, or contrasting colors can turn an otherwise simple installation into a work of art.
Design Ideas:
- Mosaic Liners: Mosaic tiles are a versatile and creative way to add interest to a space. Use mosaic borders around the edges of a room or as a feature strip in a shower or backsplash. These can be made from glass, ceramic, stone, or even metal for an eclectic look.
- Contrasting Borders: Use contrasting borders to separate different zones within a room, such as around a shower, tub, or vanity area. These borders can be used to highlight specific features of the room, such as a focal point or accent wall.
Installation Tips:
- Precision Is Key: When using borders or inserts, precision during installation is essential. Careful measurements and consistent grout lines will help maintain the overall design and ensure that each element aligns properly.
- Grout Width: Borders often look best with slightly wider grout lines, which allow the intricate details of the design to stand out. Ensure that the grout color complements the overall aesthetic of the room.
Grout Width
The width of the grout lines can significantly affect the overall look of your tile installation. The decision to go with narrow or wide grout lines should be based on the style of tile being used, the desired aesthetic, and the function of the space.
Grout Width for Different Styles:
- 1/8” Grout Lines: Narrow grout lines create a sleek, modern look, making the tiles appear larger and more seamless. This is particularly effective with large-format tiles and can help minimize the appearance of grout.
- 1/4” Grout Lines: Wider grout lines are more traditional and provide a rustic or classic feel. They work well with smaller tiles, such as mosaics, and can help emphasize the pattern or layout.
3. Advanced Color Psychology and Design Trends
Color is one of the most powerful design tools available. It has the ability to set the mood, influence perception of space, and create visual harmony. Understanding the psychology of color and how to incorporate it into your tile design is essential for achieving the desired effect in a room.
Tile Trends: Terracotta Revival and Jewel-Toned Accents
The tile industry is constantly evolving, with new trends emerging each year. In 2023, we saw a resurgence of terracotta tiles and the introduction of more bold, jewel-toned accents.
Terracotta Tiles:
Terracotta, with its rich, earthy tones, has made a comeback as homeowners and designers lean into warmer, organic hues. These tiles are perfect for creating a rustic or Mediterranean-inspired look and pair beautifully with natural wood, woven textures, and greenery.
Jewel-Toned Accents:
Rich, jewel-toned tiles—such as emerald, sapphire, and amethyst—are becoming more popular as accent tiles. These colors add a luxurious, bold touch to a room and are ideal for spaces where you want to make a statement, such as a feature wall or backsplash.
The Impact of Lighting on Tile Design
Lighting plays a crucial role in how tiles appear in a space. The type of lighting—whether natural or artificial—can drastically change the look of the tile’s color and texture. It’s important to test samples under different lighting conditions to see how they react in the space before making a final decision.
Natural vs. Artificial Light:
- Natural Light: Tiles will look different under natural light, which changes throughout the day. Warm tones like terracotta and beige can look more muted in the morning light but may appear warmer and richer during the afternoon.
- Artificial Light: Fluorescent or LED lighting tends to make colors appear cooler, while incandescent lights bring out the warmer undertones in materials. Be mindful of your light sources when selecting tile colors to ensure that they complement your existing lighting.
Grout Hacks for the Perfect Finish
Choosing the right grout color and technique can significantly affect the overall look of your tile installation. Grout can either blend in seamlessly or contrast sharply to create bold design statements.
Matching vs. Contrasting Grout:
- Matching Grout: Matching the grout color to your tiles creates a clean, seamless look, especially in modern designs where a minimalist aesthetic is desired. This style works particularly well with larger tiles or neutral-colored options.
- Contrasting Grout: Using a contrasting grout color can highlight the individual tiles and emphasize the pattern. Bold contrasting grout is often used in traditional or eclectic designs, such as with subway tiles or hexagonal tiles.
Pro Insight:
Interior designers recommend limiting bold tile designs to no more than 20% of a room’s surface. Overuse of bold patterns or colors can overwhelm a space, leading to a chaotic or unbalanced design. Instead, use bold tiles as accents or focal points while keeping the overall design neutral to create a balanced and harmonious look.
4. Budget Deep Dive
When it comes to tile installation, understanding the full scope of costs—beyond just the price of the tiles themselves—is essential for planning a budget. Factors such as labor costs, material selection, and installation complexity all contribute to the final price.
Regional Pricing: Ceramic vs. Porcelain vs. Natural Stone
Tile prices can vary significantly depending on the region. In urban areas, porcelain tiles tend to cost between $4–15 per square foot, while ceramic tiles are generally more affordable, ranging from $3–10 per square foot. Natural stone tiles, such as marble, granite, or limestone, are often more expensive, with prices starting at $7 per square foot and increasing depending on the type of stone and its rarity.
Labor Costs and Installation Fees
Labor costs are another significant part of the overall tile installation budget. Demolition work usually costs around $2 per square foot, while subfloor preparation typically runs at $2–3 per square foot. Installing complex patterns, such as herringbone or diagonal layouts, can add $5 or more per square foot to the total labor costs.
Cost-Saving Hack:
If you're looking to reduce costs, consider using larger tiles, as they require less cutting and fewer grout lines. This can cut down on both labor time and material waste.
5. DIY vs. Pro Installation: Expanded
When it comes to tile installation, one of the most significant decisions you’ll make is whether to tackle the job yourself or hire a professional. Each option has its benefits and challenges, and understanding the requirements and potential pitfalls will help you make an informed choice. The complexity of the project, the type of tile, and the space being tiled all play a role in determining whether DIY or professional installation is the best route for your needs.
DIY Installation: What You Need to Know
Installing tile yourself can be a rewarding and cost-saving endeavor, but it requires time, skill, and the right tools. It is important to understand the tools and materials needed for a successful DIY installation.
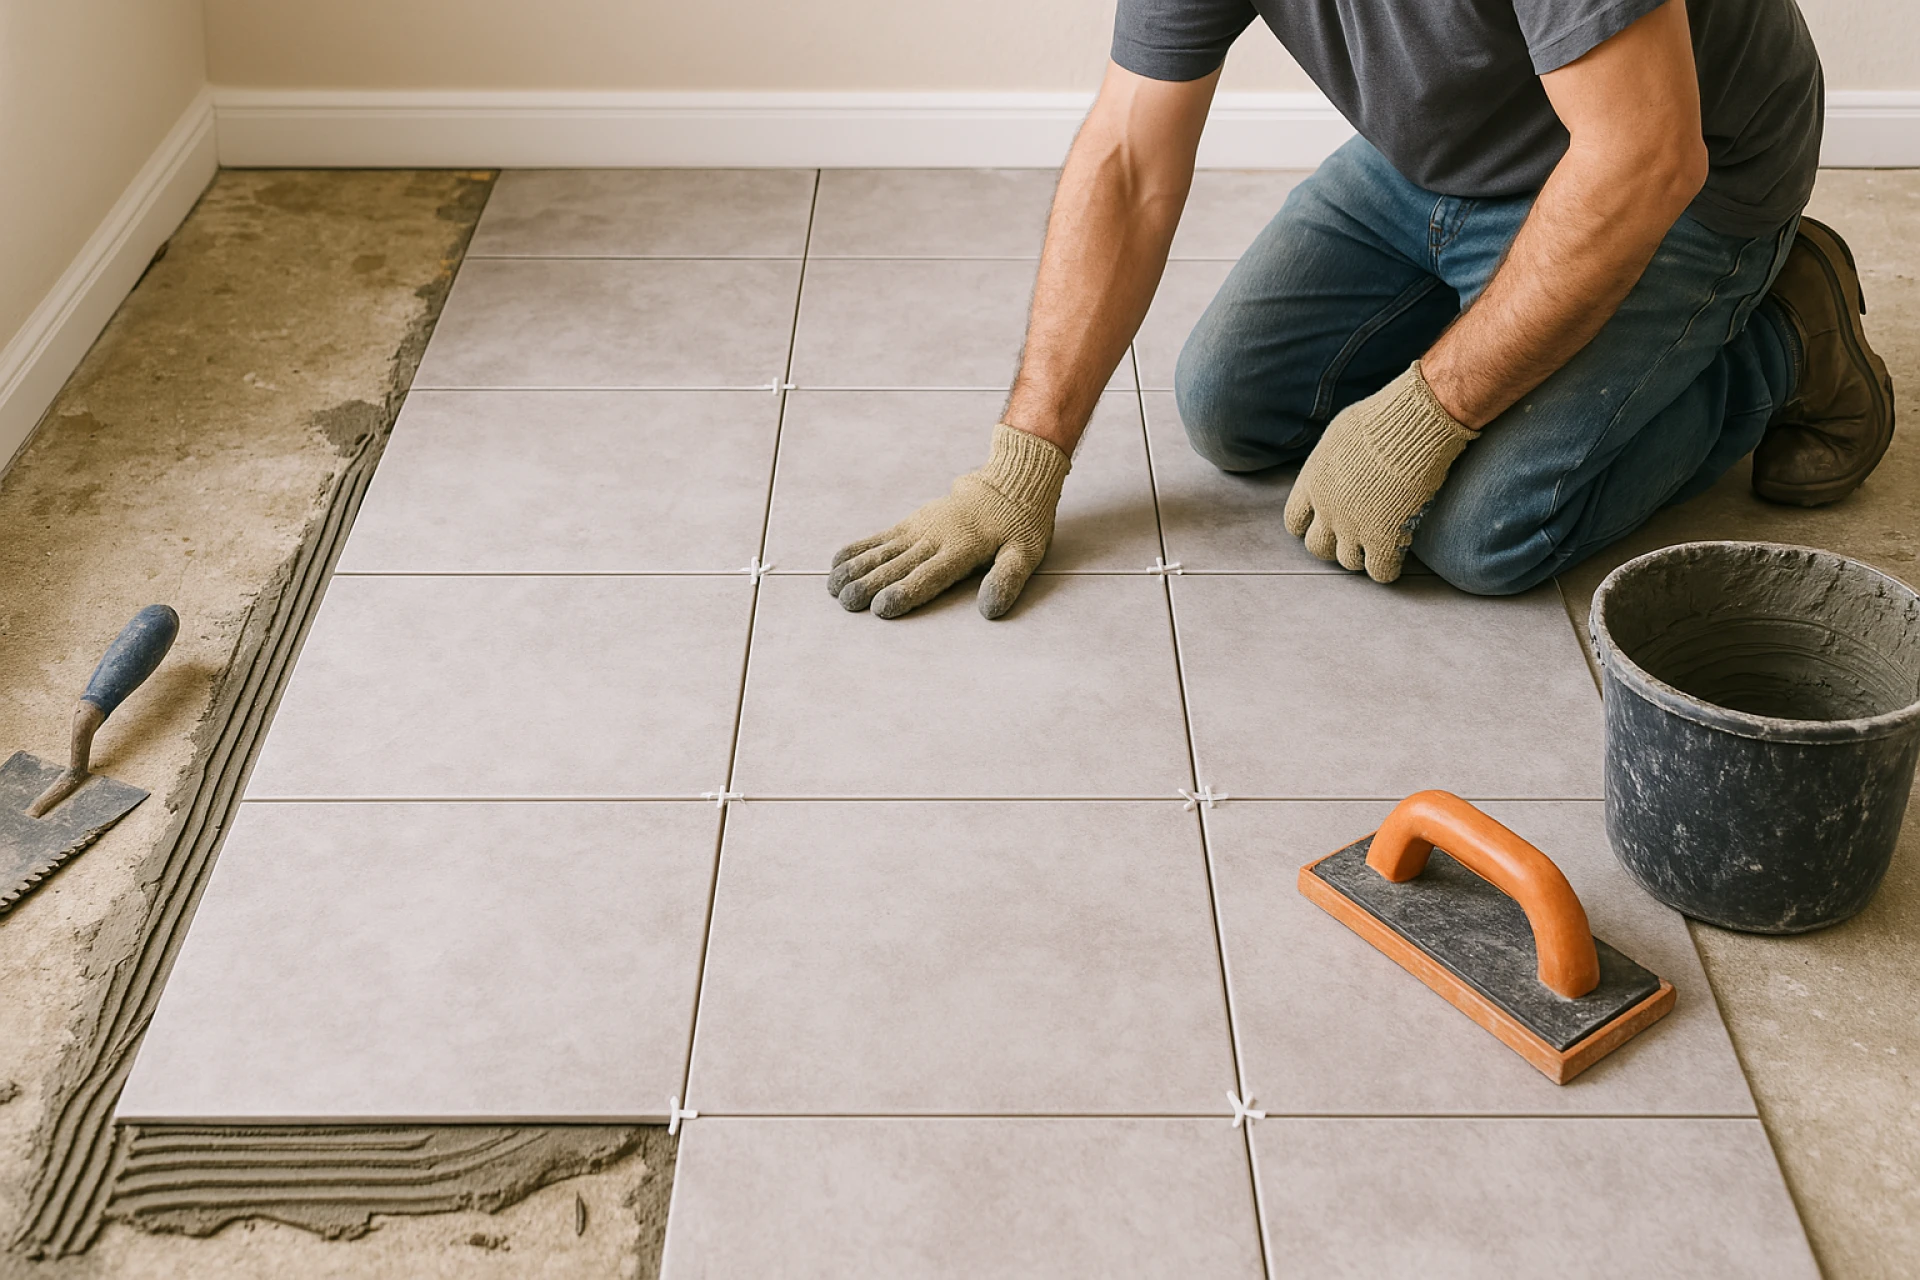
Tools Checklist for DIY Installation:
- Wet Saw: For cutting tiles, a wet saw is essential, especially when dealing with harder tiles like porcelain or stone. This tool provides clean cuts and helps reduce the risk of chipping or cracking tiles during installation.
- Trowel: A trowel is used to apply thin-set adhesive to the surface before laying the tiles. The size of the notched trowel will depend on the size of the tiles being installed, but a 1/4” or 3/8” notch is typically used for standard tiles.
- Spacers: Tile spacers are crucial for maintaining consistent grout lines between tiles. The size of the spacer will depend on the desired grout width, with most common widths ranging from 1/16” to 1/8”.
- Level: To ensure that the tiles are installed evenly, use a level to check that each tile is aligned correctly. This is especially important for large-format tiles that require precise installation.
- Grout Float: After the tiles are set, use a grout float to apply grout between the tiles, ensuring that the grout fills the joints evenly and smoothly.
Common DIY Mistakes to Avoid:
- Incorrect Adhesive Thickness: One of the most common mistakes in DIY tile installation is applying an adhesive layer that is either too thick or too thin. A thin layer of adhesive is essential for proper tile adhesion. Applying too much adhesive can lead to uneven surfaces or tiles that do not adhere properly, while too little adhesive can result in tiles that are not secured firmly.
- Misaligned Layouts: It’s easy to assume that starting tile installation at the corner of a room will lead to perfectly aligned tiles, but this often isn’t the case. A better approach is to start in the center of the room and work outwards. This ensures that the layout is symmetrical and avoids the appearance of uneven cuts along the edges of the room.
- Inconsistent Grout Lines: Uneven grout lines can make an otherwise beautiful tile installation look sloppy and unprofessional. Make sure that spacers are used consistently, and double-check the alignment of each tile as you go to avoid gaps or uneven grout spacing.
- Skipping Subfloor Preparation: Proper subfloor preparation is crucial to the success of any tile installation. Make sure the subfloor is level, clean, and free of any debris. Uneven subfloors can lead to tiles cracking, lifting, or settling over time.
When to Hire a Professional Installer:
While DIY installation can save money, there are times when hiring a professional is the best option. Certain projects require expertise that a seasoned installer can provide, ensuring that the job is done right the first time.
1. Heated Floors: Installing heated floors requires specialized knowledge of electrical systems and proper installation techniques. A professional will be able to handle the complex wiring and ensure that the system is installed safely and correctly.
2. Structural Adjustments: Heavy stone tiles or large-format tiles may require additional subfloor support to prevent cracking or shifting. A professional installer will be able to assess the structure of the floor and make any necessary adjustments before laying the tiles.
3. Complex Patterns: If you are installing intricate tile patterns such as herringbone, chevron, or diagonal layouts, a professional can ensure that the pattern is executed precisely, without distortion or misalignment.
4. Time Constraints: Tile installation can be a time-consuming process, especially if you are new to the job. If you’re on a tight timeline or want the job completed quickly, hiring a professional installer may be the best choice.
Advantages of Hiring a Pro:
- Expertise: A professional installer has years of experience and training to handle all aspects of the installation process. From subfloor preparation to tile cutting and grouting, they know exactly what to do to ensure a flawless result.
- Tools and Equipment: Professional installers come equipped with high-quality tools and equipment that can help speed up the process and improve the quality of the installation.
- Warranty: Many professional installers offer warranties on their work, which can provide peace of mind. If something goes wrong after the installation, you can rest assured knowing that the issue will be addressed.
- Time Savings: Hiring a pro means that you won’t have to spend hours (or days) working on the project yourself. Professionals can complete the installation quickly and efficiently, allowing you to enjoy your new space sooner.
6. Maintenance Mastery
Tiles are a durable and low-maintenance material, but proper care and upkeep are essential to ensuring that they continue to look great for years to come. Regular maintenance prevents damage, preserves their appearance, and extends their lifespan.
Grout Revival
Grout can often become discolored or stained over time, especially in high-traffic areas like kitchens and bathrooms. To keep your grout looking fresh, consider using UV-resistant epoxy grout for areas exposed to sunlight. Epoxy grout resists staining and discoloration, making it ideal for areas that are prone to water exposure and high humidity.
Grout Cleaning and Restoration Tips:
- Deep Cleaning: Regular cleaning of grout lines with a grout cleaner and a stiff-bristled brush will help prevent mold, mildew, and soap scum buildup. Avoid harsh chemicals that can degrade the grout over time.
- Seal the Grout: After cleaning the grout, it’s important to apply a grout sealer to protect it from dirt, moisture, and stains. This step helps to ensure the longevity of your grout and makes cleaning easier.
Chip Repair
Over time, tiles may experience chips, cracks, or other damage, especially in high-traffic areas. Fortunately, tile chip repair is a relatively simple process that can restore the appearance of your tiles.
Repairing Chips:
- Epoxy Repair: For small chips in ceramic or porcelain tiles, you can use color-matched epoxy to fill in the damage. This will help blend the repair with the surrounding tile, making the damage nearly invisible.
- Tile Replacement: For larger or more severe damage, it may be necessary to replace the affected tile. If you have spare tiles from your original installation, this can be a relatively simple process. Be sure to keep extra tiles on hand in case future repairs are needed.
Efflorescence
Efflorescence occurs when water seeps into the porous surface of the tile or grout, causing minerals to leach to the surface and form white deposits. This is a common issue in damp areas such as basements or bathrooms.
How to Remove Efflorescence:
- Vinegar Rinse: Mix a solution of vinegar and water (1:1 ratio) and apply it to the affected areas. Use a sponge or cloth to scrub the deposits, and rinse thoroughly with clean water. For stubborn efflorescence, you may need to repeat the process or use a specialized efflorescence cleaner.
- Preventing Efflorescence: To prevent future efflorescence, make sure your tiles are sealed properly and that there are no leaks in the surrounding walls or flooring. Proper ventilation in damp areas will also help reduce the likelihood of moisture buildup.
7. Eco-Friendly Innovations
The tile industry is increasingly focused on sustainability, with many manufacturers producing eco-friendly tiles and materials. By opting for green products, you can reduce your environmental impact while still achieving beautiful, functional results.
Eco-Friendly Tile Certifications:
- Green Squared: This certification ensures that tiles meet strict environmental, health, and sustainability standards. Green Squared tiles are produced using energy-efficient processes and contain recycled materials.
- Cradle to Cradle: The Cradle to Cradle certification indicates that tiles are designed with the intention of being fully recyclable or biodegradable at the end of their life cycle. This certification promotes a circular economy by ensuring that tiles are not wasteful and can be reprocessed into new products.
Recycled Glass Tiles
Recycled glass tiles are made from post-consumer glass, such as discarded bottles and windshields. These tiles not only help reduce waste but also offer a unique, colorful aesthetic that can brighten up any space. They are durable, low-maintenance, and available in a variety of finishes and textures.
Advantages of Recycled Glass Tiles:
- Eco-Friendly: By using recycled materials, these tiles help reduce the need for virgin raw materials and minimize environmental impact.
- Aesthetic Appeal: Recycled glass tiles can be found in a wide range of colors, shapes, and finishes, making them a versatile option for any design style.
- Durability: Glass tiles are resistant to moisture, stains, and scratches, making them ideal for use in wet areas such as bathrooms and kitchens.
Low-Carbon Tile Manufacturers
Certain tile manufacturers are committed to reducing their carbon footprint by using sustainable production methods. For example, Heath Ceramics is known for its solar-powered kilns, which help reduce energy consumption and minimize greenhouse gas emissions.
8. Retailer Showdown: Online vs. Local
When it comes to purchasing tiles, homeowners and contractors often face the decision of whether to buy from an online retailer or a local store. Both options have distinct advantages and disadvantages, depending on your priorities.
Online Tile Shopping: Pros and Cons
Perks of Online Shopping:
- Bulk Discounts: Many online tile retailers, such as BuildDirect or TileBar, offer bulk discounts that can save you money on larger orders.
- Virtual Showrooms: Online retailers often feature augmented reality (AR) apps or 3D tools that allow you to visualize how the tiles will look in your space before making a purchase.
- Convenience: Shopping online is convenient and accessible from anywhere, allowing you to browse a wide selection of tiles at any time. This is ideal if you are working on a tight schedule or need to make a quick decision.
Drawbacks of Online Shopping:
- Lack of Physical Inspection: One major drawback of online shopping is that you can't physically touch or see the tiles before purchasing. Although samples can be ordered, this adds time and expense to the process.
- Shipping Costs: Shipping tiles can be expensive, especially if you're ordering a large quantity. Additionally, tiles are fragile, and shipping damage is always a risk.
Advantages of Shopping Local:
Perks of Local Tile Stores:
- In-Person Samples: Shopping locally allows you to inspect tiles in person, feel their texture, and see their true color in different lighting conditions. This hands-on experience helps you make a more informed decision.
- Personalized Service: Local tile retailers often provide expert advice, personalized service, and recommendations based on your specific needs. They can also help you calculate how much tile you need, minimizing the risk of over- or under-ordering.
- No Shipping Fees: Purchasing from a local store eliminates the need for expensive shipping, which can be especially important if you’re working with a tight budget.
Drawbacks of Local Shopping:
- Limited Selection: Depending on the store, the selection of tiles may be more limited compared to online
9. Quality Assessment Toolkit
When purchasing tiles, whether for a small DIY project or a large-scale renovation, it's crucial to assess the quality of the tiles to ensure durability, aesthetic appeal, and longevity. The following guidelines will help you evaluate tiles before you make your final purchase.
Scratch Test
One of the best ways to assess the quality of a tile is to perform a scratch test. The scratch test measures the hardness of the tile, which determines its resistance to scratches and abrasions.
How to Perform the Scratch Test:
- Use a simple key or coin to scratch the surface of the tile.
- Observe how deep the scratch is. If the tile scratches easily, it may not be durable enough for high-traffic areas.
- For porcelain and ceramic tiles, look for a smooth surface with minimal scratching. For natural stone tiles, some soft stones (like limestone) may show marks from the test, so use your judgment based on the tile type.
Warpage Check
Warpage refers to the slight curvature that can sometimes occur in tiles, particularly with large-format tiles. This curvature can cause installation issues, including uneven grout lines or tiles that don't align correctly. A tile that is warped is more likely to result in gaps between tiles, creating an uneven and unprofessional look.
How to Check for Warpage:
- Lay two tiles face-to-face (with the finished sides facing out).
- Press down gently to see if there are any gaps between the edges of the tiles.
- If there are noticeable gaps, it indicates that the tile has warpage. This can lead to difficulties during installation and should be avoided if possible.
Batch Codes and Dye Lots
When purchasing tiles, particularly in large quantities, it is essential to check the batch codes and dye lots to ensure uniformity. Tiles from different batches may vary slightly in color and texture, which can result in noticeable differences when installed.
Why Batch Codes Matter:
- Uniformity: The batch code ensures that the tiles come from the same production run, which means they will match in color and design.
- Consistency: Tile manufacturers often produce different dye lots, and the color of the tiles may vary slightly between batches. If you're buying a large quantity of tiles, make sure they all come from the same batch to avoid discrepancies.
- Documentation: Keeping track of batch codes can also be useful in case you need to reorder tiles later. This ensures that the new batch will match your original purchase.
Other Considerations for Quality:
- Tile Finish: Pay attention to the finish of the tile. Glossy finishes can show scratches more easily than matte finishes. A matte or honed finish may be more practical for high-traffic areas and can provide a more subtle appearance.
- Edge Condition: Check the edges of the tiles for any chips or irregularities. Clean, smooth edges are a sign of high-quality production. If the edges are jagged or rough, it may affect the overall look once the tiles are installed.
10. 30+ FAQs: Your Tile Dilemmas Solved
Tiles are one of the most durable and long-lasting materials used in homes, but questions and concerns can arise throughout the process, from installation to maintenance. This section addresses some of the most frequently asked questions to help you navigate your tile journey with confidence.
Installation FAQs
Q: Can I tile over existing tiles?
A: Yes, you can tile over existing tiles if the surface is clean, stable, and deglossed. However, you must ensure that the original tiles are securely adhered to the subfloor, and there is no risk of movement. If the existing tiles are damaged, it's best to remove them before proceeding with new tile installation.
Q: How do I prepare a concrete subfloor for tile installation?
A: To prepare a concrete subfloor, start by cleaning the surface and ensuring it is free from debris, dust, or grease. If the concrete is uneven, you can level it using a self-leveling compound. Afterward, apply a crack isolation membrane to protect the tile installation from future cracks in the concrete.
Q: Can I use thin-set adhesive for all types of tiles?
A: Thin-set adhesive is suitable for most types of tiles, but the type of thin-set you use will depend on the tile material. For example, use a modified thin-set for porcelain and stone tiles, as they require a stronger bond. For lighter ceramic tiles, a standard unmodified thin-set may suffice.
Q: Should I install tiles in a specific pattern, or does it not matter?
A: Tile patterns are a matter of personal preference, but certain patterns can make your space look larger or more unique. For example, diagonal patterns can give a sense of space in smaller rooms. For bathrooms or kitchens, consider using subway tiles in a brick or herringbone pattern for a stylish yet timeless look.
Design FAQs
Q: What’s the best tile for radiant heating systems?
A: Porcelain or ceramic tiles are the best options for radiant heating because of their excellent thermal conductivity. These materials allow heat to transfer efficiently from the underfloor heating system to the room, keeping your floors warm and cozy during colder months.
Q: Can I mix different tile sizes in one room?
A: Yes! Mixing tile sizes is a popular trend that can add visual interest and dimension to a room. For example, pairing larger floor tiles (12”x24”) with smaller wall tiles (4”x12”) creates a balanced look that’s both modern and dynamic.
Q: How can I make a small bathroom look bigger using tile?
A: To make a small bathroom look larger, use light-colored tiles (such as whites, creams, or pastels) and install them in a way that draws the eye upward or outward. Large-format tiles with minimal grout lines will reduce the appearance of clutter and give the space a seamless feel.
Maintenance FAQs
Q: How do I remove soap scum from glass tiles?
A: To remove soap scum from glass tiles, use a pH-neutral cleaner along with a microfiber cloth. Avoid using abrasive scrubbers or harsh chemicals, as they can scratch or damage the glass surface.
Q: Can cracked tiles be repaired?
A: Yes, cracked tiles can often be repaired using color-matched epoxy or by replacing the damaged tile. Epoxy repairs are ideal for small chips or cracks, while tile replacement is best for more significant damage.
Q: How do I clean grout stains?
A: To clean grout stains, mix a solution of water and a mild, non-toxic cleaner, or use a dedicated grout cleaner. Apply the solution to the stained grout and scrub with a stiff brush. For tough stains, you can use a baking soda paste or vinegar and water solution to lift the stain.
Lifestyle FAQs
Q: What’s the best tile for homes with pets?
A: Textured porcelain or luxury vinyl tiles are great choices for homes with pets. These materials are resistant to scratches, stains, and moisture, making them perfect for pet-friendly environments. The textured surface also helps prevent slipping for both pets and people.
Q: What tiles are frost-proof and ideal for outdoor spaces?
A: Porcelain tiles are an excellent option for outdoor spaces, as they are resistant to freezing and thawing. Be sure to choose tiles with a COF (Coefficient of Friction) rating of ≥0.60 for slip resistance, ensuring that the tiles are safe to walk on in wet or icy conditions.
Q: Can I use tile in my basement?
A: Yes, tile can be used in basements, but it’s important to make sure the subfloor is properly prepared. Consider using porcelain or ceramic tiles for basement floors as they are durable and water-resistant. Ensure proper sealing and ventilation to prevent moisture buildup.
Conclusion
Tile is a versatile, durable, and stylish material that can transform any space. Whether you're choosing tiles for your kitchen, bathroom, or outdoor patio, understanding the different types of tiles, installation techniques, and maintenance tips is essential to achieving a successful outcome. By taking the time to evaluate tile quality, considering design trends, and following proper installation and care guidelines, you can ensure that your tile project not only looks great but stands the test of time.
With so many options available, from classic ceramic and porcelain tiles to more specialized materials like glass and cement tiles, there's no limit to the creative possibilities for your home or business. Whether you opt for a DIY installation or decide to hire a professional, this guide has provided you with the knowledge and resources needed to navigate the world of tile with confidence.


Sign in to leave a comment.