Adobe Creative Cloud allows you to synchronize the files through the CC account. But every user does not require to synchronize the files using Creative Cloud. In that case, few users may prefer to turn off the file synchronization for Adobe CC. So, if you would like to know how to turn off file sync for Adobe Creative Cloud, then here are some directions are given below, make sure to read them carefully.
Disable the Synchronize Settings
The users are intended to disable the synchronize settings through the below-written guidelines. If you have already tried this solution, then proceed further to the next fix.
- Firstly, you have to invoke the application of Adobe Creative Cloud via the Windows menu.
- After that, reach the system tray and select the button of Creative Cloud.
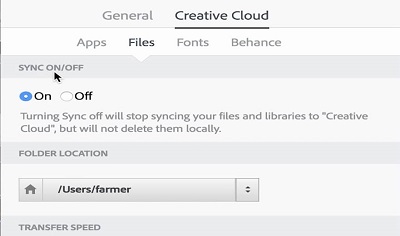
- You should select the gear icon on the upper right side of the windows of CC application then choose the Preferences option.
- Then select the section of Creative Cloud.
- Thereafter, click on the Files option to invoke the options.
- Now, switch the toggle of ‘Sync On/Off’ settings to disable it.
Remove the Folder of Creative Cloud Files
The users who are keen to remove the folder of Creative Cloud files, then you can determine to pursue the directions given below.
- You should delete the shortcut for the folder of Creative Cloud Files on the left side Navigation pane of File Explorer using PinCCF.zip, which includes an official file of registry via Adobe.
- Then invoke the screen of File Explorer by holding the Windows and E buttons altogether over the keyboard.
- After that, invoke the folder which contains the PinCCF .zip file.
- You have to hold the button of Extract all to invoke the screen.
- Thereafter, select the button of Extract.
- Go to the file of ‘unPinCCF.reg’ and twice click on it into the folder of extracted.
- You will see a section of Registry Editor and then select the Yes option at the screen to continue.
- After that, select the OK option.
- Now, reboot the system, once you update the registry using unPinCCF.reg.
- Still, if you are not happy with it, then you should restore the folder of Creative Cloud Files by twice click on the file of ‘rePinCCF.reg.’
Conclusion
The article will tell the users about specific ways to solve the subsequent issue. The prior thing is to be aware while reading the provided workaround alongside implement the steps in the same order as we did it. We are very thankful for the internet as we have gathered information to create this article through it. We hope you will find a cure for your problem through this article.
Source:-https://devinsmith007.wordpress.com/2020/05/11/how-to-disable-file-sync-for-adobe-creative-cloud/


