In this article, we have discussed how to enable noise cancellation on Microsoft Teams. Launched after Google Meet and Zoom, this video conferencing service is progressing on a fast pace with the continuous addition of new features in its updates. The previous update of Microsoft Teams brought the “Together Mode” for the users to make them feel that they are really at their workplace.
However, Microsoft has now come up with another prime feature as the company has brought AI-based background noise cancellation for Teams. Now you get an option to suppress the background noise by enabling real-time noise cancellation. This feature helps in preventing any outside disturbance. No user would prefer to be distracted while he is on a meeting or a call, and turning on noise cancellation would act as a lifesaver when there is too much disturbance in the surroundings. So, let us proceed further with the instructions on how to enable noise cancellation on Microsoft Teams.
Enable Noise Cancellation on Microsoft Teams
Before we proceed with the steps, please be noted that the noise cancellation on Teams is right now available only for the Windows version of the app; however, it will be available for both paid and free users. Below we have mentioned the steps with which you can enable noise cancellation on Microsoft Teams:
- First, you need to go to your profile icon, appearing on the upper-right corner.
- Then tap on the “Settings.”
- Further, you need to go to the “Devices” option appearing on the left pane, and in the “Noise Suppression,” you need to choose “Auto.” This will suppress the background noise automatically when you are connected on a call or a meeting.
- You can increase or decrease noise cancellation level (i.e., high or low) depending upon the conditions. If there are extreme disturbances, then choose “High,” but be aware that the resources on your system will be consumed in a higher amount when you choose “High.” Alongside that, please be informed that the suppression of noise won’t happen if you have turned on the live caption or any call is getting recorded.
- After taking an overview of the feature, you can make a call through Teams to check what Microsoft’s AI can do. No doubt, it will amaze you with its ability to suppress the unwanted noise around you.
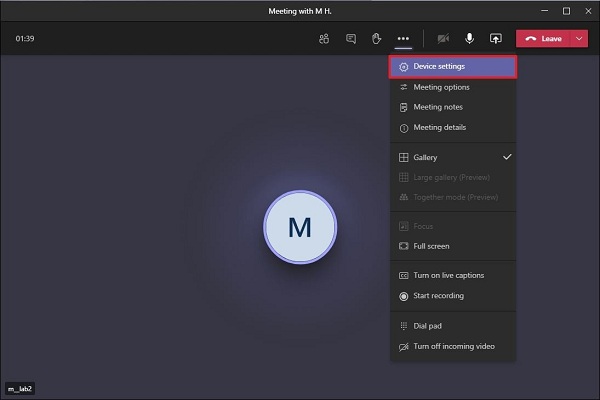
- The noise cancellation feature can also be enabled or managed while you are on a call. For that, you need to go to the top-right corner of your screen and click on the three-dot menu.
- Further, go to the “Device Settings.”
- The “Noise Suppression” option will appear in the device settings. From the drop-down menu, you can then change the noise cancellation levels.
- In case you don’t need to use the noise cancellation feature anymore, then follow the below-mentioned steps:
- Go to your profile,
- Click on the “Settings,”
- Tap on “Devices,”
- Then, go to “Noise Suppression,” and you may disable it by choosing “Off” appearing in the drop-down menu.
So, these were the steps with which you can activate Noise Suppression before or during calls on Microsoft Teams. If you are present in a boisterous environment, we would recommend using this amazing feature. Trust us; you won’t regret it.
Source-How to Enable Noise Cancellation on Microsoft Teams


