Columns are useful in everything like writing for a magazine, newspaper, preparing a brochure, newsletter, or a flyer in the Google Doc. You need columns to split your text into two or three parts in the document. This makes everything neat and easy to use. And this is where Google Docs comes in. It offers a built-in function to help you separate parts of your document in two or three columns. Moreover, you can also create Google Docs Templates with columns. So, follow us along in this blog if you want to learn making columns in Google Docs using Templates.
Firstly, we will use the default Google Docs method on the Web.
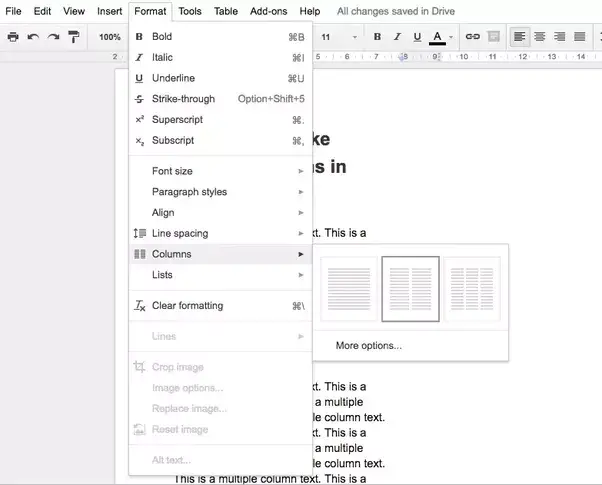
It is quite easy to make columns in Google Docs. We have provided below an example where we are using a dummy Google Docs document.
- Firstly, open the Google Docs document.
- Then click on the Format option which is in the menu bar.
- After that select columns from the drop-down menu.
Note: Google Docs only offer two or three columns by default to choose from. Then select the relevant options and with that, you can see the relevant changes in the document.
- Also, you can select more options through which you can customize the column’s visuals.
- Lastly, there is also an option with which you can shorten/widen the gap between columns and can also add a visual line between two columns.
Make Columns In Google Docs in Mobile Apps
You can also make columns in Google Docs using the Android and iOS mobile apps. All you have to do is follow us along.
- Firstly, open the Google Docs document in your mobile app.
- Then tap on the edit button which is at the bottom and then open the editing interface.
- Now move to the layout menu.
- Here you can change columns, add spacing to columns, make columns, add a line between columns, and also change column direction.
Note: Also, if you are a power user of the column function in Google Docs. You can create a dedicated column template that you can use whenever required.
Create a Google Docs Column Template
As we said earlier if you are a power user who uses the column feature in day-to-day life you need to save the document as a template. By doing that you can ensure that you have a template and you can just open that and start writing in Google Docs with your preferred column settings. Follow us along to do that.
- Firstly, open a blank Google Doc document.
- Secondly, go to Format > Column and then select your preferred style and make adjustments.
- Then give the document a name of your preferred choice and move it to a specific place in the Google Drive Folder.
- After that select the recently saved Google Docs column Template and do a right-click on it.
- Once that is done, select Make a copy from the context menu.
- Now Google Drive will make a copy of the document.
- Your Google Docs document is ready to go now open it and start firing your words.
Now you don’t need to make any extra adjustments to the document. Now it will automatically create columns based on your saved settings in the template. All you have to do is create a copy of your already made template in Google Drive and it is ready to use.
Conclusion
Creating and adjusting text in columns in Google Docs provides your text with a visual representation of your upcoming magazine and newsletter article. Hope you find this information useful. Thank you for reading.
Visit: norton.com/setup


