Chart patterns occur whenever the price of an asset, on the chart, moves in a way that resembles shapes that we see in our day to day lives. Like a rectangle or a triangle. Or even head and shoulders. This is the case of a cup and a andle. These patterns are a visual means to understand when to sell when to buy. They provide an entry position, a precise location for a stop loss and a price target so that the trade can be exited properly. Let us read more about this pattern and learn how it can be used to magnify the success rate.
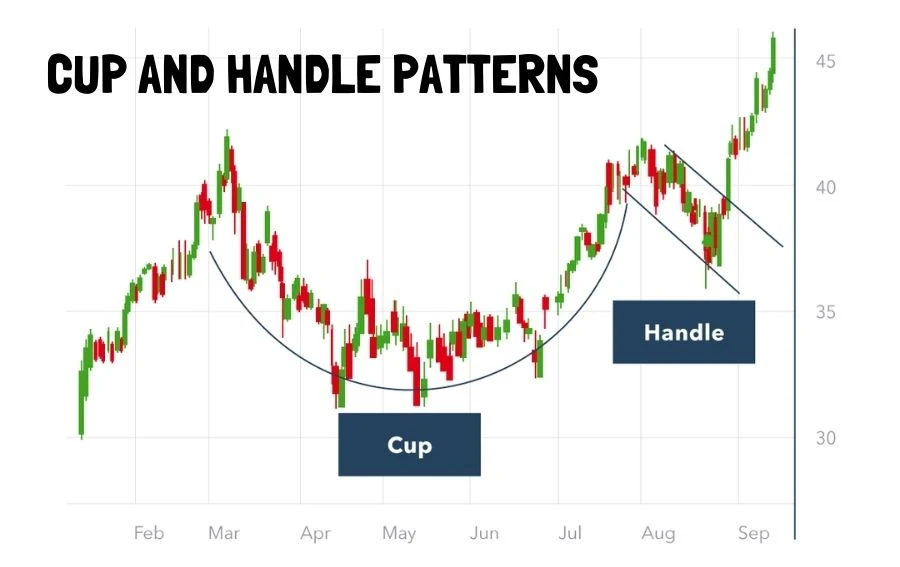
The Cup and Handle:
This pattern can occur in a one-minute chart and also, monthly, weekly charts. It occurs when there is a price wave that is down, followed by a stable period, finally followed by an uptrend of the same size. This is almost similar to the decline in prices. What happens is, a U shape is created. Some call it the cup, and some even call it the cup and the handle. The handles can be in the form of triangles.
There is a constraint for this pattern to form, and that is, the handles should be smaller than the cups, and also, they should not fall under the lower part of the cup, ideally staying at the upper third. For instance, if a cup is formed between $99 and $100, then the handle is supposed to be at $ 99.50
A cup and a handle chart normally indicate that there is a reversal pattern or a pattern that can be constant. The reversal may occur when the price has been in the downtrend for a longer tenure, then forms a cup and handle, and then the price begins rising. The constant pattern might occur during an ongoing uptrend. The price keeps rising, forms a cup and handle and would still continue rising.
How to enter a Cup and Handle trade?
Wait for the handle to appear on the chart. It often takes the form of a descending channel or parts sideways and sometimes even a triangle. Buy calls should be made when the price breaks free from the triangle channel-top. Here, the pattern is considered complete, and the price should, in theory, rise.
The price should rise in theory, doesn't mean it will. The price could rise a bit and then plunge, not enough to book a profit. It could part sideways, and it could also fall right after you take an entry position. Since this can be a probable situation, too, nothing explains the stop loss in a better sense.
How to Set a Stop-Loss?
The stop loss can get a trader out of a trade if the price actually drops, rather than seeing a short time drop. The stop loss serves in order to mitigate the risk on the trade by automatically selling the positions if the price falls enough to breach the mark placed by the SL order itself.
In the case of a Cup and Handle, the stop loss can be placed at the lowest point that can be seen in the handle. IF the price has been moving up and down within the handle, then the stop loss can be placed below the most recent low that has been.
Since the handle needs to happen within the limits of the upper handle of the cup, a properly placed SL order shouldn't be in the insides of the lower half of the formation of the cup. For instance, if the cup forms between 40 and 49.50, then the stop loss should be anywhere that is above 49:75.
This is because of the fact that 49.75 is the halfway point of the cup. IF the Sl is below this point, then completely avoid the trade. To be precise, the upper third of the Cup Handle is where the SL order should be.
If the SL is in the upper Thor, it stays closer to the entry point. This genetic, in return, will help reduce the risk-reward ratio. The stop-loss order always represents the risk portion of the whole trade, and the target price represents the reward portion of the trade.
Picking the correct Profitable Exit:
To add to the height of the breakout point, add the height of the cup to that, no matter what it may be. The result is the target. For instance, if the formation is between 10 and 99, then the breakout is 100, with the target being 101.
There can be instances when both sides of the cup differ in terms of height. Here, the smaller height can be used to add to the breakout point in order to achieve a conservative target. To achieve an aggressive target, use the bigger height.
The Fibonacci extension indicator can be used as well. The extension can be drawn from the cup-low to the high that the right side holds. Then, connect it to the handle low. In terms of the Fibonacci pattern, One represents a target that is 100% conservative. The 1.61% and the 162% represent more of an aggressive target. Hence, the targets can be placed between one and 1.61
If you are more into intraday, and the target is still not achieved as the day ends, close the position before the market closes. A trailing stop loss may be used to get out of a situation that makes the price reach the target and makes it fall again.
Things to Consider:
Ethically, the cup should have a stabilising period or a pause. This is generally at the bottom of the cup. Here, the price moves sideways or might even make a rounded bottom. In turn, that can help in improving the odds that are when the price can move higher before the breakout.
In the case of a V bottom, the price will drop and then suddenly rally. This can also form the pattern of concern here. The decision to enter the trade here depends on the trader. The people who tend to perceive the V bottom as a sharp reversal in the case of a downtrend shows that the buyers walked in on the right side of the pattern, and they didn't just walk; they were aggressive in doing so.
The people who oppose the V bottom may put forth an argument that the price didn't flatten out for a while before it plunged to the bottom, and hence, the price may come back, just to test that level. Finally, when the price breaks from above the handle, it can signal an uptrending move.
If the trend is still up and the cup formation is in the middle of that trend, then the buy signal can also provide extended benefits of the overall trend. In such a case, traders should look for a heavy trend that is heading into the insides of the cup and handle.
To look for more confirmation signs, the bottom of the cup can be checked if it aligns with a long term support level—for example, a moving average or a rising trendline.
The cup and handle is one of the many patterns that are formed in between the candlesticks. It is always better to stick to one pattern and then make the trades accordingly. Notice one pattern, understand it and then look for it anywhere that you can. May it be a 100 chart. Give that a go and see trading change right in front of your eyes.
Bottom Line:
The cup and handle is one of the many patterns that are formed in between the candlesticks. It is always better to stick to one pattern and then make the trades accordingly. Notice one pattern, understand it and then look for it anywhere that you can. May it be a 100 chart. Give that a go and see trading change right in front of your eyes.


Sign in to leave a comment.