
 Maintaining a clean dryer exhaust vent is crucial for ensuring your Dryer operates efficiently and safely. Over time, lint and debris can accumulate in the vent, posing a fire hazard and reducing the Dryer\'s performance. Fortunately, cleaning your dryer exhaust vent is a straightforward process that you can handle yourself with a few essential tools. Whether you\'re tackling this task as part of your routine home maintenance or integrating it into your commercial duct cleaning services, here\'s a step-by-step guide on how to clean your dryer exhaust vent.
Step 1: Gather Your Tools and Materials
Before you begin, gather the following tools and materials:
A screwdriver or nut driver (to disconnect the vent)
A vacuum cleaner with a hose attachment
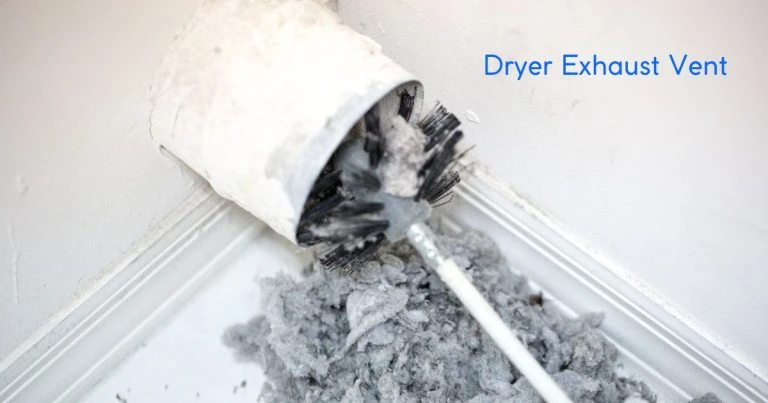
A dryer vent brush kit
A flashlight
A microfiber cloth
Duct tape (optional)
Step 2: Disconnect the Dryer
Unplug the Dryer: Ensure your safety by unplugging the Dryer from the electrical outlet. If you have a gas dryer, turn off the gas supply before proceeding.
Move the Dryer: Carefully pull the Dryer away from the wall to access the vent. Be cautious not to damage the floor or the Dryer itself.
Step 3: Detach the Dryer Vent
Locate the Vent: Identify where the vent attaches to the back of the Dryer. Use a screwdriver or nut driver to loosen the clamp or screws securing the vent to the Dryer.
Remove the Vent: Gently pull the vent away from the Dryer. You may need to wiggle it slightly to disconnect it completely.
Step 4: Clean the Dryer Vent
Vacuum the Vent: Use the hose attachment on your vacuum cleaner to remove any loose lint and debris from the vent opening on the Dryer.
Insert the Dryer Vent Brush: Feed the dryer vent brush into the vent tubing. Push it in as far as possible, then pull it out slowly, twisting it to dislodge and remove any built-up lint.
Brush and Vacuum: Repeat the process of brushing and vacuuming until no more lint comes out. You may need to insert the brush from both ends of the vent tubing for a thorough cleaning.
Step 5: Clean the Exterior Vent
Locate the Exterior Vent: Find the vent outlet on the exterior of your home. A vent hood or flap usually covers it.
Remove the Cover: If the cover is screwed on, use a screwdriver to remove it. If it’s a flap, gently lift it.
Clean the Exterior Vent: Use the dryer vent brush and vacuum to remove any lint and debris from the exterior vent opening. Make sure the flap or vent cover moves freely and isn’t obstructed.
Step 6: Reconnect and Test the Dryer
Reattach the Vent: Once the vent is clean, reconnect it to the back of the Dryer. Secure the vent with the clamp or screws.
Move the Dryer Back: Carefully push the Dryer back into its original position. Be sure the vent hose isn’t kinked or crushed.
Plug In and Test: Plug the Dryer back into the electrical outlet and turn on the gas supply if you have a gas dryer. Run the Dryer for a few minutes to ensure it’s working correctly and that air is flowing freely through the vent.
Step 7: Maintain Regular Cleaning
To prevent lint buildup and ensure your Dryer operates efficiently, make a habit of cleaning the vent regularly. Aim to clean the dryer exhaust vent at least once a year or more frequently if you use your Dryer heavily.
Conclusion
Cleaning your dryer exhaust vent is a vital maintenance task that enhances the efficiency and safety of your appliance. By following these simple steps, you can prevent potential fire hazards, reduce energy consumption, and prolong the lifespan of your Dryer. Regular maintenance not only protects your home but also ensures that your Dryer performs at its best, saving you time and money in the long run.


Sign in to leave a comment.