


Being a Cricut user, I know how to connect Cricut Explore Air 2 to computer. If you want to learn it, then stick to this blog till the end and follow each step. Let me introduce you—I’m a professional crafter and a passionate Cricut user for the last six years. I have tried almost every Cricut machine for my regular crafts. And I love teaching people about different things. So, this blog post is all I have to connect with my followers and readers.
Today’s post is simple. However, all my users will learn something new like always. I know you might be eager to learn the process. But, wait, are you aware of Cricut Design Space? I hope you’re. But, even if you don’t, I will explain it to you through this blog. Let’s get into it!
A Brief About Cricut Design Space
Before getting started with how to connect Cricut Explore Air 2 to computer, you must know this. If you’re a novice and recently took your step into the Cricut world, you should know that it’s a Cricut specialized software application that you’ll need to download and install in order to use your Cricut machine.
This software offers you with many intriguing features to start designing and set yourself apart from the competition. So, are you ready to stand out from the crowd? Yeah, it’s possible when you know the complete process to set up your Explore Air 2 machine or any Cricut product you have.
How to Connect Cricut Explore Air 2 to Computer?
Computers are the best devices with which to connect your Cricut. Do you know why? These devices are fast in speed and give a better user experience with a wider screen. I also use a computer for all my connection work. Let’s check the methods here.
Method 1: Using a USB Cable
A USB connection is a primary method for connecting Cricut machines to your computer device. So, learn how to connect Cricut Explore Air 2 to computer via USB from the steps below.
To start, get the USB cable that you’ve got with your Cricut machine.Before that, unbox your machine completely and take off the coverings as well.After that, take the USB cable and connect one end to the machine and another end to the computer’s USB port.Now, turn on your devices and check if your computer shows the machine’s connection status.Then, you can continue installing the Cricut Design Space from cricut.com/setup .Finally, you’ll start making crafts using your Cricut. That’s how to connect Cricut Explore Air 2 to computer with USB. Now, look at another method. You can use the same procedure with your Mac computer as well.
Method 2: Via a Bluetooth Connection
You know the connection process with a USB cable, which is a basic connection process. However, you must ensure that your PC has USB drivers. Well, moving forward, let’s learn how to connect Cricut Explore Air 2 to computer wirelessly with a Bluetooth connection. Look at the steps below.
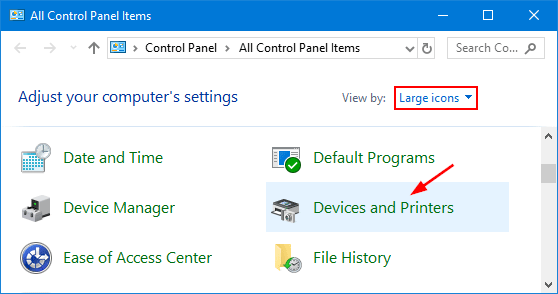
In the beginning, make sure that your Explore Air 2 machine is at least 10-15 feet apart from your computer and is ON.Then, check if your PC has Bluetooth from the Device Manager.Now, head to the Control Panel and click on the Devices and Printers option.Thereafter, hit the “Add a device” option.Next, let your PC identify your Cricut cutting machine.Choose your Bluetooth device name or Cricut’s name from the list of devices.You may need to enter the code when you’re asked. (Note: If you don’t know the code, type “0000”).And then, hit the Next button to finish pairing between your Cricut and computer.In the last step, hit the Close button to exit from the window.
That’s how to connect Cricut Explore Air 2 to computer. Now, you can utilize your Cricut machine to create fun crafts.
Conclusion
Finally, you know the connection process for a Cricut Explore Air 2 machine on a computer. The connection process is simple and straightforward. Beginners, as well as pro users, can perform this setup quite easily and hassle-free. Also, the USB and Bluetooth setup are great for connecting your Cricut to the computer. Once you connect your Cricut to a computer, you can start making anything you want.
FAQs
Why Is My Cricut Explore Air 2 Not Connecting to My Laptop?
If your Cricut Explore Air 2 is not connecting to a laptop, it may be due to the distance between your devices being more than 10-15 feet in case of a Bluetooth connection. Also, you need to check if your devices have Bluetooth connectivity or not. If you are using a USB connection, make sure that your PC has USB drivers.
How to Connect Cricut Explore Air 2 to Mac via Bluetooth?
These are the steps to connect your Explore Air 2 machine to your Mac via Bluetooth:
Initially, check if your Cricut machine is at least 10-15 feet away from Mac.Now, check if your Bluetooth option is ON on Mac.Then, move to the System Preferences and find the Bluetooth option.After that, select your Cricut model from the list of Bluetooth devices.If your screen asks you for a code, type “0000.”Lastly, your devices will connect via Bluetooth.How Do I Connect My Cricut Explore Air 2 to iOS?
To connect your Cricut to iOS, follow these steps:
First, ensure that your Cricut and iOS devices are at least 10-15 feet apart.Now, open the Settings app.Then, check if the Bluetooth option is ON.After that, select the Bluetooth module from the list of devices.Next, allow your iOS device to pair with Cricut.Type “0000” when your screen asks you for a PIN code.Also, get the Cricut Design Space.Finally, your devices are connected together.