Creating labels is the best way to organize your pantry and other parts of your life. Custom Cricut wine bottle labels are perfect for you who want to gift or give as party favors. If you have been looking for how to make a Cricut wine label, you may be wondering how to go about it. This blog will- show you how to make Cricut wine bottle labels at home. As your template, you can get started with this Cricut wine bottle label project in the Cricut Design Space.
We’ll go through each step on how to make a Cricut wine bottle label at home, so you can make stunning wine labels that impress your family and friends. Creating Cricut wine bottle labels or stickers is fun and easy so let’s start.
How To Make Cricut Wine Bottle Labels At Home (Stepwise Guide)
When you are wondering how to make Cricut wine bottle labels, first choose any type or texture of sticker paper or self-adhesive vinyl you want. Then place the wine label template into the Cricut machine and customize it as you wish.
Now, put self-adhesive vinyl or sticker paper onto the Cricut cutting mat. Weed down your design, leaving the vinyl on the back. After that, use transfer tape to the front of your vinyl design and use it to attach the label to your wine bottle as wanted. Weed the vinyl so it sticks, then removed the transfer tape. Using stickers, cut them onto the Cricut machine and peel and apply them.
To select the suitable material to make the Cricut wine bottle label, you will need the following:
- Wine bottles
- Cricut machine
- Self-adhesive vinyl or sticker paper
- Weeding tool
- Transfer tape
To make Cricut wine bottle labels for your favorite red wine is easy and fun. You can use self-adhesive vinyl or stickers to make Cricut wine bottle labels.
Step 1 – Choose Self-Adhesive Paper
Firstly, you must choose the suitable paper type for your Cricut wine bottle label. You need a sticker paper or vinyl that handles moisture and cold temperatures.
You have to use only self-adhesive materials because you cannot use heat to stick vinyl to your wine bottle. This will spoil the wine bottle inside. Thankfully, Cricut self-adhesive vinyl is available in all colors and textures so that you can find the suitable vinyl for the Cricut wine bottle labels.
You can buy wine bottle label templates from manufacturers available on the market. We at the Cricut Design Space love using templates because we know they will work perfectly. Use the Cricut Design Space to make the Cricut wine bottle label exactly how you want it to look.
If you are using a Cricut Maker or Joy, you can clamp the Cricut pen to your Cricut machine and drag it onto the label before cutting them.
Step 2 – Cut Wine Bottle Labels With Cricut
Now that your design and materials are ready, it is time to cut the Cricut wine bottle labels. Place material onto a regular Cricut cutting mat and follow the machine’s instructions for cutting labels.
Be sure settings are correct for the thickness and paper type. Then send your design to the Cricut machine and let it do its job.
Step 3 – Weed the Label
After your Cricut wine bottle labels are cut, it is time to weed them out. It means using a weeding tool to remove the excess vinyl or paper outside the label.
You should be left with an adhesive vinyl label stuck to the back material.
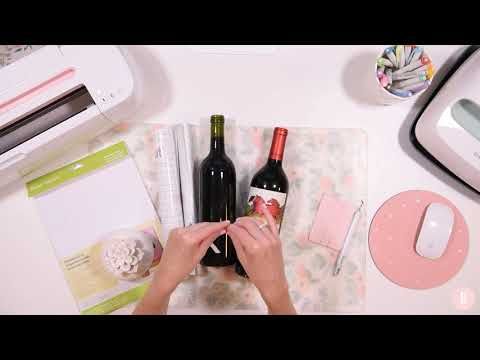
Step 4 – Apply Transfer Tape To Design
StrongGrip transfer tape is the best to use for most vinyl projects. It includes a grid to help you install your vinyl perfectly, enabling you to “pick up and place” your design easily.
Use transfer tape to the front of the adhesive vinyl design. Remove the back from the adhesive vinyl, then use transfer tape to apply your design to the wine bottle.
Burn the design using a craft stick or something similar to activate the adhesive and eliminate bubbles. Carefully remove the transfer tape to reveal the finished label.
Step 5 – Place Stickers On a Wine Bottle
If you use stickers, cut out sticker paper, peel them off the back, and place them as wanted.
How To Make Cricut Wine Bottle Labels (Tips and Tricks)
Pick the suitable Cricut machine for your craft project. To make Cricut wine bottle labels in large amounts, you’ll need to select a Cricut machine that handles larger projects.
The Cricut Maker or Explore Air can cut over 100 different materials, making it the best choice for any project.
Collect all the materials you’ll need. For custom labels, you need self-adhesive vinyl or sticker paper. Also, for the Cricut machine, you’ll need some labels, transfer paper, and a cutting mat.
Consider buying custom wine labels from manufacturers on the market. You can usually get a pack of custom-created labels for a few bucks.
Visit Site – cricut.com/setup
Source :- https://cricutsetmaker.com/how-to-make-cricut-wine-bottle-labels-at-home/
0


