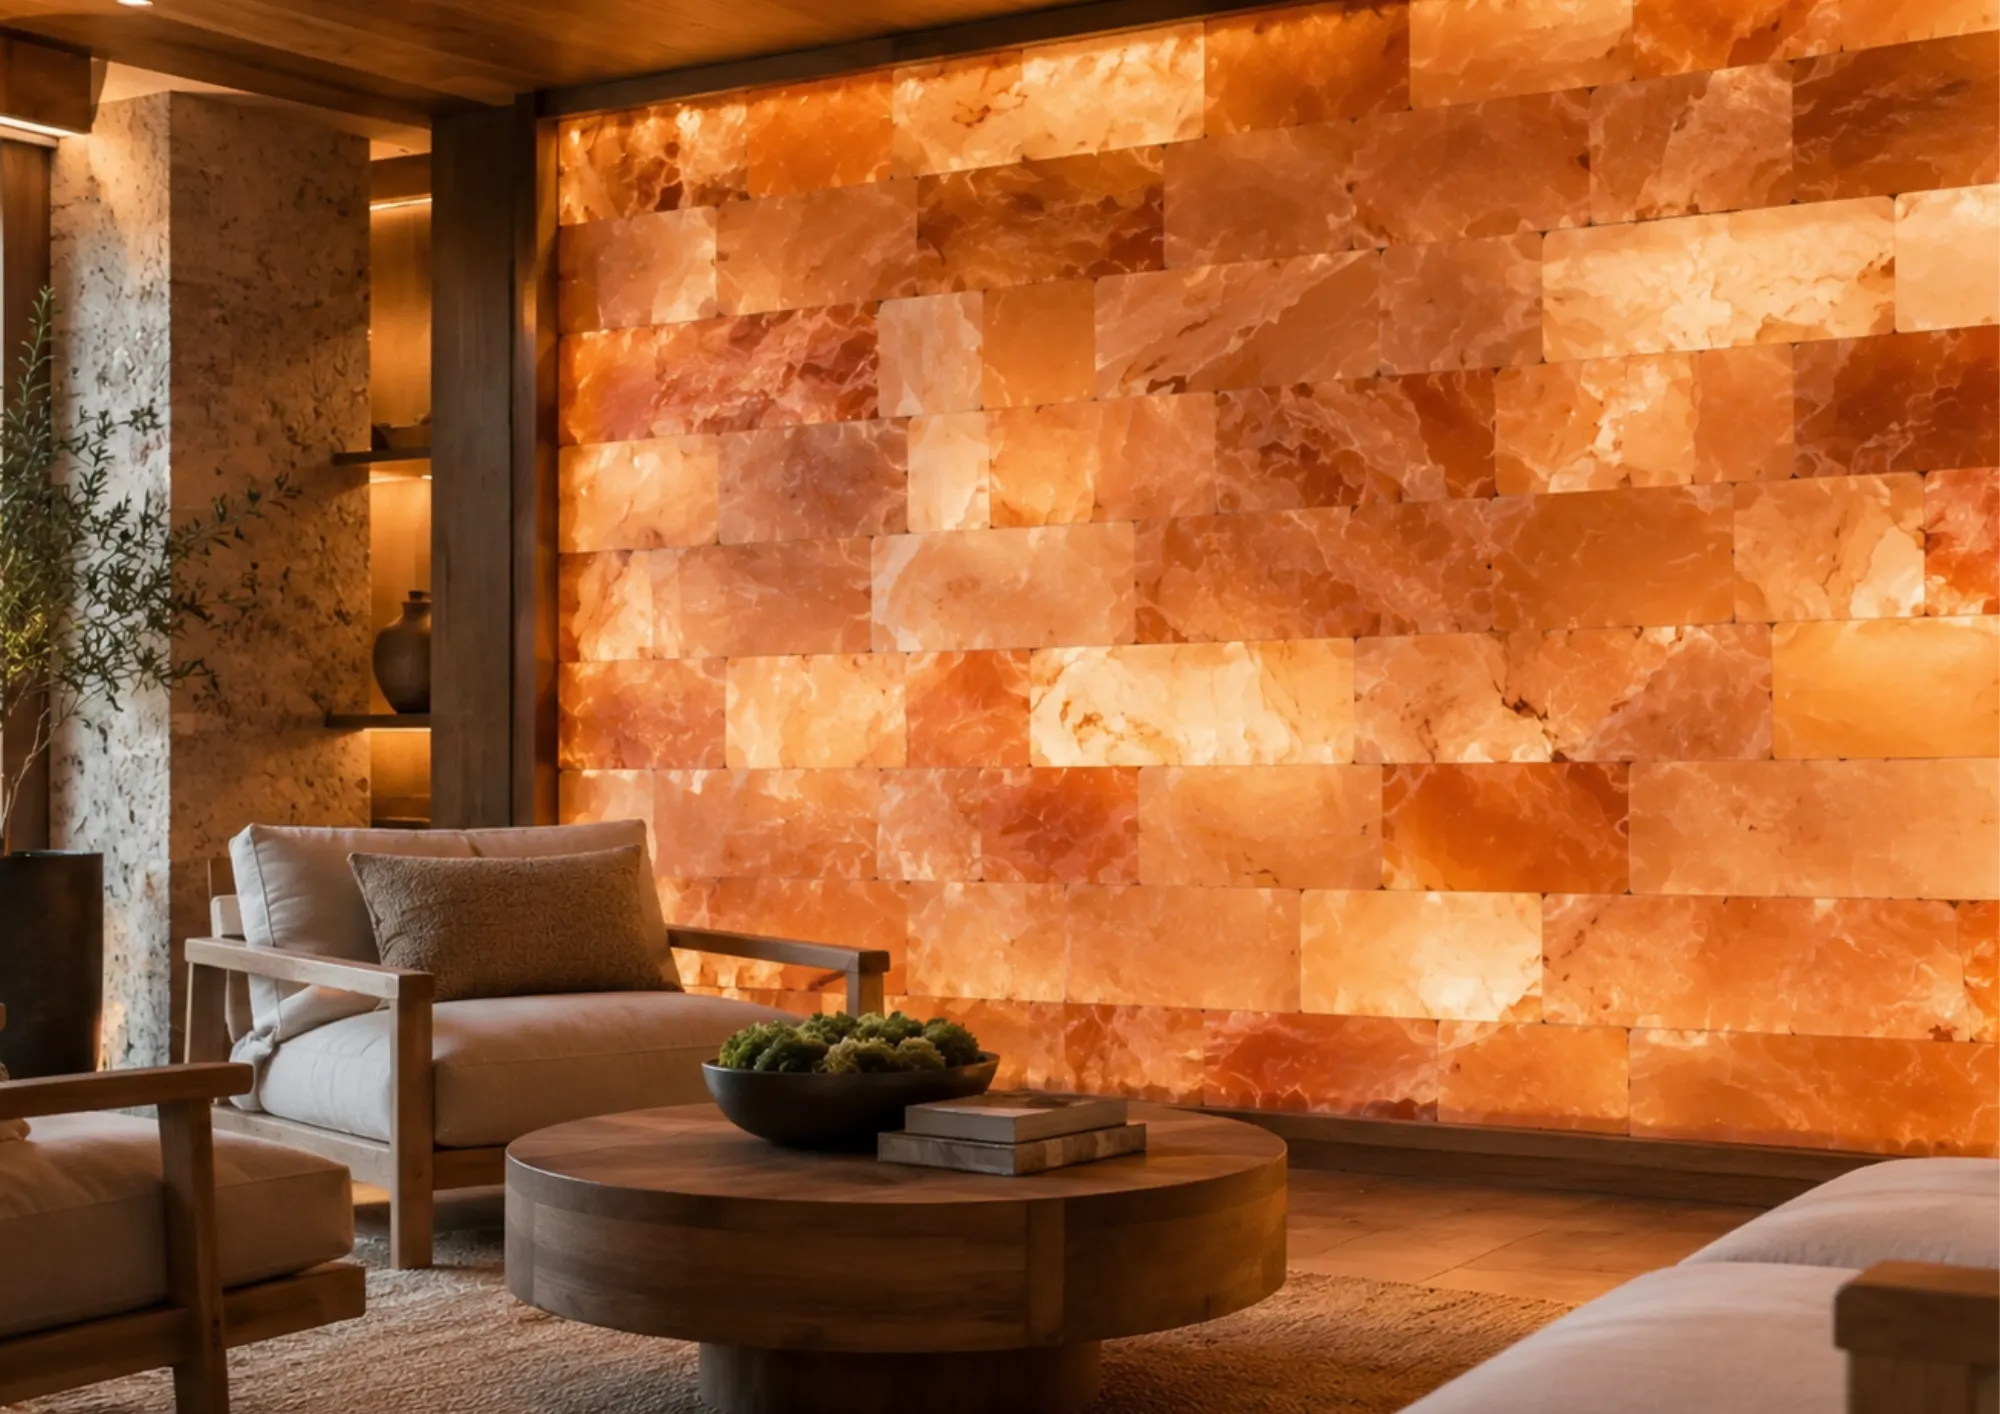

A Himalayan salt block feature wall can transform an ordinary interior into a distinctive architectural focal point. Its natural shades of pink, peach, orange, and cream can complement contemporary homes, hotel reception areas, spa interiors, wellness studios, and selected commercial spaces.
However, creating an attractive salt wall requires more than choosing blocks with appealing colors. Accurate measurements, block dimensions, layout patterns, lighting, structural support, and moisture management all influence the finished result.
Whether you are planning a small decorative panel or a full-height feature wall, the following guide explains how to develop a practical design before installation begins.
What to Consider Before Designing a Salt Block Wall
Before selecting a pattern or calculating the material quantities, gather the basic information you need to plan the project.
You will need:
- Wall measurements, including its width and height
- The dimensions and thickness of the proposed salt blocks
- A notebook, pencil, measuring tape, and calculator
- Graph paper or design software for creating a scaled layout
- Information about doors, windows, electrical outlets, and adjoining finishes
- Details about lighting, ventilation, moisture exposure, and wall support
Also establish the project's budget and intended use. A decorative wall in a dry living room may have different installation requirements from a large illuminated feature in a commercial spa.
Step 1: Select the Right Wall Location
The location determines how prominently the salt wall appears and how practical it will be to maintain.
In a residential interior, a salt block feature wall may work behind a seating area, along an entrance wall, or within a dedicated decorative niche. In commercial settings, it can create a visual focal point behind a reception desk or within an appropriately designed wellness space.
Evaluate the proposed location using these questions:
- Will the wall be visible from the main entrance or seating area?
- Will furniture, doors, or decorative objects obstruct the feature?
- Can the wall be inspected and maintained easily?
- Is the area protected from direct water exposure and persistent condensation?
- Can suitable lighting and electrical services be installed safely?
Avoid choosing a location solely for its appearance. The supporting structure, surrounding environment, and maintenance requirements must also be suitable for the installation.
Step 2: Measure the Wall Accurately
Accurate measurements help you determine the approximate material requirements and identify layout problems before purchasing blocks.
Measure the wall's total width and height. Record the dimensions of doors, windows, electrical outlets, recesses, and other features that affect the usable surface.
Calculate the gross wall area using this formula:
Wall area = Width × Height
For example, a wall measuring 10 feet wide and 8 feet high has a gross area of 80 square feet.
If the wall contains a window measuring 3 feet by 4 feet, the opening occupies 12 square feet. The remaining net area would be approximately 68 square feet, assuming there are no other openings.
For irregular walls, divide the surface into smaller rectangles and calculate each section separately.
Remember that the net wall area is only the starting point. Block joints, edge conditions, cuts, and the actual installation system can affect the final material quantity.
Step 3: Choose the Appropriate Salt Block Dimensions
Block dimensions influence the appearance, proportions, and construction requirements of a feature wall.
For example, rectangular blocks measuring 8 × 4 inches can create a traditional brickwork appearance, while other dimensions may produce different proportions and visual rhythms.
When comparing products, check the following details:
- Face width and height
- Block thickness
- Dimensional consistency within the supplied batch
- Natural color variation
- Suitability for the intended installation
- Available specifications for the proposed mounting or bonding system
Do not estimate the actual size of a block from a product photograph. Request the dimensions and relevant product specifications before finalizing your design.
For a commercial project, reviewing physical samples can help you assess the proportions, texture, and natural color variation more accurately.
Step 4: Select a Pattern That Suits the Space
The block pattern determines how the wall's individual elements work together. A simple, well-proportioned arrangement can often produce a more refined result than an unnecessarily complicated design.
Consider these common layout approaches.
Horizontal courses
Blocks are arranged in aligned horizontal rows. This creates a structured appearance that can complement contemporary interiors and rectangular architectural spaces.
Staggered joints
Vertical joints are offset between adjacent rows, creating a familiar brickwork effect. The pattern can add visual movement while maintaining an organized layout.
Vertical emphasis
A layout that emphasizes vertical lines can make the feature appear taller or create a different visual rhythm. The proposed arrangement must remain compatible with the actual block dimensions and installation system.
Framed feature panel
Instead of covering an entire wall, blocks are installed within a defined section or architectural recess. This approach can create a focal point while allowing surrounding materials to remain visible.
Before choosing a pattern, check how the blocks will fit around corners, edges, outlets, and openings. Avoid designs that create excessive narrow cuts or awkward gaps.
Step 5: Create a Scaled Layout Drawing
Once the dimensions and pattern have been selected, prepare a drawing that represents the wall as accurately as possible.
Graph paper is sufficient for a straightforward project, while design software can help with more complicated spaces.
Your drawing should identify:
- The overall wall dimensions
- Each row and column of blocks
- The locations of doors, windows, and outlets
- Corners, top edges, bottom edges, and adjoining finishes
- Proposed lighting locations
- Areas that may require cutting or adjustments
For example, a drawing at a scale of one-quarter inch per foot would represent a 10-foot-wide wall as 2.5 inches wide on paper.
Use the drawing to review alignment, margins, symmetry, and the placement of the feature within the room.
A scaled layout is a design-planning tool, not a substitute for construction drawings or professional installation specifications where these are required.
Step 6: Arrange the Natural Colors
Himalayan salt blocks can vary naturally in pink, peach, orange, cream, and other mineral tones. This variation is part of their visual character and can influence the overall appearance of the wall.
There are several ways to approach color distribution.
A balanced arrangement spreads lighter and darker blocks across the surface. This can create a relatively consistent appearance without eliminating the natural differences between individual pieces.
A more varied arrangement allows contrasting shades to form an organic pattern. This can work well when the goal is to emphasize the natural character of the material.
For a more controlled appearance, inspect representative samples before installation. If the project requires a particular color balance, discuss the available variation with your supplier.
Avoid assuming that every block will match a single product photograph. The final wall's appearance depends on the actual materials supplied and how they are arranged.
Step 7: Plan Joints, Corners, and Finishing Details
Small finishing decisions can have a significant effect on the overall quality of a salt block feature wall.
Consider how the blocks will meet the surrounding surfaces, including painted walls, wood panels, stone, plaster, and metal trim.
Pay particular attention to:
- Consistency of joints between blocks
- Alignment at internal and external corners
- Top and bottom termination details
- Openings for electrical components
- Transitions between salt blocks and other materials
- Access required for inspection and maintenance
The appropriate joint dimensions and bonding materials depend on the selected blocks and installation system. Confirm these requirements with a qualified installer rather than choosing materials based solely on their appearance.
A well-planned edge detail helps the installation look intentional and reduces the likelihood of improvised finishing work.
Step 8: Design the Lighting Before Installation
Lighting can significantly change how a Himalayan salt block wall appears. The visible result depends on the blocks' light-transmitting properties, thickness, color, spacing, and the construction behind them.
Possible approaches include ambient room lighting, directional fixtures, and concealed illumination. Backlighting may also be considered when the blocks and the complete wall assembly are suitable for that application.
Before selecting fixtures, establish the desired visual effect. Soft, evenly distributed illumination may suit a calm wellness interior, while directional lighting can emphasize texture and variations in color.
Consider the following practical requirements:
- Evenness of light distribution
- Access to wiring and electrical components
- Heat management and ventilation
- Compatibility between the lighting system and the wall assembly
- Safe access for future inspection and maintenance
Test a representative block sample under the proposed lighting before approving the final design.
Electrical work should be reviewed by a qualified professional. Installations in saunas, spas, and other specialized environments require particular attention to the environmental ratings of electrical equipment and the suitability of the complete installation.
Step 9: Assess Moisture and Structural Requirements
Moisture control and structural support are essential considerations when designing a Himalayan salt block feature wall.
Salt is water-soluble. Direct water exposure, persistent dampness, and condensation can gradually damage the material. A location that appears visually suitable may therefore be inappropriate if its environmental conditions are not controlled.
Review the room's ventilation, humidity, cleaning practices, and proximity to showers, sinks, pools, or water features.
The supporting structure is equally important. Salt blocks can create a substantial load when installed across a large surface. The complete assembly, including the blocks, supporting components, bonding materials, and any lighting equipment, must be accounted for.
Before installation, confirm that:
- The supporting wall can carry the intended load.
- The mounting or bonding system is appropriate for the application.
- Moisture exposure has been evaluated.
- Ventilation and maintenance requirements are understood.
- Electrical components are suitable for their environment, where applicable.
Do not assume that a system suitable for a dry decorative wall will also be appropriate for a sauna or high-humidity space. Large, elevated, illuminated, or specialized installations should be reviewed by qualified professionals before construction begins.
Step 10: Calculate the Approximate Number of Blocks
After preparing the layout, estimate the number of blocks required for the project.
- For rectangular blocks, the nominal face area can be calculated by multiplying the face width by the face height.
Consider a block with an 8 × 4-inch face:
8 × 4 = 32 square inches.
Since one square foot contains 144 square inches, the nominal face area is:
32 ÷ 144 = approximately 0.222 square feet.
The theoretical quantity is therefore:
144 ÷ 32 = approximately 4.5 blocks per square foot.
For a wall with a net area of 68 square feet, the preliminary estimate would be:
68 × 4.5 = approximately 306 blocks.
- This is a mathematical estimate based on nominal face area, not a final purchasing quantity. Actual requirements depend on joint dimensions, the selected pattern, block orientation, cuts, openings, edge details, and the installation system.
- For an initial budget, a small allowance for cutting and breakage may be useful. However, the appropriate allowance should be determined from the actual layout rather than applied as a universal percentage.
- For larger projects, ask your supplier or installer to review the scaled drawing and calculate the required quantity using the actual product dimensions and installation specifications.
Step 11: Review Materials and Installation Costs
A realistic budget should account for more than the price of the salt blocks.
Depending on the project, additional costs may include:
- Bonding materials and supporting components
- Lighting fixtures and electrical work
- Cutting and finishing
- Installation labor
- Delivery and handling
- Inspection and maintenance provisions
If you are sourcing materials for a larger project, compare product specifications, available quantities, delivery arrangements, and suitability for your intended application.
You can review available Himalayan Salt Blocks when evaluating material options for a planned salt wall.
Confirm the dimensions, quantities, and relevant installation details before placing an order. This is especially important when working to a fixed budget or construction schedule.
Step 12: Complete a Final Design Check
Before installation begins, review the entire plan rather than focusing only on the wall's appearance.
Use this checklist to identify outstanding decisions:
- The wall dimensions and openings have been measured.
- The selected block dimensions have been confirmed.
- The pattern has been checked against the actual measurements.
- Natural color variation has been considered.
- Joints, corners, edges, and adjoining finishes have been planned.
- Lighting and electrical requirements have been reviewed.
- Moisture exposure and ventilation have been assessed.
- Structural support and installation materials have been specified.
- The estimated quantity accounts for the actual layout.
- Access for inspection and maintenance has been considered.
For a large or visually complex project, a sample panel or professional mock-up can help you evaluate the pattern, color distribution, joints, and lighting before committing to the complete installation.
Common Mistakes to Avoid When Designing a Salt Wall
- Even a straightforward feature wall can become more expensive or difficult to install when essential details are overlooked.
- Choosing blocks before measuring the wall: This can result in poor proportions, excessive cutting, or unnecessary material purchases.
- Relying on product photographs: Photographs do not always represent the actual dimensions, color variation, or appearance of a complete installation.
- Ignoring the joints: A layout that works mathematically may still create awkward gaps or inconsistent edges when the actual joint dimensions are considered.
- Planning lighting too late: Adding illumination after the layout has been finalized can complicate wiring access, fixture placement, and installation details.
- Underestimating the environmental requirements: Moisture, condensation, and unsuitable electrical equipment can create problems that cannot be solved through decorative design alone.
- Ordering materials without reviewing the layout: A theoretical blocks-per-square-foot calculation is useful for an initial estimate, but the final quantity should reflect the actual installation plan.
- Addressing these issues during the design stage helps make the project more predictable and reduces avoidable adjustments during installation.
Conclusion
Designing a Himalayan salt block feature wall begins with accurate measurements, suitable materials, and a carefully planned layout. Block patterns, natural color distribution, joints, lighting, moisture control, and structural support all contribute to the appearance and practicality of the finished installation.
A successful design does not necessarily require an elaborate pattern. Consistent alignment, balanced colors, thoughtful lighting, and properly planned finishing details can create an attractive architectural feature while keeping the project manageable.
By reviewing these decisions before purchasing materials or beginning construction, homeowners, designers, and commercial project planners can approach their salt wall projects with greater confidence and a clearer understanding of the work involved.























Sign in to leave a comment.