

Carpenter bees look harmless at first. They buzz around quietly and don’t sting unless pushed. But under that calm act, they can dig deep into wooden boards, beams, or rails. Unlike termites, they do not eat wood, but they drill into it to make homes for their young. These holes weaken the structure and invite more problems over time.
If you spot round holes in beams or boards with bits of sawdust nearby, there is a good chance you are looking at carpenter bee damage. Leaving it untreated can lead to bigger repair jobs down the line. A wood carpenter often gets called in when the damage is beyond simple fixes. But with the right approach, you can repair these spots yourself.
Why Carpenter Bees Damage Wood in the First Place
Carpenter bees love soft, dry, and untreated wood. Deck rails, soffits, fascia boards, and siding are common targets. Once they pick a spot, they bore in and create tunnels that stretch several inches inside the wood.
Their goal is to lay eggs and protect them inside these tunnels. Over time, more bees use the same holes, making the damage worse. The longer the wood stays untreated or exposed, the deeper the problem goes.
How a Wood Carpenter Would Approach the Repair
A skilled wood carpenter begins with one thing first. Inspection. Before anything gets patched or sealed, the damage needs to be measured. This means checking how deep the tunnels go and whether the board or beam is still strong.
If the wood is rotting or cracking around the entry holes, the piece may need to be replaced. If it is just surface damage or a short tunnel, a repair is still possible. Fixing early damage is cheaper and faster than replacing full sections of wood.
Step 1 - Clean Out the Bee Tunnel
You cannot fix what you cannot see. Start by clearing out each tunnel. Use a wire or long nail to reach inside the hole and pull out loose dust or debris. This helps reveal the full length of the tunnel. A can of compressed air can blow out remaining dust.
This step is important. If you leave debris inside, it weakens the repair and traps moisture, which may lead to rot.
Step 2 - Treat the Hole
Before filling the hole, treat it with a spray or dust that targets bees. Even if they are gone, other bees may return to use the same tunnel. Wood bees often come back year after year.
Spray the treatment deep into the hole. Wait a few hours before moving to the next step.
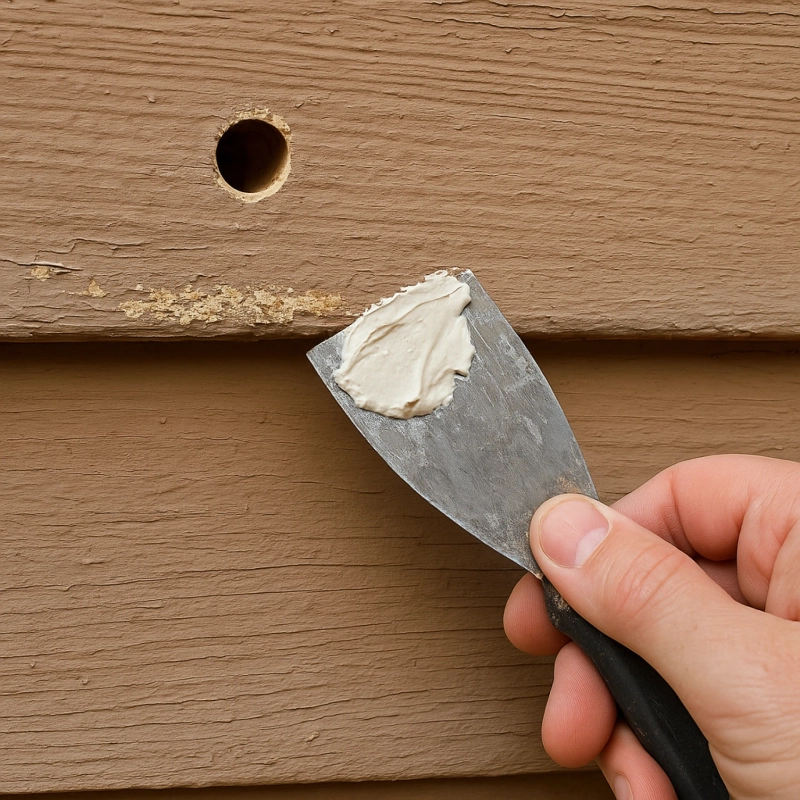
Step 3 - Plug and Fill the Hole
Now that the tunnel is clean and treated, you can fill it. For shallow holes, wood filler or epoxy putty works well. For deeper holes, use a dowel rod cut to size. Push it into the hole with wood glue, then patch the outer surface with filler.
Let it dry fully. Sand it down smooth once dry so the area matches the rest of the surface.
Step 4 - Paint or Seal the Wood
This last step protects the wood. Untreated wood invites bees back. Paint creates a smooth, sealed surface that bees avoid. Stain with sealant also works, but raw wood is like an open door to them.
Check all wood surfaces nearby and repeat the seal process to prevent future damage.
Basic Carpentry Tips That Help Prevent Future Damage
One of the best basic carpentry tips is simple. Keep exterior wood sealed. Always paint or seal new boards before installing them. Exposed ends and edges are the first spots bees target.
Install trim or mesh in places where bees like to dig. Soffits and corners need extra attention. Fill any cracks or holes as soon as you spot them.
Also, keep an eye out during spring. That is when carpenter bees become active. Early action saves wood from deeper damage.
What Carpentry Information Tells Us About Repair Materials
When it comes to repair, not all fillers and sealants are the same. The best carpentry information points to epoxy wood filler for deeper fixes. It hardens strong and bonds well with dry wood.
Latex filler works for cosmetic patches but may crack over time in outdoor weather. Always choose a product rated for exterior use when fixing bee damage outdoors.
If the wood feels soft around the hole, press in deeper with a screwdriver. If it sinks, that wood might be too weak to repair. In that case, replacing the board is better.
One of the Best Carpentry Tips for Beginners
If you are new to woodwork, there is one key lesson. Do not rush repairs. A fast patch often leads to more damage. Follow each step in order. Clean. Treat. Fill. Seal.
Take your time. Sand between steps if needed. Let fillers dry all the way. These small actions make a big difference in how long the repair holds.
Having the right tools also helps. A sanding block, wood filler, glue, dowels, and paintbrushes are all basic items worth keeping on hand.
Prevention Is Easier Than Repair
Once you fix carpenter bee damage, stop it from happening again. Regular checks on outdoor wood go a long way. Early spring is the best time to inspect, patch, and paint.
Hang bee traps near common spots to catch them before they drill. Some homeowners install fake hornet nests to scare bees away, and many say it works.
Choose hardwoods or treated wood for outdoor use when possible. Bees are less likely to dig into these boards.
Final Thoughts:
Repairing wood damaged by carpenter bees takes time and care. But if you follow the steps and keep up with prevention, you can stop it from getting worse. A skilled wood carpenter knows how to restore the strength of damaged boards. But many small repairs can be done with the right steps and some patience. Start early. Fix holes right when you find them. Use the correct products. Keep all exposed wood sealed. These habits keep your wood strong and your home safe from more damage down the road.