If you own a Cricut Explore Air 2, you may wonder about its use. Almost every user has little doubt about the model they have, and they want to learn about their features. This guide does it for you. We understand, as a beginner, it’s a little tricky to handle a machine like Cricut. Even if you have already used the previous models, you may feel difficulty in its setup. This is why this blog teaches you how to set up Cricut Explore Air 2, from unboxing to using it. Read the blog till the end to learn the setup completely.
Cricut Explore Air 2 Set Up
Unboxing
Once you get your Cricut Explore Air 2, check that it has all items included. If you find anything missing during unboxing or has to be returned, you can contact Cricut support for a replacement.
These are the items that must be included in your Cricut package:
- User manual
- Cricut Explore Air 2 machine
- Cutting blade
- Cricut cutting mat
- Power and USB cords
- Silver pen and accessory adapter
- Cardstock & vinyl samples
Inside The Cricut Machine
You must know about the basic features of the Cricut Explore Air 2. Here are the features that this machine holds and helps you get a project out of it.
- Tool cup- It is used to hold pens and scissors etc.
- Accessory clamp A- This is the place where the accessory adapter is pre-installed, and the pens can be inserted for drawing. It can also hold scoring blades.
- Blade clamp B- It is also pre-installed. It helps you remove the leftovers of vinyl.
- Accessory storage compartments- The machine has two storage compartments, the smaller compartment that holds additional blade housing and the accessory adapter. The larger compartment is used for storing longer tools or pens.
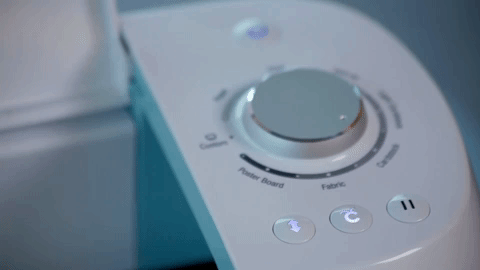
- Smart set dial- It is used to select the materials you need to cut.
- Cutting mat- This tool is used to load the material into the Cricut machine. It has a sticky side for holding the material in one place.
Connect Your Machine To PC/Mac/iPad
First, install your machine on a spacious surface to move the Cricut mat easily. Then, follow the given steps. The Cricut Explore Air 2 has a wireless feature; still, we will set it up using the USB cable.
- Connect the power adapter and USB cable to the Cricut machine and the computer.
- Then, turn on the machine and the computer.
- Go to the Cricut official website, sign in to a user account, and download the Cricut Design Space, a piece of software used to run the machine.
- After that, run the installer and go to design.cricut.com.
- In the top left corner, click the menu icon and then select ‘New Machine Setup.’
- The Cricut will guide you through the installation process and make your first project.
How To Make Your First Project On Cricut Explore Air 2?
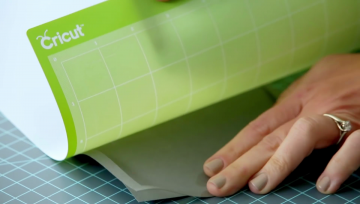
Once you learn how to set up Cricut Explore Air 2, you can make a beautiful card to test it. Let’s learn the ways to make a card. You will need cardstock paper, a cutting mat, and a silver pen. Remove the protective film from the cutting mat and keep it safely aside. You will have to use it later to protect your mat.
Now, follow the instructions to make the first project:
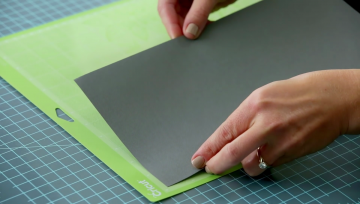
- On your cutting mat, load the gray cardstock. Align both the things on the top left corner just below the Cricut logo. The shinier side should be facing upwards and aligned vertically on the mat.
- Put the mat into the machine. Be careful and gently press the mat against the rollers and press the Load button on the top right of the machine. It appears as a double arrow.
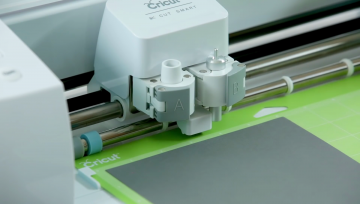
- Insert a silver pen. To do this, open the accessory clamp A. Remove the pen’s cap and insert its tip into the housing unit until it clicks into it. Put the cap on the end of the pen to avoid losing it. Close the clamp.
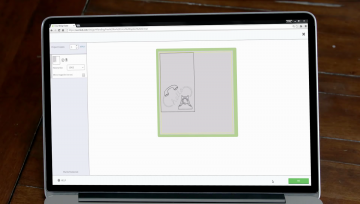
- Then, you can check the design on the mat preview screen. Press Go.
- Set the dial on the cardstock.
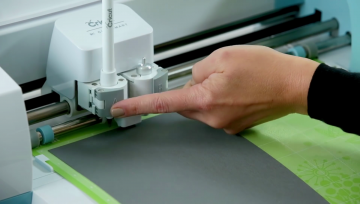
- Then, the “C” button on the machine will flash. Press the C button.
- Now, unload the mat by pressing the unload button. Also, remove the pen.
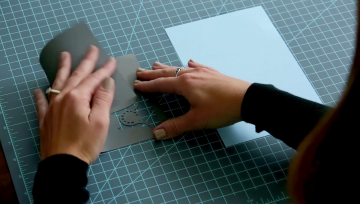
- Lay the cutting mat on a clean surface and curl its edge upwards, so the material peels away from it. Keep the mat curled to remove the material easily.
- Then, fold the card in half and fold your blue paper too. Now place the blue card inside the gray card. If you like, glue them in place.
This is how you created your first project with Cricut Explore Air 2. You can make tons of such projects using the machine and its smart accessories.
0


