

The Medical ID introduced on iPhone is the essential feature iPhone owners can use in many ways. Here’s how to set it up quickly and why it is considered a lifesaver.
iPhone, designed and introduced by Apple, is a multipurpose device. Thankfully, it is packed with several useful features, and Medical ID is one of them. You can use it legitimately in any emergency event if you need to quickly view the medical info of a person. It’s a feature that no user ever wishes to be required. Still, a Medical ID can become a lifesaver in a situation where a piece of particular information can come quickly.
Nowadays, users can find such safety features widely on most smartphones. No doubt, it’s incredible to see such features. When it comes to the iPhone, specifically, it is packed with an Emergency SOS feature allowing users to call emergency services operating locally. You can contact local emergency services by pressing down the button rapidly five times in a row. With this action, emergency services operating at local levels will instantly come to your help.
Regarding Emergency SOS, it is not much talked about the iPhone feature, but it is a crucial feature that requires a thorough discussion. Apple created this feature to help people who are in a severe emergency or need. For example, you can use the Emergency SOS feature if you are suffering from a severe allergic reaction or something that requires immediate medical help.
Setting up Emergency SOS is relatively easy, and most iPhone owners are pretty aware of the procedure. It would be best to hold down the power and volume down buttons simultaneously until you see the power menu.
To make the feature more effective, you can enable a couple of settings. For example, you need to open the Settings section on your iPhone. After then, you can scroll down the page and then click on ‘Emergency SOS.’ You will find the option ‘Call with Side Button’ at the top of the Emergency SOS page.
Now, you can turn on the toggle to enable Emergency SOS. Plus, make sure that Auto Call is enabled. Apart from these, it is also essential to set up emergency contacts on your iPhone. To do this, go to the Settings section of that Emergency SOS page and click on ‘Edit Emergency Contacts in Health.’ Here, you will be directed to the Medical ID settings. You need to click on the Edit option appearing at the top of this section. It will enable you to remove, edit, and add emergency contacts.
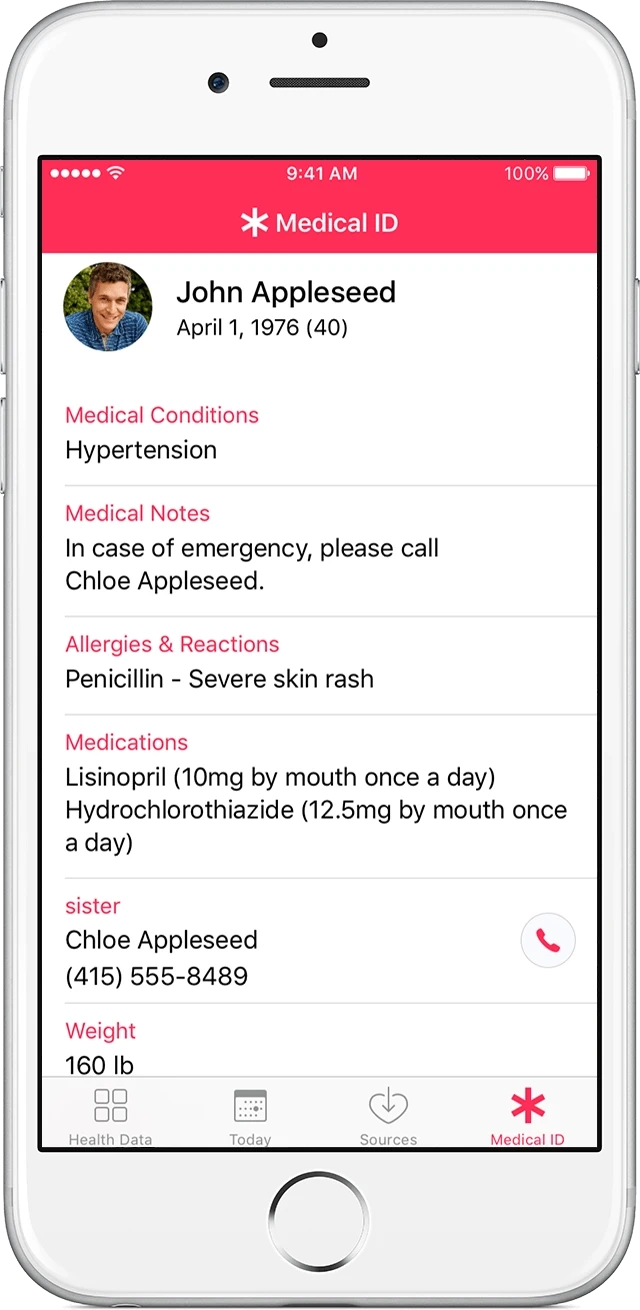
Medical ID: How to Set it Up on Your iPhone
In addition to The feature, Emergency SOS, Apple has equipped iPhone with a Medical ID also. It remains visible on the same page where iPhones find the option to turn off their phone. When you activate the Medical ID on that particular page, you can find the owner’s medical history in a quick rundown that may include the owner’s age, emergency contacts, blood type, allergies, and many more. Access to such information can be hugely important when the first responders are taking care of someone.
To benefit from this app, it is crucial to set up a Medical ID on your iPhone properly. To do this, you need to click on the Apple Health app on your iPhone. Then, click on the profile icon appearing in the upper-right corner. Now, click on Medical ID. After then, click on the Edit button appearing towards the upper-right. Now, the users can enter their Medical ID.
Further, Apple allows its users to hide or show any categories they see fit. Here, you can add or remove emergency contacts. To edit your emergency contacts, you need to click on the Health app and then click on the Summary section. Now, click on your profile picture that appears in the upper-right corner. Further, you need to go to the Medical Details option.
Now, you need to click on the Medical ID option. To edit, you need to scroll down to Emergency Contacts. Here, the users need to click on the Plus button appearing next to “add emergency contact’. After then, tap on a contact and mention the relationship. If you need to remove any emergency contact, click on the Delete button appearing next to the specific reference and then click on Delete. At last, click Done.
As stated above, it is pretty simple to access Medical ID. You need to hold down the volume down+ power buttons simultaneously. Then, swipe the toggle, Medical ID, all the way to the right until it appears to you. If you have turned off the display of your iPhone, but need to see the Medical ID again, then following the same process as you adopted while accessing the future will help you.
Moreover, the tech giant disables Touch ID/Face ID automatically whenever the feature is used. You need to enter the PIN or password after using the Medical ID feature.
Hi! I am Elisa Wilson; I hope you are having a great day! I have worked across many domains, including digital marketing and technical writing, and nowadays, I just put my focus on writing for an online audience. I write general blogs, emphasizing critical points and putting the main concept across to the reader in a concise and clear way. I like criticism, so if you do not like anything about my work, kindly get in touch with me and let me know if you like to see any changes. Anyways, you can proceed to read my work on this website: Roku.com/link.