Radon is a silent killer. This invisible, odorless, and tasteless gas is the second leading cause of lung cancer in the United States, responsible for over 21,000 deaths each year. Yet, despite its deadly nature, many homeowners are unaware of the dangers radon presents or how to effectively protect their families from exposure.
When it comes to reducing radon levels in your home, you have two main options: professional radon mitigators or do-it-yourself (DIY) solutions. But which one is more effective? Are DIY solutions enough to safeguard your health, or is it worth investing in a professional service?
In this article, we’ll explore the pros and cons of each approach, help you understand the science behind radon mitigation, and guide you toward the best solution for protecting your home and your family.
What Is Radon and Why Is It Dangerous?
Radon is a radioactive gas that forms naturally from the decay of uranium in soil, rock, and water. It seeps into homes through cracks in the foundation, gaps around pipes, and other openings in the structure. Because radon is colorless and odorless, most people don’t realize they have a radon problem until it’s too late.
Health Risks of Radon Exposure
When radon is inhaled, its radioactive particles can damage lung tissue, increasing the risk of lung cancer. The longer you are exposed to high radon levels, the greater the risk. According to the Environmental Protection Agency (EPA), radon is responsible for about 14% of all lung cancer deaths globally, second only to smoking.
How Radon Enters Your Home
Radon gas can enter your home through several pathways, including:
- Cracks in the foundation
- Construction joints
- Gaps around service pipes
- Wall cavities
- Crawl spaces
Once inside, radon levels can build up, especially in basements and lower floors where ventilation is poor.
Testing for Radon: The First Step to Protection
Before deciding on a mitigation strategy, you need to know your home’s radon levels. Testing is simple and inexpensive, and there are two main types of tests:
- Short-term tests – Measure radon levels over 2–7 days.
- Long-term tests – Measure radon levels over 90 days or more, providing a more accurate picture of average exposure.
The EPA recommends fixing your home if radon levels exceed 4 picocuries per liter (pCi/L) — although levels as low as 2 pCi/L can still pose health risks.
DIY Radon Mitigation Solutions
If your radon test results show elevated levels, you may be tempted to try a DIY solution. DIY radon mitigation is generally more affordable, but is it effective? Let’s break down some common approaches.
1. Sealing Cracks and Openings
Sealing cracks and gaps in your foundation is a common first step. It can help reduce radon levels by limiting the entry points for radon gas. However, sealing alone is not typically enough to reduce radon levels significantly.
2. Improving Ventilation
Increasing ventilation in your basement or crawl space can help dilute radon levels. This may involve installing vents or using fans to increase air exchange.
3. Installing a DIY Radon Mitigation Fan
Some homeowners install radon mitigation fans to create negative pressure beneath the foundation, which helps redirect radon away from the home. However, improper installation can result in ineffective mitigation or even increased radon levels.
4. Activated Charcoal Radon Reduction
Activated charcoal filters can help absorb radon from the air, but they are generally not strong enough to reduce radon levels significantly on their own.
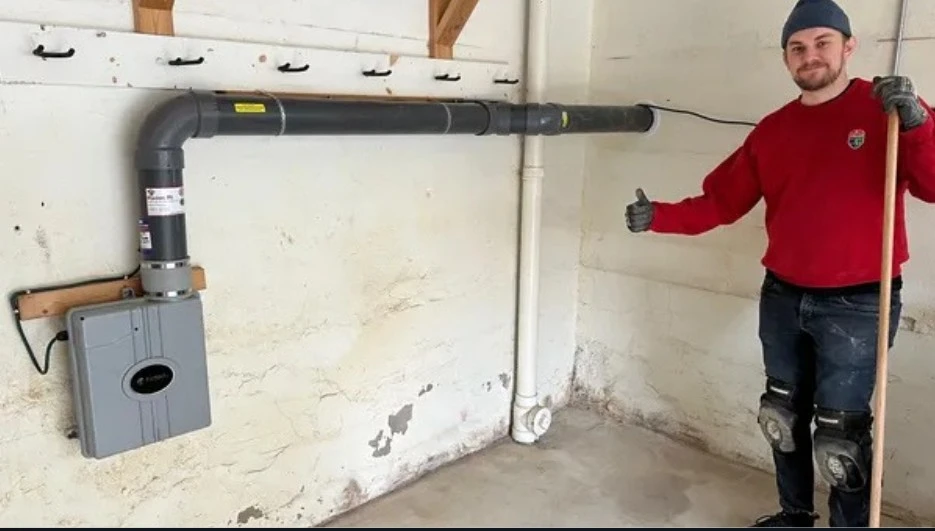
5. Sub-Slab Depressurization (DIY)
Sub-slab depressurization involves drilling into the foundation and installing a pipe and fan system to vent radon outdoors. While this is the most effective DIY method, it requires significant skill and proper equipment to install correctly.
Professional Radon Mitigators: What They Offer
Hiring a professional radon mitigation company comes with a higher price tag, but it also brings expertise and guaranteed results. Here’s what professionals offer that DIY solutions often lack:
1. Expert Assessment and Customized Solutions
Radon mitigation professionals conduct a thorough inspection of your home and design a solution tailored to your specific needs. This ensures maximum effectiveness.
2. Advanced Mitigation Techniques
Professionals have access to high-grade equipment and advanced mitigation methods, including:
- Sub-slab depressurization
- Drain tile suction
- Sump hole suction
- Block wall depressurization
3. Proper Installation and Sealing
Incorrect installation of a radon mitigation system can lead to increased radon levels. Professionals are trained to install systems correctly and ensure all entry points are properly sealed.
4. Post-Mitigation Testing
A professional service includes follow-up testing to confirm that radon levels have been successfully reduced to safe levels.
5. Warranty and Long-Term Support
Most professional radon mitigation companies offer warranties and ongoing support, giving you peace of mind that your home remains safe over time.
Cost Comparison: DIY vs. Professional Mitigation
DIY Costs
- Short-term test kits: $10–$30
- Long-term test kits: $25–$100
- DIY sealing and ventilation: $50–$500
- DIY sub-slab depressurization: $500–$1,500
Professional Costs
- Professional testing: $150–$300
- Professional mitigation system: $800–$2,500 (depending on home size and complexity)
While DIY solutions are cheaper upfront, they may not provide the same long-term effectiveness and reliability as professional systems.
Effectiveness of DIY vs. Professional Mitigation
DIY Effectiveness
- Sealing and ventilation can reduce radon levels by 10%–30% at best.
- DIY sub-slab depressurization can reduce radon levels by 30%–70%, but success depends heavily on proper installation.
Professional Effectiveness
- Professional sub-slab depressurization systems can reduce radon levels by 90% or more.
- Professionally installed systems are more reliable and come with performance guarantees.
When DIY Is Enough — and When It’s Not
✅ DIY Solutions May Be Enough If:
- Your radon levels are slightly elevated (between 2–4 pCi/L).
- Your home’s foundation is easy to seal and ventilate.
- You have experience with home improvement projects.
❌ Professional Mitigation Is Better If:
- Radon levels exceed 4 pCi/L.
- Your home’s foundation is complex (e.g., multiple slabs, crawl spaces).
- You’ve tried DIY solutions without success.
- You want a long-term, guaranteed solution.
Conclusion: Should You Go DIY or Hire a Pro?
When it comes to protecting your family from radon, the stakes are high. While DIY radon mitigation can be effective for mild cases, it often falls short when radon levels are high or when the home’s structure is complex. Professional radon mitigation offers a more reliable and lasting solution, with expert assessment, customized systems, and guaranteed results. For trusted professional service, visit Fort Collins Radon Mitigation.
If you value peace of mind and long-term protection, investing in a professional radon mitigation system is the safest and most effective choice. However, for mild radon issues or temporary fixes, DIY methods can be a cost-effective starting point. The key is to test your home regularly and take action promptly — because when it comes to radon, ignorance isn’t bliss — it’s dangerous.


Sign in to leave a comment.