Tearing down walls, ripping up floors, and picking out the perfect backsplash—renovating a kitchen is one of the most exciting projects a homeowner can take on. It’s also one of the most overwhelming. You’ve probably spent hours scrolling through Pinterest, saving photos of marble countertops and farmhouse sinks, but bringing that vision to life requires serious planning.
The kitchen is the heart of the home. It's where you cook, eat, socialize, and help kids with homework. Because it serves so many functions, getting the design and functionality right is critical. But for a first-timer, the process is filled with potential pitfalls. Budget overruns, unexpected delays, and decision fatigue are all too real.
That’s why preparation is your best defense against renovation stress. By breaking the project down into manageable steps, you can navigate the chaos and end up with a space you truly love. Whether you are doing a DIY refresh or hiring professionals for a full-scale overhaul, this checklist will guide you through the essential phases of your renovation journey.
Phase 1: Planning and Budgeting
Before you swing a single hammer or buy a single appliance, you need a plan. This is the unglamorous part of the renovation, but it’s arguably the most important. A solid plan acts as your roadmap, keeping you on track when things get chaotic.
define Your Goals
Why are you remodeling? Do you need more storage? Is the layout dysfunctional? Are you updating for resale value? Be specific about your pain points. If you love to bake, you might prioritize double ovens and counter space. If you host dinner parties often, an open layout might be non-negotiable.
Set a Realistic Budget
Kitchen renovations can cost anywhere from $15,000 to over $50,000 depending on the scope. determine how much you are willing to spend and then—this is crucial—set aside an additional 15-20% for unexpected costs. In older homes especially, you never know what you might find behind the drywall.
Create a Wish List vs. Needs List
It’s easy to get carried away with high-end appliances and luxury finishes. Separate your "must-haves" (functional layout, updated electrical) from your "nice-to-haves" (wine fridge, heated floors). If the budget gets tight, you’ll know exactly where to cut.
Research Professionals
Unless you are incredibly handy, you will likely need a contractor, designer, or specialized tradespeople. Take your time vetting these pros. If you are planning a kitchen remodel central Florida, look for local experts who understand the specific building codes and architectural styles of the region.
Phase 2: Design and Layout
Once you know what you can afford, it’s time to figure out what it will look like. This phase bridges the gap between your dreams and reality.
The Work Triangle
The classic "kitchen work triangle" connects the three main work areas: the sink, the stove, and the refrigerator. While modern kitchens have evolved into "zones," ensuring an efficient flow between these three points is still vital for a functional workspace.
Choose Your Layout
Will you keep the existing footprint or move walls? Common layouts include:
- L-Shaped: Great for open-concept living.
- U-Shaped: Maximizes counter space and storage.
- Galley: Efficient for smaller spaces.
- Island: Adds prep space and seating, but requires ample square footage.
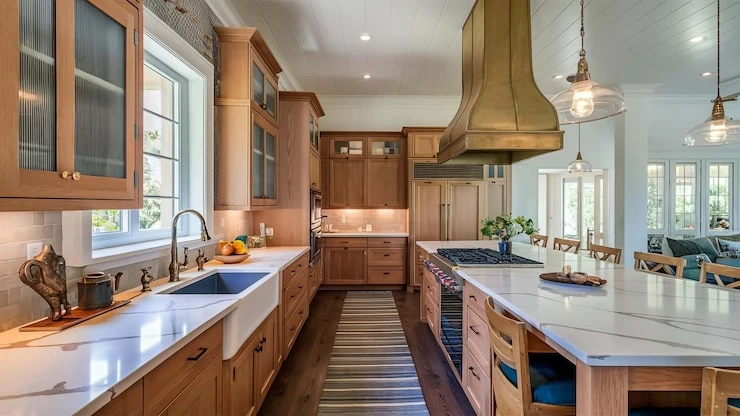
Select Your Materials
This is the fun part. Start picking out your finishes.
- Cabinetry: Custom, semi-custom, or stock? Shaker style or flat-panel?
- Countertops: Quartz is durable and low-maintenance; granite offers natural beauty; marble is luxurious but porous.
- Flooring: Hardwood, tile, or luxury vinyl plank? Consider durability and water resistance.
- Backsplash: This is a great place to add personality without breaking the bank.
Phase 3: Hiring and Scheduling
With a design in hand, it’s time to assemble your team and set a timeline.
Get Multiple Quotes
Don't settle for the first estimate you receive. Get at least three detailed quotes. Compare not just the bottom line, but the timeline and the scope of work included. If you are specifically looking for a kitchen remodel central Florida, ensure the quotes account for local labor rates and material availability in the Sunshine State.
Sign a Contract
Never start work without a signed contract. It should outline the payment schedule, start and end dates, specific materials to be used, and a procedure for change orders (changes to the original plan).
Apply for Permits
Depending on the scope of your work, you may need building, electrical, or plumbing permits. Your contractor typically handles this, but as the homeowner, it is ultimately your responsibility to ensure everything is legal.
Order Materials
Supply chain issues can cause massive delays. Order your cabinets, appliances, and fixtures well in advance. You don't want your contractor ready to install a sink that won't arrive for another six weeks.
Phase 4: Demolition and Rough-In
Now the noise begins. This phase is messy, loud, and disruptive.
Prepare Your Home
Pack up your kitchen. Box up dishes, pantry items, and small appliances. Set up a temporary kitchen elsewhere in the house with a microwave, coffee maker, and mini-fridge. You’ll be living without a stove for a while, so plan for simple meals or takeout.
Demolition
Out with the old! Cabinets are removed, appliances hauled away, and flooring ripped up. If walls are coming down, this is when it happens.
Rough-In Work
Before walls are closed back up, the "guts" of the kitchen are installed.
- Plumbing: Moving pipes for sinks or pot fillers.
- Electrical: Running wires for new outlets, lighting, and appliances.
- HVAC: Adjusting vents or ductwork if necessary.
This is the stage where unforeseen issues often pop up—like outdated wiring or water damage. That 20% contingency fund you set aside? You might need it here.
Phase 5: Installation and Finishes
The dust settles, and your vision starts to take shape.
Drywall and Painting
Walls are closed up, taped, mudded, and sanded. A fresh coat of paint usually goes on before the cabinets are installed to ensure clean edges.
Flooring Installation
Depending on the type of floor, it might go in before or after cabinets.
Cabinetry and Countertops
This is the biggest transformation. Once the cabinets are hung, the template for your countertops is taken. Installation usually follows a week or two later.
Backsplash and Hardware
The jewelry of the kitchen! The tile is set, and knobs and pulls are installed on drawers and doors.
Appliances and Fixtures
The sink, faucet, dishwasher, and stove are hooked up. Lighting fixtures are hung. Suddenly, it looks like a real kitchen.
Phase 6: The Final Walkthrough
You’re almost there. Before you make the final payment, you need to ensure everything is perfect.
Create a Punch List
Walk through the space with your contractor. Look for small details: a cabinet door that doesn’t close right, a scratched paint job, or a missing piece of trim. Write everything down on a "punch list."
Final Inspections
Your contractor will schedule final inspections to close out your permits. This ensures all work meets safety codes.
Deep Clean
Construction dust gets everywhere. Hire a professional cleaning crew or spend a weekend scrubbing every nook and cranny before you unpack.
Enjoy Your New Space
Pop the champagne! You survived. Whether you tackled a DIY project or managed a full contractor team for your kitchen remodel central Florida, you now have a space that is tailored to your life and style.
Creating a Kitchen, You'll Love for Years
Renovating a kitchen is a marathon, not a sprint. It tests your patience, your budget, and your ability to make decisions under pressure. But the payoff is immense. A well-designed kitchen improves your daily life, adds significant value to your home, and becomes the backdrop for countless memories.
By following a checklist and staying organized, you move from feeling overwhelmed to feeling empowered. You control the process rather than letting the process control you. Take your time during the planning phase, hire people you trust, and don't be afraid to ask questions along the way. Your dream kitchen is within reach—you just have to take it one step at a time.


Sign in to leave a comment.