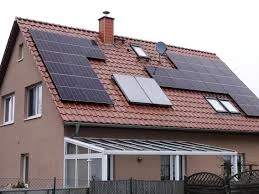
Installing a solar panel system for your home involves several steps, from initial planning to the final connection to your electrical system. Here’s a detailed guide to help you through the process:
Assess Your Energy NeedsCalculate Energy Consumption: Determine your average monthly energy consumption in kilowatt-hours (kWh). This information is usually available on your electricity bills.Determine System Size: Decide on the size of the solar panel system you need based on your energy consumption and the amount of sunlight your location receives. Evaluate Your RoofRoof Condition: Ensure your roof is in good condition and can support the weight of solar panels.Sunlight Exposure: Check that your roof receives adequate sunlight throughout the day. Ideally, the roof should face south in the northern hemisphere and north in the southern hemisphere. Choose Your Solar Panel SystemTypes of Panels: Decide between monocrystalline, polycrystalline, or thin-film solar panels based on efficiency, cost, and available space.Inverter Selection: Choose a suitable inverter (string, micro-inverter, or power optimizer) to convert the DC power generated by the panels into AC power for your home. Obtain Permits and ApprovalsLocal Regulations: Check local zoning laws and building codes. Obtain the necessary permits from your local government or building authority.Utility Approval: Get approval from your utility company, especially if you plan to connect the system to the grid and participate in net metering. Install Mounting SystemMark the Roof: Mark the positions for the mounting brackets on your roof.Install Brackets: Secure the mounting brackets to your roof. Ensure they are properly aligned and securely attached. Install Solar PanelsAttach Panels: Secure the solar panels to the mounting brackets. Ensure they are firmly in place and properly aligned.Connect Panels: Connect the panels together using appropriate wiring. This is typically done in series or parallel, depending on your system design. Install Inverter and Other ComponentsMount the Inverter: Install the inverter close to your main electrical panel. Ensure it is in a shaded, cool location to prevent overheating.Wiring: Connect the solar panels to the inverter. Use appropriate conduit and wiring to ensure a safe and efficient connection.Grounding: Properly ground the system to protect against electrical faults. Connect to Electrical SystemConnect to Breaker Panel: Run the wiring from the inverter to your home’s breaker panel. Install a new breaker if necessary.Utility Connection: If your system is grid-tied, connect it to the utility grid according to your utility company’s specifications. Inspection and TestingLocal Inspection: Schedule an inspection with your local building authority to ensure the system complies with all regulations and safety standards.System Testing: Test the system to ensure it is operating correctly. Verify the output and check for any issues. Activate the SystemTurn On the System: Once everything is connected and inspected, turn on the system. Monitor the performance through the inverter display or monitoring software.Monitor and Maintain: Regularly check the system’s performance and clean the panels as needed to ensure maximum efficiency.Tips for a Successful Installation
Professional Installation: While DIY installation is possible, hiring a professional installer ensures the job is done safely and correctly. Professionals are familiar with local regulations and can handle any issues that arise.Warranty and Support: Choose a system with a good warranty and customer support. This provides peace of mind and assistance if you encounter any problems.By following these steps and considerations, you can successfully install a solar panel system for your home, leading to energy savings and a reduced carbon footprint.


Sign in to leave a comment.