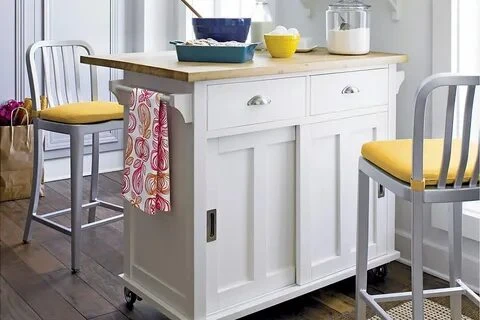
Are you looking to enhance your kitchen with a versatile and stylish addition? A portable kitchen island could be the perfect solution. Whether you live in a compact apartment or a spacious home, a portable kitchen island provides extra counter space, storage, and functionality without the permanence of a fixed installation.
In this guide, we’ll walk you through the steps to build your very own portable kitchen island, perfect for any kitchen setting, including those in Adelaide.
Why Choose a Portable Kitchen Island?
A portable kitchen island is an excellent choice for adding flexibility and utility to your kitchen. It can be moved as needed, allowing you to adapt your kitchen layout for different occasions.
where many homes feature modern and open-plan kitchens, a portable kitchen island can seamlessly blend style and practicality. Plus, building your own gives you the freedom to customize it to your specific needs and preferences.
Materials and Tools Needed
Before diving into the building process, gather the following materials and tools:
Wooden countertop or butcher blockPre-finished cabinets or custom-built cabinetsHeavy-duty caster wheelsScrews and nailsDrill and screwdriverMeasuring tapeSandpaper and paint or stainHandles and knobs
Step-by-Step Guide to Building Your Portable Kitchen Island
Read More: TIPS FOR CHOOSING YOUR IDEAL PORTABLE KITCHEN ISLAND
Step 1: Design Your Island
Decide on the dimensions and design of your portable kitchen island. Consider the height, width, and depth based on your kitchen space. Sketch a simple design plan, including storage compartments and shelves.
Step 2: Prepare the Cabinets
If you’re using pre-finished cabinets, ensure they are the correct size and style for your design. For a custom build, construct your cabinets using quality wood, ensuring they are sturdy and fit your specifications.
Step 3: Attach the Countertop
Place the wooden countertop or butcher block on top of the cabinets. Secure it with screws from the inside of the cabinets to avoid visible fasteners. Make sure it is centered and level.
Step 4: Install the Caster Wheels
Flip the assembled island base to attach the caster wheels. Ensure the wheels are evenly spaced and securely fastened. Using heavy-duty caster wheels will provide stability and ease of movement.
Step 5: Finishing Touches
Sand any rough edges and apply paint or stain to match your kitchen décor. Add handles and knobs to the cabinets for a polished look. Ensure all components are securely attached and the island moves smoothly.
Conclusion
Building your portable kitchen island is a rewarding project that enhances both the functionality and aesthetics of your kitchen. Whether you're in Adelaide or anywhere else, a well-crafted portable kitchen island can make meal prep, entertaining, and daily kitchen tasks more efficient and enjoyable.
By following this DIY guide, you’ll have a custom kitchen island tailored to your needs, adding a personal touch to your cooking space. Enjoy the flexibility and style that a portable kitchen island brings to your home!
For more tips, and advice, or to share your DIY kitchen island Adelaide project, feel free to Contact Us. We’d love to hear from you and see how your portable kitchen island turned out!


Sign in to leave a comment.