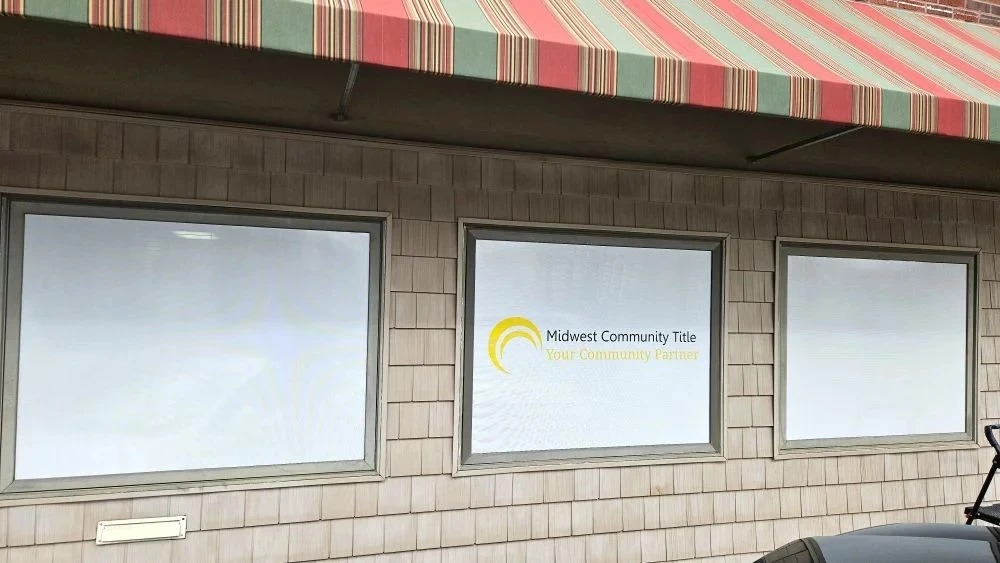
If you’ve invested in custom window graphics for your business, congratulations — you’ve made a smart branding move! Window graphics are one of the most effective and affordable ways to showcase your brand, attract foot traffic, and transform plain glass into a powerful marketing tool.
But to get that sleek, professional look, installation matters just as much as design. Even the most stunning graphics can look unprofessional if bubbles, wrinkles, or misalignment occur during setup. The good news? You don’t have to be a professional installer to achieve a clean, smooth finish.
In this guide, we’ll walk you through easy installation tips for custom window graphics — step by step.
1. Gather the Right Tools Before You Start
Preparation makes all the difference. Having the right tools on hand ensures a smoother process and better results. Here’s what you’ll need:
- Cleaning solution (mild soap and water or glass cleaner)
- Lint-free microfiber cloths
- Plastic squeegee or credit card
- Masking tape
- Spray bottle with soapy water (for wet application)
- Utility knife or scissors
- Measuring tape and level
These simple tools help you clean, align, and apply your window graphics accurately without damaging them.
2. Clean and Dry the Surface Thoroughly
The first — and arguably most important — step is cleaning your window surface. Dirt, dust, or grease can prevent the adhesive from sticking properly and create air bubbles.
Follow these steps:
- Wipe the glass with a mild soap and water solution.
- Use a lint-free cloth to dry the surface completely.
- Avoid using harsh chemicals like ammonia or alcohol-based cleaners, which can affect adhesion.
A clean, smooth, and dry surface ensures your graphic sticks evenly and lasts longer.
3. Choose Between Wet or Dry Application
There are two common methods to apply custom window graphics: wet and dry installation.
- Wet Application:
- Best for larger graphics or when repositioning is needed. Spray a light mist of soapy water on the glass before applying the graphic. This lets you slide it into position and squeeze out air bubbles easily.
- Dry Application:
- Works best for smaller decals or when you’re confident about the placement. Simply peel and stick directly onto the glass. It’s faster but requires precision since you can’t reposition once the adhesive touches the surface.
If you’re a beginner, the wet method is more forgiving.
4. Measure and Mark the Placement
Before peeling off the backing, double-check where you want to position your graphic.
- Use masking tape to hold the graphic in place temporarily.
- Step back and make sure it’s straight and centered.
- Use a level if needed to ensure proper alignment.
Once you’re happy with the position, mark the corners lightly with tape or a dry-erase marker. This acts as a guide during installation.
5. Peel the Backing Carefully
When you’re ready to apply the graphic, start by peeling just a few inches of the backing paper from one edge — don’t remove it all at once.
If you’re doing a wet application, spray the adhesive side lightly with the soapy water solution. This keeps it from sticking instantly, giving you time to adjust.
For dry applications, be extra cautious to avoid folding or touching the sticky side, as fingerprints can affect adhesion.
6. Apply the Graphic Slowly and Smoothly
Start from one edge and work your way across the surface. Use your squeegee or a credit card wrapped in a soft cloth to smooth out the graphic from the center outward.
Move slowly and apply even pressure to push out air bubbles and excess water.
Pro Tip: Work in small sections — this helps prevent creases or trapped air.
If you notice bubbles, lift that section gently and reapply, smoothing it out again.
7. Remove Air Bubbles and Excess Water
Even with care, tiny bubbles can appear. Don’t panic — they’re easy to fix.
For wet applications, wait a few hours until the adhesive begins to set. Then, use your squeegee to push any trapped water or air toward the edges.
For dry applications, use a pin or needle to pop small bubbles and press out the air gently. Avoid using too much force — you don’t want to tear the vinyl.
8. Trim the Edges Neatly
Once the graphic is fully applied, use a sharp utility knife to trim any excess vinyl around the edges or window frame.
Take your time — clean edges make a huge difference in the final appearance.
If your window has curves or corners, carefully trace along them for a smooth finish.
9. Let It Set Properly
After installation, let the graphic cure for 24 to 48 hours before cleaning or exposing it to moisture.
This allows the adhesive to bond fully with the glass surface, ensuring durability. Avoid touching or pressing on the graphic during this period.
10. Maintain Your Window Graphics
Proper care extends the life and look of your custom window graphics.
- Clean gently with a soft cloth and mild soap.
- Avoid power washing or using harsh chemicals.
- Check for edges peeling due to weather or moisture and press them back promptly.
With good maintenance, high-quality window graphics can last 3 to 5 years or even longer.
Final Thoughts
Installing custom window graphics doesn’t have to be complicated. With a little patience, the right tools, and careful attention, you can achieve a professional, bubble-free finish that elevates your storefront’s look instantly.
Whether you’re showcasing your logo, promotions, or privacy film, a well-installed window graphic reflects your brand’s attention to detail — and that makes all the difference.
If you’re looking for professionally designed and installed custom window graphics, reach out to your local sign experts today. They’ll help you create stunning visuals that turn your windows into powerful marketing displays.


Sign in to leave a comment.