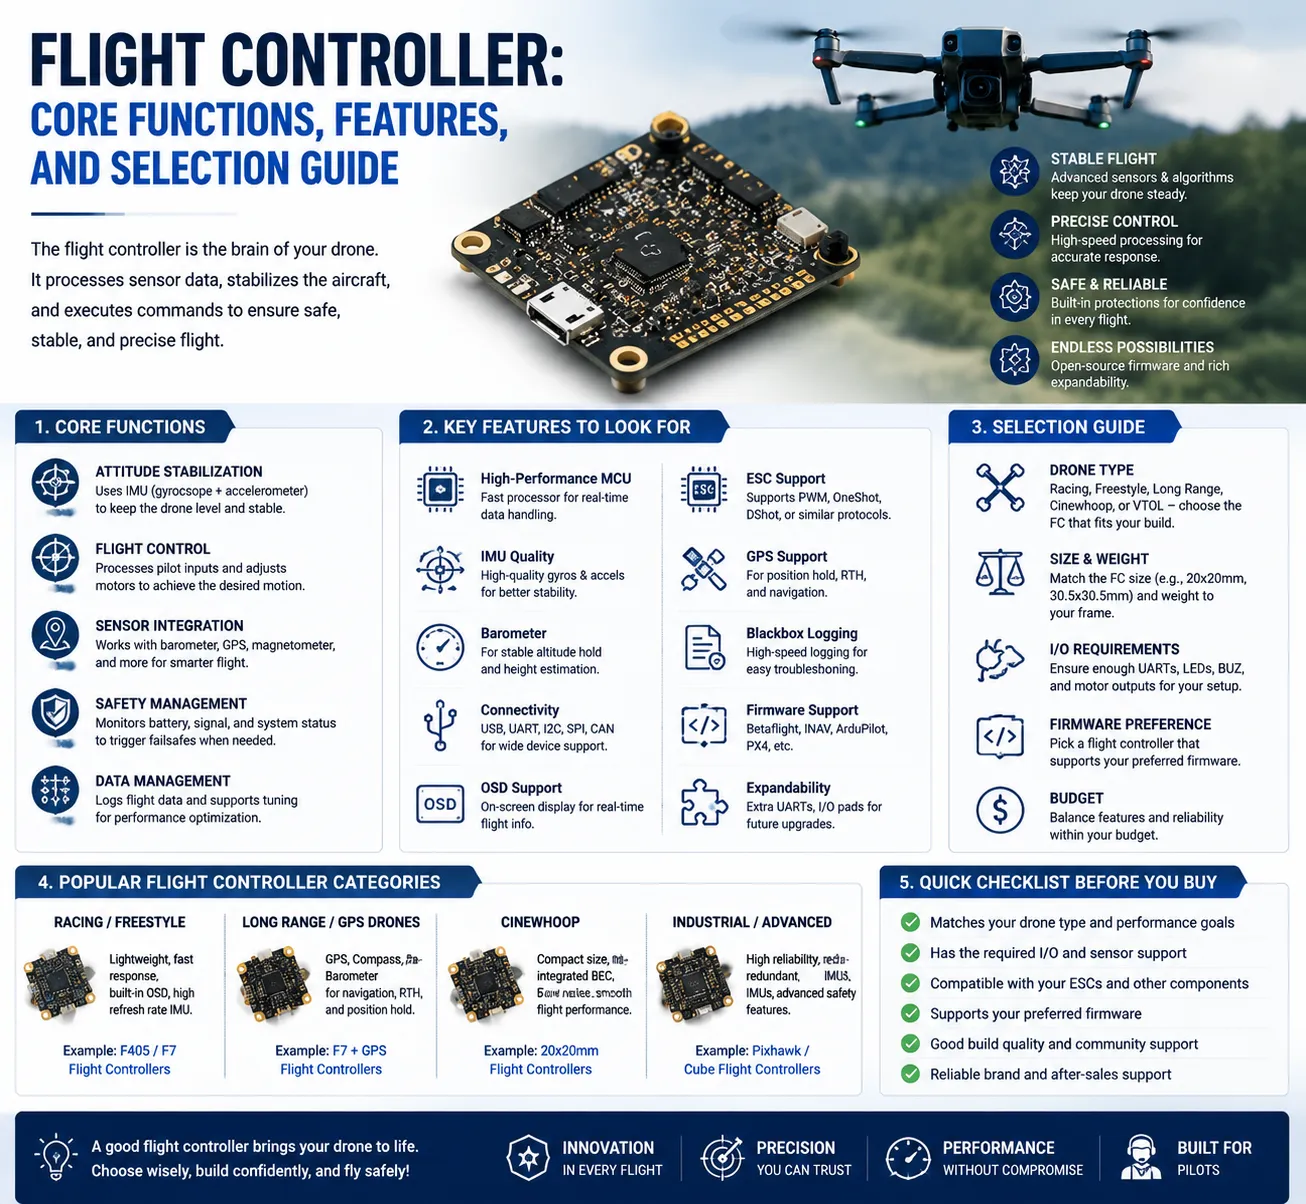

A flight controller is the decision-making center of a drone. It receives information from onboard sensors, interprets the pilot’s commands, calculates the aircraft’s movement, and sends rapid instructions to the motors. Although it may look like a small circuit board, it performs thousands of calculations every second to keep the aircraft stable, responsive, and predictable. Whether you are building a compact racing drone, an aerial photography platform, an industrial inspection aircraft, or an experimental unmanned system, choosing the right controller can make the difference between a smooth flight and an unstable machine.
The controller does much more than simply connect electronic components. It coordinates the motors, monitors orientation, manages flight modes, processes navigation data, and helps protect the aircraft when unexpected conditions occur. A well-matched controller can improve handling, reduce vibration-related errors, simplify setup, and create room for future upgrades. Understanding its functions and specifications therefore helps builders avoid overspending on unnecessary features while also preventing the frustration caused by choosing hardware that cannot support the intended aircraft.
Flight controller development is an important area for Shenzhen Rich Full Joy Electronics Co Ltd, where practical electronics manufacturing experience can support dependable control-board solutions for modern unmanned aircraft. Reliable manufacturing is especially important because the controller operates in an environment filled with electrical noise, vibration, temperature changes, and sudden movement. Consistent circuit quality, accurate component placement, strong solder joints, and careful inspection all contribute to stable performance. When these manufacturing details are handled correctly, builders gain a stronger foundation for creating safe, responsive, and efficient aircraft.
What Is a Flight Controller?
A flight controller is a specialized computer designed to control the movement of an aircraft. In a multirotor drone, it sits between the pilot’s input system and the motor-control hardware. When the pilot commands the aircraft to climb, turn, roll, or move forward, the controller converts that command into individual motor-speed adjustments. These adjustments must happen almost instantly because even a small delay can make the aircraft feel loose, unpredictable, or difficult to control.
The controller also receives measurements from sensors that detect angular movement, acceleration, altitude, direction, and sometimes position. It compares the pilot’s desired movement with the aircraft’s actual movement, calculates the difference, and corrects it. This process repeats continuously throughout the flight.
You can think of the controller as a skilled cyclist balancing on a narrow path. The cyclist does not wait until the bicycle falls before making a correction. Instead, tiny adjustments happen constantly and almost unconsciously. In the same way, a drone controller repeatedly adjusts motor output before instability becomes visible.
Core Functions of a Flight Controller
The primary function of a flight controller is stabilization, but its responsibilities extend far beyond keeping the aircraft level. It coordinates almost every major electronic system involved in flight.
1. Reading Sensor Data
The controller gathers information from several sensors. The most important is the gyroscope, which measures rotational movement around the aircraft’s three axes: roll, pitch, and yaw. An accelerometer measures changes in linear motion and helps estimate the aircraft’s orientation relative to gravity.
Some controllers also support a barometric pressure sensor for altitude estimation, a magnetic sensor for directional reference, and a satellite-positioning receiver for location-based navigation. By combining these measurements, the controller can build a more accurate picture of what the aircraft is doing.
Sensor quality matters, but sensor placement and circuit design are equally important. Excessive mechanical vibration can distort measurements, while poor electrical filtering can introduce unwanted noise. A properly designed controller reduces these problems before the data reaches the flight software.
2. Stabilizing the Aircraft
Stabilization is achieved through a feedback loop. The controller compares the requested orientation with the measured orientation and calculates the motor changes needed to reduce the difference. This process must be fast, accurate, and consistent.
For example, imagine that a gust of wind pushes the right side of a quadcopter upward. The sensors immediately detect the change. The controller then adjusts the motor outputs to bring the aircraft back toward the requested angle. The pilot may barely notice the disturbance because the correction happens so quickly.
Different flight modes can provide different levels of stabilization. Some modes allow the aircraft to tilt freely until the pilot commands it back. Other modes automatically return the aircraft toward a level position when the control sticks are released. The best option depends on the pilot’s experience and the purpose of the aircraft.
3. Controlling Motor Output
A multirotor aircraft moves by changing the speed of individual motors. The flight controller calculates the required output for each motor based on pilot commands and sensor feedback.
During a forward movement, for example, the controller changes the balance of thrust so the aircraft tilts in the desired direction. During a yaw movement, it changes the relationship between motors rotating in opposite directions. During a climb, it increases overall thrust while continuing to maintain balance.
This coordination is often called motor mixing. A standard four-motor aircraft uses a relatively simple mixing pattern, while aircraft with six, eight, or more motors require more complex calculations. The controller must support the intended airframe layout and provide enough motor outputs for the build.
4. Managing Communication
A modern controller communicates with numerous devices, including the pilot’s receiver, motor controllers, navigation modules, cameras, telemetry systems, sensors, and data-storage devices. These connections rely on communication ports and supported signal formats.
The number of available ports is therefore an important selection factor. A basic build may need only a receiver connection and motor outputs. An advanced aircraft may also require ports for position data, digital video control, external sensors, current monitoring, and long-range telemetry.
Planning these connections before purchasing the controller prevents a common problem: discovering that the board lacks enough ports after the aircraft is already assembled.
Important Hardware Features
Not every flight controller is designed for the same type of aircraft. Comparing hardware features helps reveal which board is best suited to a particular project.
Processor Performance
The processor handles sensor readings, control calculations, communication, logging, and additional software features. Faster processors can generally manage higher control-loop speeds and more demanding functions without becoming overloaded.
However, the fastest processor is not automatically the best choice. A simple recreational aircraft may perform perfectly with modest processing power. A more advanced platform with detailed logging, navigation functions, multiple peripherals, and high-speed control loops benefits from greater capacity.
The goal is to select enough performance for the intended workload while maintaining reasonable cost, power consumption, and setup complexity.
Gyroscope and Accelerometer
The gyroscope is one of the most critical components on the board. It measures the rotational changes that the controller uses for stabilization. A clean sensor signal helps the aircraft respond accurately, while noisy data can produce oscillation, hot motors, or inconsistent handling.
Some controllers include more than one motion sensor. Dual-sensor designs may offer flexibility or redundancy, depending on the software configuration. Yet the number of sensors matters less than their implementation. Good power filtering, sensible board layout, vibration isolation, and correct software settings often provide greater benefits than simply adding another sensor.
Power Regulation and Filtering
A controller typically receives power from the aircraft’s electrical system and regulates it to levels required by the processor, sensors, and connected equipment. Stable regulation protects sensitive electronics from voltage fluctuations.
Electrical noise can come from motors, switching circuits, long wiring paths, and high-current components. Good filtering reduces the chance that this noise will interfere with sensors or communication signals. Builders should check the supported input voltage, regulated output capacity, and recommended wiring arrangement before installation.
Memory and Flight Logging
Onboard memory allows the controller to record detailed flight information. These logs can include sensor measurements, motor commands, control-loop behavior, and system events.
Flight logs are especially valuable when tuning an aircraft or investigating unusual behavior. Instead of guessing why the drone vibrates or responds poorly, the builder can examine recorded data and identify likely causes. Sufficient storage makes it easier to capture longer flights or higher-detail information.
Common Flight Controller Features
Modern controllers may offer a broad collection of features. The most useful options depend on the aircraft’s mission, but several capabilities are widely valuable:
- Multiple flight modes for manual, assisted, and self-leveling control
- Voltage and current monitoring for better battery awareness
- On-screen flight information for displaying useful data to the pilot
- Flight-data logging for troubleshooting and tuning
- Navigation support for position, speed, and return functions
- Buzzer output for locating the aircraft or signaling warnings
- Expandable communication ports for receivers, sensors, and telemetry
- Configurable motor outputs for different airframe designs
- Fail-safe settings for responding to lost signals or low power
A long feature list can look impressive, but practical usefulness should come first. Buying a controller with dozens of unused functions may increase setup complexity without improving flight performance. A better strategy is to identify the essential requirements, add a reasonable margin for future upgrades, and choose a board that meets those needs cleanly.
How to Select the Right Flight Controller
The best controller is not necessarily the most expensive or powerful model. It is the one that fits the aircraft, the pilot, and the planned application.
Match It to the Aircraft Type
A lightweight racing drone has different requirements from a large aerial surveying platform. Racing aircraft usually prioritize low weight, fast response, compact dimensions, and reliable logging. Photography aircraft often benefit from smooth stabilization, navigation support, and multiple accessory connections. Industrial systems may require redundant sensors, robust power handling, and extensive communication options.
Start by defining the aircraft’s size, motor count, battery voltage, payload, and intended flight style. These details quickly narrow the available choices.
Check the Physical Size
Flight controllers are produced in different shapes and mounting dimensions. A board that is too large may not fit the frame, while a very small board may have limited ports or tightly spaced solder pads.
Measure the available mounting area and confirm the hole spacing before purchase. Also consider connector access, wiring routes, cooling, and space for vibration isolation. A board may technically fit inside the frame yet still be inconvenient to install or maintain.
Count the Required Connections
Create a connection list before selecting the controller. Include every motor output, receiver connection, navigation module, camera-control wire, telemetry device, sensor, buzzer, and accessory.
Then choose a board with enough ports to support the complete system. Leaving one or two ports available for future additions is often worthwhile. It is much easier to reserve expansion capacity during the design stage than to redesign the wiring later.
Confirm Voltage Compatibility
The controller’s input limits must match the aircraft’s power system. Supplying excessive voltage can damage the board, while unstable or insufficient power can cause resets and unreliable behavior.
Builders should also check the output capacity of regulated power rails. Cameras, receivers, sensors, and other accessories can draw meaningful current. The total connected load should remain within the controller’s rated limits, with a safety margin for temporary peaks.
Consider Setup Difficulty
Advanced controllers can provide extensive customization, but they may also require more knowledge and careful configuration. Beginners often benefit from clear labeling, accessible solder pads, straightforward wiring, and well-organized software settings.
Experienced builders may prefer greater control over filtering, motor output, sensor selection, logging, and communication. Neither approach is wrong. The controller should match the user’s technical comfort level as well as the aircraft’s requirements.
Flight Controller Selection Checklist
Before making a final decision, review the following points:
- Does the controller fit the frame and mounting pattern?
- Does it support the required number of motors?
- Is it compatible with the battery voltage?
- Are enough communication ports available?
- Can its regulated outputs power the connected accessories?
- Does it include suitable motion sensors?
- Is flight-data logging available?
- Does it support the required navigation functions?
- Are the solder pads or connectors easy to access?
- Is there enough capacity for future expansion?
This simple checklist helps prevent mismatched components and unnecessary rebuilding. It also encourages builders to evaluate the complete aircraft rather than focusing on a single specification.
Installation and Wiring Tips
Careful installation can improve the performance of even a modest controller, while poor installation can make high-quality hardware behave badly. Mount the board in the correct orientation and configure that orientation accurately in the software. Keep power wiring organized, avoid unnecessary wire length, and separate sensitive signal lines from high-current paths where practical.
Secure the controller firmly without creating excessive mechanical stress. Soft mounting may help reduce vibration, but an overly loose board can move unpredictably. Solder joints should be smooth, clean, and strong, with no stray wire strands or bridges between pads.
Before connecting the battery, inspect every power connection and verify polarity. A current-limited testing device can provide extra protection during the first power-up. Once the system starts correctly, test sensor orientation, receiver movement, motor order, and motor direction before installing propellers.
Tuning for Better Flight Performance
After installation, the controller must be configured for the aircraft. Basic setup includes selecting the airframe layout, calibrating sensors, assigning receiver channels, setting motor outputs, and choosing suitable flight modes.
Tuning adjusts how strongly and quickly the controller responds to movement errors. Settings that are too low may make the aircraft feel soft or imprecise. Settings that are too high may produce oscillations, vibration, noise, or excessive motor heat.
Make small adjustments and test them systematically. Change one group of settings at a time so the result remains understandable. Flight logs can reveal whether an issue comes from poor tuning, mechanical vibration, damaged propellers, flexible frame parts, electrical noise, or another source.
A well-tuned aircraft should feel connected to the pilot without appearing nervous. It should hold the requested movement cleanly, recover from disturbances smoothly, and keep the motors within a safe temperature range.
Safety and Reliability Considerations
Reliability begins before the aircraft leaves the ground. Configure signal-loss behavior, low-voltage warnings, arming rules, and emergency responses carefully. Confirm that the controller can recognize abnormal conditions and respond in a predictable way.
Inspect wiring, connectors, antennas, fasteners, motors, and propellers before each flight. Review the aircraft after hard landings because small cracks or loose connections may create larger problems later. Keep software settings documented so a known working configuration can be restored when necessary.
The controller is a powerful safety tool, but it cannot compensate for every mechanical or operational mistake. Good component selection, careful assembly, disciplined testing, and responsible flying must work together. When these elements are treated as parts of one system, the aircraft becomes more dependable and enjoyable to operate.
Conclusion
A flight controller is the core of a modern drone’s control system. It reads sensor data, interprets pilot commands, stabilizes the aircraft, manages motor output, communicates with connected equipment, and records information that can improve tuning and troubleshooting. Selecting the right controller requires more than comparing processor speed or counting features. Builders should consider aircraft type, physical dimensions, voltage limits, port availability, sensor quality, power regulation, logging capacity, and ease of setup.
A thoughtful selection process produces an aircraft that is easier to assemble, configure, maintain, and upgrade. Just as importantly, it creates a stronger foundation for stable flight and predictable behavior. By matching the controller to the real needs of the project and installing it carefully, builders can achieve excellent performance without unnecessary complexity.
For a practical overview of factory planning, equipment, production requirements, and development stages, read https://www.richpcba.com/blogs/guide-build-fpv-drone-factory-requirements-roadmap/.

























Sign in to leave a comment.