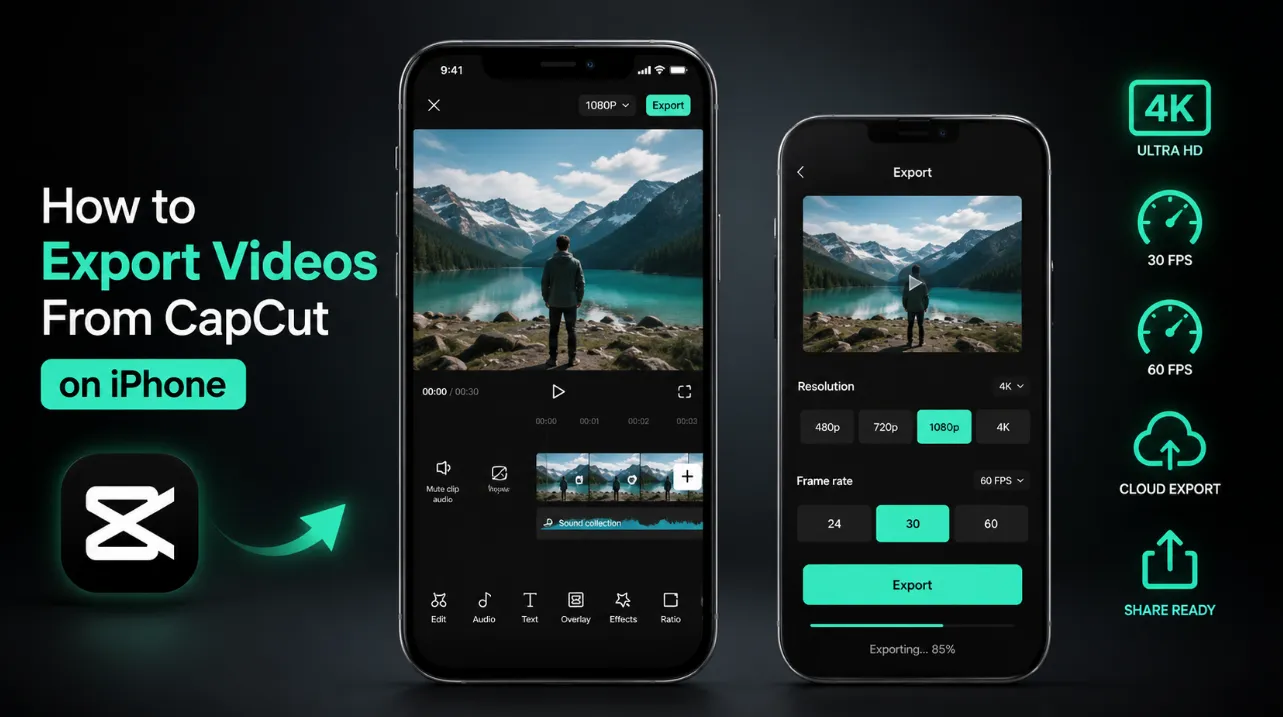

Exporting a video from CapCut on an iPhone is a straightforward process, but choosing the right export settings can make a major difference in the quality of the final file. Whether you are creating a short social media clip, a YouTube video, a personal montage, or professional content, CapCut provides several options that allow you to control video resolution, frame rate, and other output settings. If you simply tap the export button without checking these options, your video may not have the quality, file size, or format you actually want. This guide explains how to export videos from CapCut on iPhone, how to select the best settings, how to avoid common export problems, and how to maintain video quality after editing.
Open Your CapCut Project
The first step is to open CapCut on your iPhone and locate the project you want to export. Make sure you have completed all of your editing before starting the final export. Check the timeline carefully for unwanted clips, incorrect transitions, missing text, audio synchronization problems, or effects that may not have been applied as expected. If you are looking for information related to capcut apk ios, make sure you are using the official iPhone version of CapCut and have your project saved properly before exporting. It is better to identify these issues while the project is still editable than after the final video has already been saved to your device.
If your project contains multiple video clips, photos, music tracks, captions, stickers, or effects, review the complete timeline from beginning to end. Pay particular attention to the final few seconds because accidental blank frames or unwanted clips can sometimes be overlooked. Once you are satisfied with the project, you can prepare the video for export.
Tap The Export Button
After opening and reviewing your project, look toward the upper-right area of the CapCut editing interface for the export control. The exact appearance or placement of interface elements can change between app versions, but the export option is generally easy to identify. Tapping it opens the export screen, where you can review available output settings before creating the final video.
Do not immediately confirm the export if you want to control the quality of your video. The export screen can provide options related to resolution, frame rate, quality, and other settings depending on the current version of CapCut and the capabilities of your iPhone. Taking a few seconds to review these settings can help you avoid producing a file that is unnecessarily compressed or larger than required.
Choose Video Resolution
Resolution is one of the most important settings when exporting a video from CapCut on an iPhone. It determines the number of pixels contained in the final video and therefore affects the amount of visible detail. Common options can include 720p, 1080p, and 4K, although the choices available to you can depend on the original footage, project settings, device, and current CapCut version.
If your original video was recorded in 4K and your project supports 4K editing, exporting at 4K can help preserve the detail captured by the camera. For many social media videos, however, 1080p is sufficient and can provide a good balance between image quality and file size. You should avoid assuming that choosing the highest resolution will always produce the best result. Exporting low-resolution footage as 4K does not recreate genuine detail that was never captured in the original recording.
Select The Frame Rate
Frame rate refers to the number of individual frames displayed every second. Common frame rates include 24fps, 30fps, and 60fps. The appropriate option depends on how your footage was recorded and how you want the finished video to look.
If your original footage was captured at 30fps and your project is designed around 30fps, exporting at 30fps is generally a sensible choice. If you recorded sports, gaming footage, action scenes, or other content at 60fps, maintaining a 60fps export may help preserve smoother motion when the destination supports it.
Increasing the export frame rate does not automatically make 30fps footage behave like genuine 60fps footage. The additional frames have to come from somewhere, so it is generally better to maintain consistency between the original footage, editing timeline, and final export whenever possible.
Select High Quality
After choosing resolution and frame rate, check whether CapCut provides a quality or bitrate-related option for your project. Higher-quality export settings generally preserve more visual information but can also create larger files. The exact controls available can vary depending on the version of the app and project.
For important videos, selecting a higher-quality option can be worthwhile because excessive compression may make fine details look soft or introduce visible artifacts. This can be especially noticeable in videos containing fast movement, detailed backgrounds, text, gradients, or dark scenes.
At the same time, maximum quality is not always necessary. If you are creating a quick social media clip, sending the video through a messaging service, or saving space on your iPhone, a moderate setting may provide a better balance between quality and file size.
Export In 4K
If you want to export a CapCut video in 4K, first make sure that your source footage and project support the resolution. A 4K export generally refers to a video with approximately 3840×2160 pixels in the UHD format. This provides substantially more image detail than Full HD at 1920×1080 pixels.
4K can be useful for high-quality YouTube videos, professional projects, footage intended for larger screens, or videos that may be cropped during post-production. However, 4K files require more storage and can take longer to render and upload.
There is also little benefit in forcing 4K export when your original footage is only 720p or 1080p. In such cases, the application may upscale the video, but increasing the pixel dimensions does not recreate the original detail that was not captured by the camera.
Export In 1080p
For many iPhone creators, 1080p remains a practical export resolution. Full HD provides good visual quality while producing smaller files than 4K, making it convenient for social media, messaging, online sharing, and everyday video storage.
If your source footage was recorded in 1080p, exporting at 1080p can maintain the native resolution without unnecessary upscaling. It can also make the final file easier to upload when you have limited internet bandwidth.
For creators who primarily publish short-form social media content, 1080p can therefore be an effective compromise between sharpness, compatibility, processing time, and storage requirements.
Check Video Orientation
Before exporting your CapCut project, confirm that the orientation matches the platform where you intend to publish it. Vertical videos are typically designed for mobile-first short-form content, while landscape videos are commonly used for traditional video platforms and wider displays.
If your project was designed vertically, check that important subjects, captions, logos, and other elements remain within the visible area. Exporting with the wrong orientation can result in unnecessary cropping or black borders when the video is viewed elsewhere.
The project canvas should ideally be configured correctly before editing rather than attempting to fix the orientation after the final export. This gives you greater control over composition and prevents important visual elements from being cut off.
Check Audio Quality
Video export is not only about resolution. Audio quality can have an equally important effect on the overall viewing experience. Before exporting, listen to the project and make sure dialogue, music, sound effects, and voiceovers are balanced properly.
Check for sudden volume changes, distortion, unwanted background sounds, or sections where music overwhelms speech. If your project contains voice narration, make sure the voice remains clear and understandable throughout the video.
Once the export is complete, play the finished file on your iPhone and listen carefully. Sometimes a problem that is not obvious during quick timeline editing becomes more noticeable when watching the complete exported video.
Save The Exported Video
After selecting your preferred settings, confirm the export and allow CapCut to render the project. The time required can vary considerably depending on the length and complexity of the video, the resolution, the number of effects, and the processing capabilities of your iPhone.
Avoid closing the application or interrupting the export unnecessarily. Large 4K projects with numerous effects and transitions can require more processing time than short 1080p clips.
When the export finishes successfully, CapCut will generally provide options for saving or sharing the completed video. Save it to your iPhone's Photos library if you want to access the finished video alongside your other media.
Check The Final Video
Do not assume that an exported video is perfect simply because CapCut reports that the export has finished. Open the final file in the Photos app and watch it from beginning to end. Check the resolution, image sharpness, audio, transitions, captions, and overall presentation.
Look particularly closely at sections containing fast movement, small text, shadows, gradients, and detailed backgrounds. These areas can make compression problems easier to notice.
If you discover a problem, return to the original CapCut project instead of repeatedly editing the compressed exported file. Keeping the original project allows you to make corrections while retaining the highest-quality source material.
Avoid Common Export Problems
Several common mistakes can reduce the quality of an exported CapCut video. One of the most frequent is selecting a lower resolution than the original footage requires. Another is exporting at a frame rate that does not match the project, which can sometimes produce unwanted motion characteristics.
Excessive compression is another potential issue. While smaller files are easier to store and share, aggressive compression can make footage look blurry or introduce blocky artifacts. Repeatedly exporting and re-importing already compressed videos can also gradually reduce quality.
Creators should also avoid assuming that a 4K setting automatically makes every video look professional. Good export quality begins with good source footage and continues through appropriate editing and encoding decisions.
Export For Social Media
If you are exporting a CapCut video specifically for social media, consider the requirements of the destination before selecting your settings. Different platforms may use different preferred aspect ratios, resolutions, and compression systems.
For vertical short-form content, a 9:16 project is commonly appropriate. For landscape videos, 16:9 is widely used. The best resolution also depends on the platform and content type.
It is generally better to upload a clean, high-quality export rather than intentionally creating a poor-quality file because the platform will compress it anyway. Social platforms often process uploaded videos themselves, so giving them a good-quality source provides a better starting point.
Use The Right CapCut Version
iPhone users may encounter different search terms for CapCut, including references to a capcut apk ios download. It is important to understand that iOS applications are distributed differently from Android APK files, so users should be careful with websites claiming to provide unofficial iPhone APK downloads or modified versions.
For reliable performance, updates, security, and access to the intended features, use the legitimate CapCut application available through Apple's official app distribution system. Unofficial modified applications can create security, privacy, compatibility, and account-related risks.
Using the legitimate app also makes it easier to receive current updates and follow the latest export options provided by the developer.
Best Export Settings
There is no single export setting that is perfect for every CapCut project. A useful starting point is to match the export resolution to the source footage, keep the frame rate consistent with the project, use a high-quality setting when preserving detail is important, and select an aspect ratio appropriate for the destination.
For many standard social media projects, 1080p can provide a strong combination of quality and manageable file size. For projects recorded and edited in 4K, a 4K export can preserve additional detail when supported by the device and destination.
The most important principle is consistency. Avoid unnecessarily converting resolution or frame rate during export, and choose settings according to the actual requirements of your video.
Final Tips
Before exporting a video from CapCut on iPhone, review the entire project, confirm the orientation, check the resolution, match the frame rate to your source material, and select an appropriate quality level. Make sure your audio is clear and that important text or graphics are positioned correctly.
After exporting, watch the final video rather than immediately uploading it. This gives you an opportunity to catch rendering problems, missing effects, audio issues, or unexpected cropping before the video reaches your audience.
If you regularly create videos, maintaining the original project files and source footage is also useful. It allows you to make future changes without repeatedly editing and compressing an already exported file.
Conclusion
Learning how to export videos from CapCut on iPhone is simple once you understand the main export settings. After completing your edits, open the export menu, select an appropriate resolution and frame rate, choose a suitable quality level, and confirm that the video's orientation matches your intended platform. For high-quality projects, use the highest practical settings supported by your source footage rather than increasing resolution unnecessarily.
For most everyday social media content, 1080p can provide an excellent balance between quality and file size, while 4K is useful when the original footage and destination justify the larger file. Always review the finished export before publishing, particularly when your project contains important text, detailed visuals, or professional audio. With the right settings and a careful workflow, you can export polished, high-quality videos from CapCut on your iPhone while avoiding unnecessary compression and compatibility problems.



















Sign in to leave a comment.