In the ever-evolving world of digital marketing and brand development, visual identity plays an essential role in creating a memorable and trustworthy brand presence. Whether you’re promoting products, services, or events, your brand’s visual elements—such as banners—are key to attracting attention and building recognition. A well-crafted banner can do wonders for your brand’s visibility and messaging, helping to convey your message more clearly and professionally.
But how do you create those eye-catching, professional banners that align with your brand? That’s where a Banner Maker App comes in. These apps make it incredibly easy for anyone—whether you’re a business owner, marketer, or content creator—to design stunning banners that reflect your brand's identity, even without a background in graphic design.
In this article, we will explore how to effectively use a Banner Maker App to enhance your brand’s visual identity. We’ll discuss its benefits, how to choose the right app, and provide a step-by-step guide to help you get started creating banners that stand out.
Why Visual Identity Matters for Your Brand
Visual identity encompasses the visual elements of your brand, including the logo, color scheme, typography, images, and overall design style. These elements work together to create a cohesive and recognizable presence that helps your audience instantly recognize your brand across various platforms.
In today’s competitive market, consumers are constantly bombarded with advertisements and messages. With limited attention spans, it’s crucial that your brand quickly grabs attention and communicates its core message. Visual identity is one of the most effective tools in achieving this goal.
Banners, as visual tools, are particularly effective in helping convey your brand’s message quickly. Whether displayed on websites, social media platforms, or email newsletters, banners serve as a powerful visual element to increase brand awareness, promote offers, and drive traffic.
However, creating banners that reflect your brand identity—while being professional, eye-catching, and effective—requires the right tools. This is where a Banner Maker App can help.
Benefits of Using a Banner Maker App for Your Brand
1. Easy-to-Use and Accessible: One of the biggest advantages of using a Banner Maker App is its ease of use. These apps are designed with simplicity in mind, so even if you don’t have any graphic design experience, you can still create professional-looking banners. With user-friendly interfaces and drag-and-drop functionality, anyone can create a stunning banner in just a few clicks.
2. Time and Cost Efficiency: Hiring a professional designer to create banners can be expensive and time-consuming. With a Banner Maker App, you can design banners in minutes, saving both time and money. You can create as many banners as you need without incurring extra costs.
3. Customization Options: While pre-designed templates can help you get started, Banner Maker Apps offer extensive customization options that allow you to align your designs with your brand’s visual identity. From adjusting colors and fonts to adding logos and images, these apps give you full creative control over your designs.
4. Flexibility Across Platforms: Banners are used across various platforms, from social media to email marketing to your website. A Banner Maker App ensures that your banners are optimized for multiple platforms, offering the right sizes, resolutions, and formats for each platform.
5. Increased Engagement and Brand Recognition: Banners designed with a Banner Maker App are more likely to attract attention, increasing engagement with your audience. Eye-catching banners that align with your brand’s visual identity help reinforce your brand’s message and create a lasting impression with potential customers.
Choosing the Right Banner Maker App
With numerous Banner Maker Apps available in app stores today, it’s important to choose one that fits your needs and helps you elevate your brand’s visual identity. When selecting the best app, here are a few factors to consider:
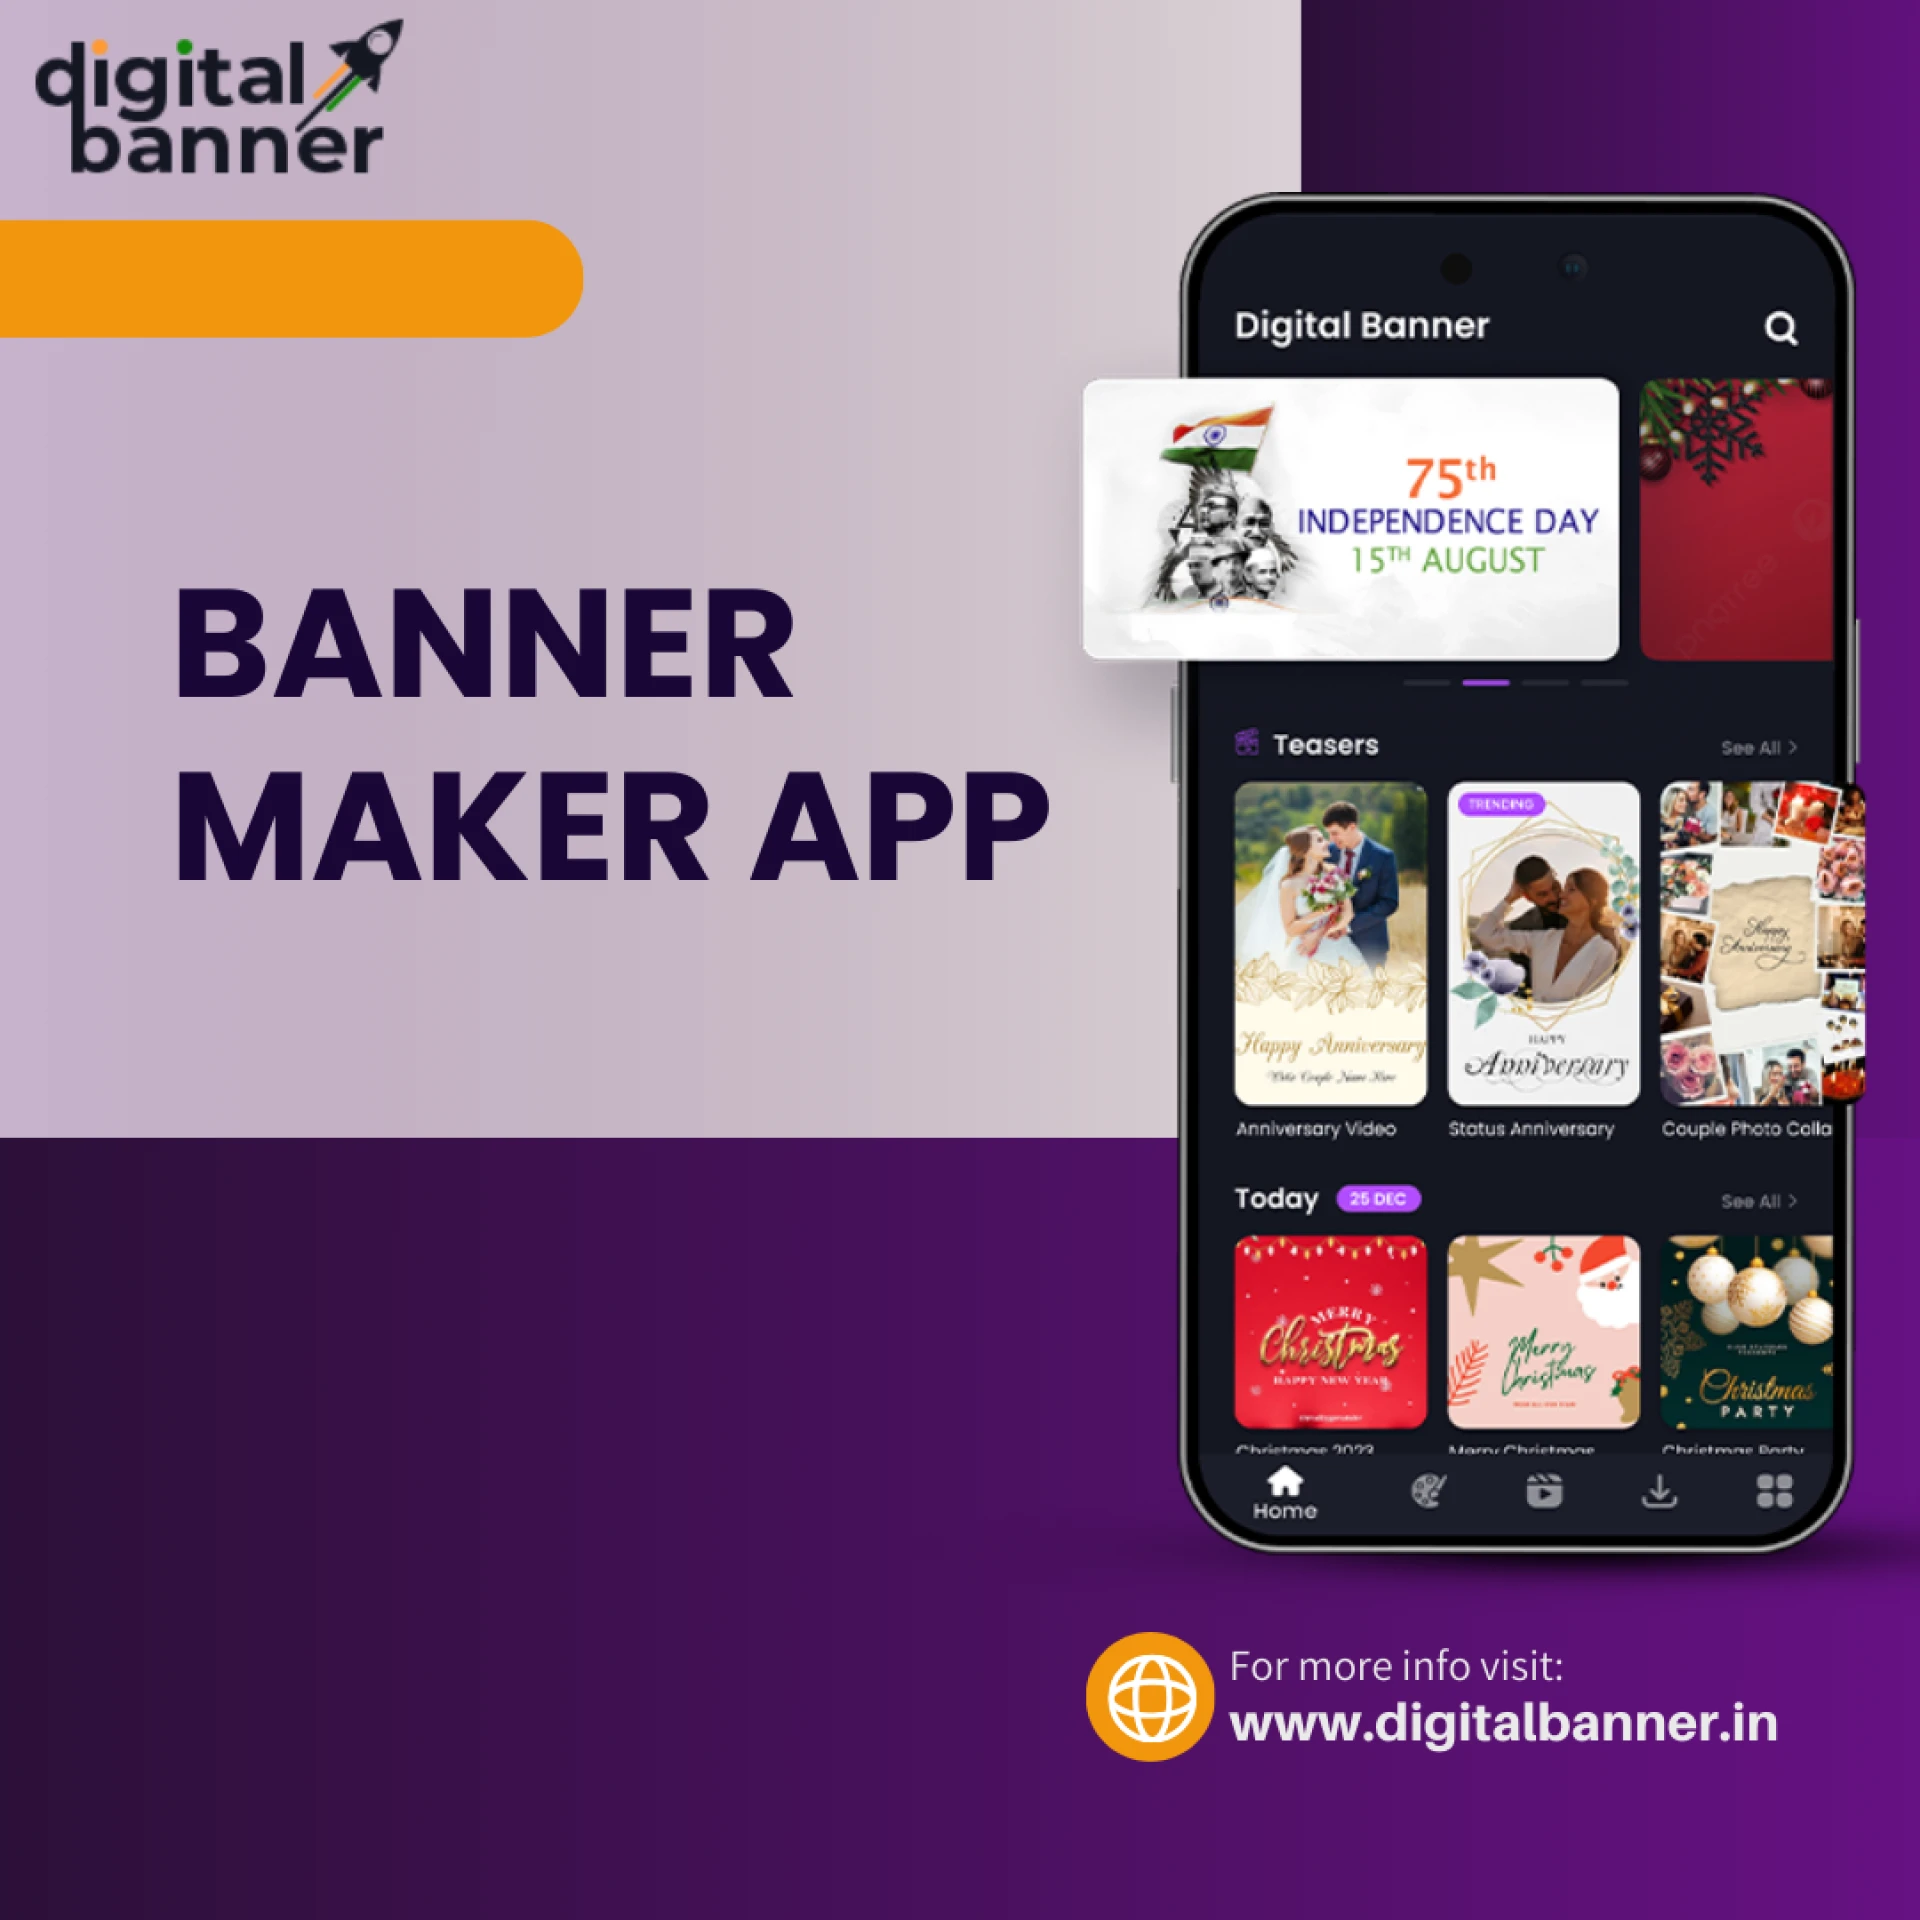
- Ease of Use: Look for an app with an intuitive user interface and a simple design process. You don’t want to waste time figuring out complex features. Apps like Digital Banner for Android and Digital Banner on iOS are both highly rated for their user-friendly design.
- Customizability: Choose a Banner Maker App that offers plenty of customization options, including the ability to upload your own images, adjust text size and style, and change color schemes. The more flexibility the app provides, the better you can tailor the banners to your brand.
- Templates and Design Tools: A good app should come with professionally designed templates that are easily customizable. Templates help you get started quickly, while design tools like background removers, filters, and color palettes allow you to add your own personal touch.
- Cross-Platform Compatibility: Make sure the app you choose is compatible with various platforms, so you can create banners that are optimized for different uses—whether for social media posts, email headers, or website banners.
- Cost: Many Banner Maker Apps are free, but some come with premium features that require a subscription or one-time payment. Evaluate whether the app offers value for your money by providing the features you need to design professional banners.
Step-by-Step Guide to Using a Banner Maker App to Boost Your Brand’s Visual Identity
Now that you’ve chosen the right Banner Maker App, let’s dive into the process of creating banners that boost your brand’s visual identity.
Step 1: Define Your Brand’s Visual Identity
Before you start designing your banners, take a moment to define your brand’s visual identity. This includes understanding your brand’s color scheme, fonts, and overall style. Your banners should align with these visual elements to create a cohesive brand presence across all touchpoints.
- Colors: Choose a color palette that reflects your brand’s personality. For example, blue might evoke trust and professionalism, while red can represent energy and passion.
- Typography: Select fonts that are easy to read and consistent with your brand’s style. Keep your fonts consistent across all banners to maintain brand identity.
- Logo and Graphics: Make sure to include your brand’s logo in the banner. You can also use other branded images or icons to enhance the visual appeal.
Step 2: Choose the Right Template or Start from Scratch
Once you’ve defined your visual identity, open the Banner Maker App and choose a template that aligns with your design goals. If you prefer to start from scratch, you can begin with a blank canvas and customize it based on your brand’s elements.
- Templates: Choose from a wide range of pre-designed templates that match the purpose of your banner, whether it’s for a sale promotion, a social media post, or an event announcement.
- Custom Layout: If you’re aiming for something unique, start with a blank template and design your banner from scratch using your brand’s colors, fonts, and images.
Step 3: Customize Your Banner Design
With your template selected, it’s time to customize the design to suit your brand’s visual identity.
- Text: Add your desired text, such as a headline, subheading, or call to action (CTA). Use your brand’s fonts to maintain consistency and ensure the text is easy to read.
- Images and Logos: Upload your brand’s logo and any other images that represent your brand or product. Make sure the images are high quality and correctly sized.
- Color Scheme: Adjust the color scheme of the banner to match your brand’s colors. The Banner Maker App should allow you to easily change background colors, text colors, and accents to align with your visual identity.
Step 4: Optimize for the Platform
Different platforms require different banner sizes and formats. Use the Banner Maker App to optimize your design for the specific platform where the banner will be displayed.
- Social Media Banners: Adjust the size and resolution to fit the platform you’re posting on (e.g., Facebook, Instagram, Twitter).
- Website Banners: Make sure the banner dimensions are suitable for website headers, sidebars, or landing pages.
- Email Banners: Ensure that the banner is appropriately sized for email marketing campaigns, without being too large to load quickly.
Step 5: Download and Publish Your Banner
Once you’re satisfied with your design, download the banner in the appropriate format (JPEG, PNG, etc.) and resolution. The Banner Maker App should provide options for downloading your banner in high-quality formats suitable for both web and print use.
You can now upload the banner to your website, social media platforms, or email marketing campaigns, or use it in any other part of your marketing strategy.
Step 6: Analyze and Adjust for Better Results
Once your banner is live, monitor its performance. Track metrics like engagement, clicks, and conversions to determine how effective the banner is in promoting your brand. If necessary, make adjustments to improve its performance, such as tweaking the text, color scheme, or call to action.
Conclusion
Using a Banner Maker App is one of the most efficient and cost-effective ways to boost your brand’s visual identity. These apps allow you to create professional-quality banners that align with your brand’s colors, typography, and messaging, even if you don’t have a design background. By following the steps outlined above, you can design banners that grab attention, increase engagement, and reinforce your brand’s presence across all platforms.
Whether you’re promoting a special offer, launching a product, or simply reinforcing your brand’s identity, a Banner Maker App can be a valuable tool in your marketing toolkit. So why wait? Start designing today and watch your brand’s visual identity come to life with stunning, eye-catching banners that drive results.


Sign in to leave a comment.