Do It Yourself Drones are becoming more & more popular These days, and building your drone can be both a pleasurable and informative adventure. In this Blog, we will discuss how to build drones using drone kits that let you modify and construct your drone. Let's get started!
Step 1: Choose the suitable drone kit:
Before selecting the drone you want, select a kit compatible with your ability and requirements. There are various drone kits available, from basic options for beginners to advanced models for seasoned drone fans. Consider factors like price, desired features, and possible upgrades before choosing.
Step 2: Gather the necessary tools and equipment:
You'll need several pieces of equipment and tools to assemble your drone. Here is a list that includes frequently utilized things:
Screwdrivers (both Phillips and flathead)PliersWire cutters/strippersSoldering iron and solderHeat shrink tubingMultimeterSafety gogglesTweezersMat for antistatic (optional but strongly advised)Step 3: Go through the Instruction Manual:
Before beginning the assembly process, make sure you read the instructions manual for this drone kit. Learn about the various elements, their roles, and their links. Being aware of the steps will help you prevent mistakes and aid in the resolution of all issues.
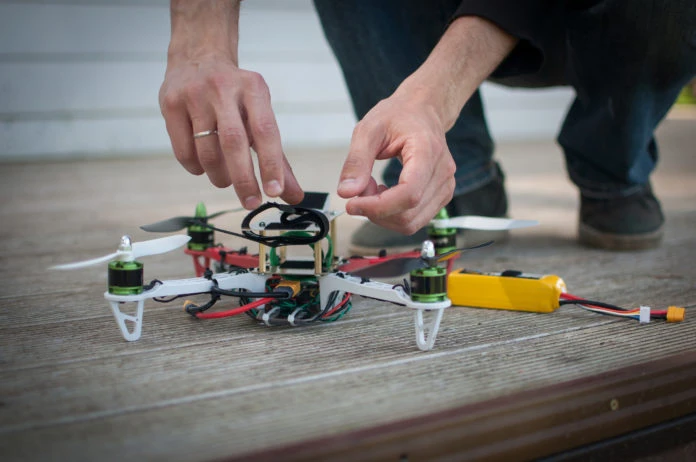
Step 4: The first step is to assemble your drone's frame following the guidelines:
It is usually about fixing the arms, the landing gear and the central body construction. It is important to ensure that all screws are tightened properly. However, you must be mindful not to force it too tight and damage the structure.
Step 5: Connect the Flight Controller to the Drone.
The flight controller is the electronic brain of the drone responsible for stabilizing the drone and the flight controls. Follow the steps to put the controller onto the frame and ensure it is perfectly set and properly connected. Also note any other parts which require connection to the frame, such as GPS modules and power distribution boards and others.
Step 6: Connect your electronic speed controllers (ESCs):
The ESCs determine the speed of each motor. Attach the ESCs to the motors on the outputs of the flight controller, and ensure that you have the proper wiring and the correct polarity. Use the soldering and heating shrink tubing to join the ESCs and ensure no short circuits.
Step 7: Connect motors and Motor Propellers:
Attach motors at the proper places on the drone frame, ensuring they are correctly placed. Connect them with the screws that are supplied. After that, you can place the propellers onto their motor shafts. Check that they are snug but not overly squeezed. Keep track of the proper orientation of your propeller (clockwise and counterclockwise) to ensure that the propeller is stable during flight.
Step 8: Connect radio transmitter and receiver:
This radio transmitter and receiver allow you to operate the drone using a remote. Follow the steps for connecting your receiver to the controller for flight. Connect the receiver with the transmitter using the directions of the manufacturer. Ensure your controls are correctly adjusted and the drone responds to your input.
Step 9:Connect and verify your Power System:
Connect the battery to the power distribution board or flight controller based on the settings of the kit. Check the orientation of the battery and make sure the connection is secured. Switch on the drone and check the motor's response to throttle commands by using the transmitter. Check that the motors rotate in the proper direction and modify the settings if needed.
Step 10: Fine-tuning and Testing After the initial configuration, the next step is fine-tuning and Testing. When the initial configuration is completed, it is possible to modify the drone's performance using the software offered by the manufacturer. Change parameters such as PID values, flight modes, and stabilizer settings to improve efficiency. Perform thorough inspections before the flight.
To conclude
Creating drones using drone kits is an exciting and profitable project that allows you to customize the drone you have built to suit the needs of your business. When you follow this step-by-step guide and the directions given, you can get your drone ready to start flying. Enjoy yourself and take advantage of the flight!
Always follow all laws in your area and directions in using your drone, and respect the privacy and safety of those around you.
If Anyone want suggestion for a good drone kit, then you may refer to this link: "DRONE KIT"


Sign in to leave a comment.