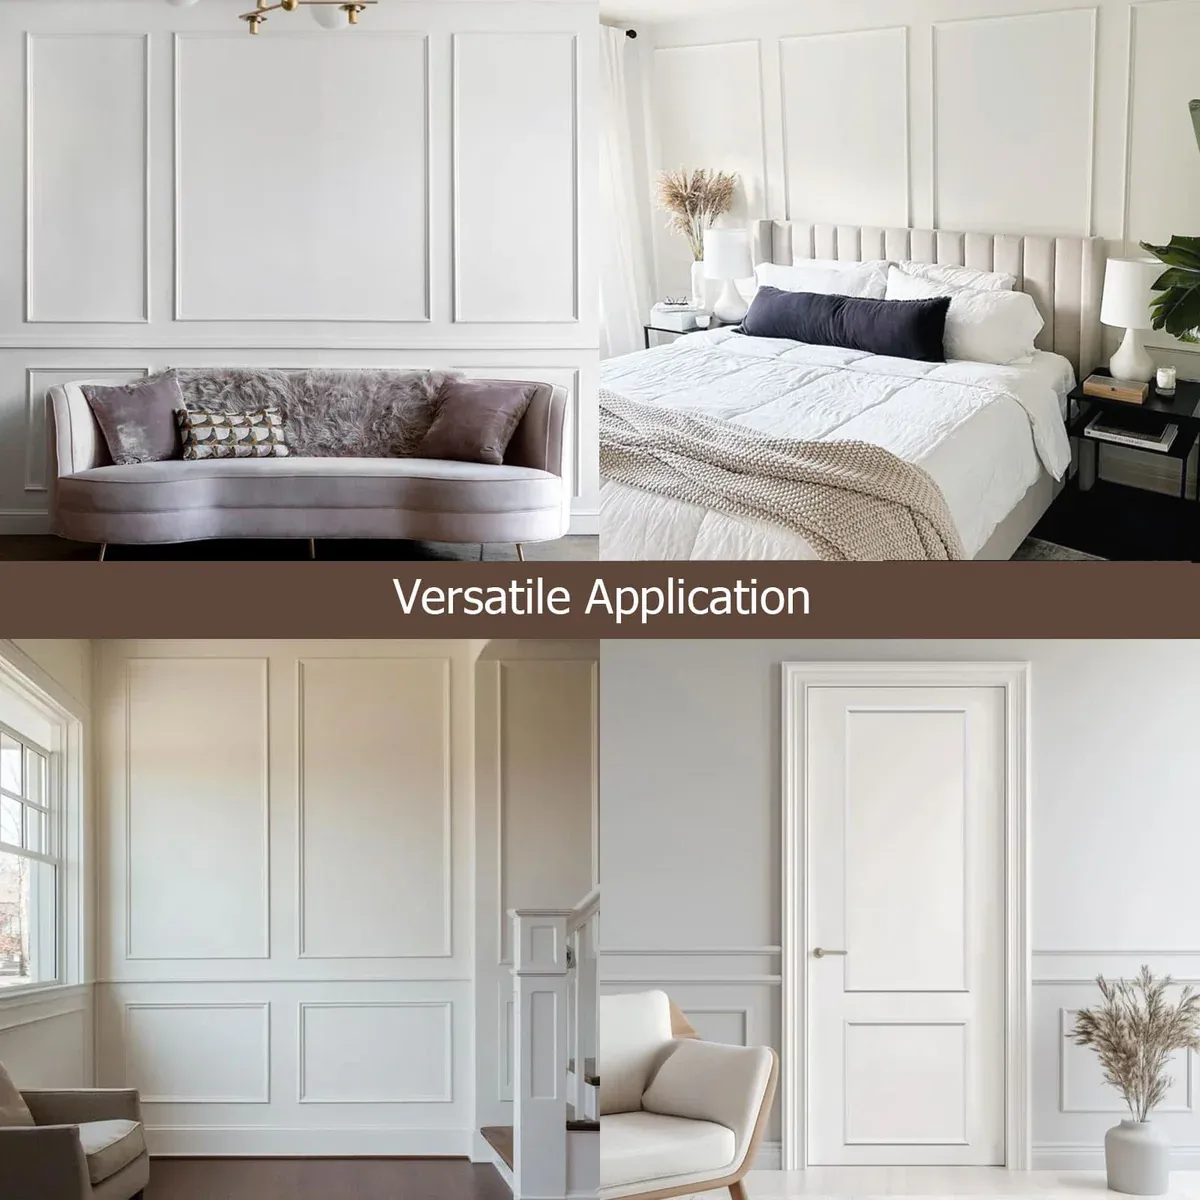
When plain walls start to feel more like a blank stare than a blank canvas, many homeowners dream of adding architectural character without the cost or chaos of a full renovation. Enter the premium wall molding kit a thoughtfully packaged solution that brings timeless elegance into any room. Unlike traditional molding projects that require measuring every angle from scratch, cutting countless trial pieces, and making multiple trips to the hardware store, these all-in-one kits come with pre-cut or easily adjustable components designed for consistency and ease. The result is a high-end, custom look that transforms ordinary drywall into a feature worth admiring, whether you lean toward classic Victorian paneling or sleek modern geometric designs.
Why Choose a Kit Instead of DIY From Scratch
The difference between wrestling with raw materials and unboxing a coordinated system is the difference between a weekend project and a month-long headache. When you buy molding by the foot, you also sign up for figuring out corner joints, calculating spacing, and hoping your saw cuts match perfectly on all four sides of a panel. Premium kits eliminate most of that guesswork by providing detailed layout guides, pre-measured design ratios, and often even adhesive backing or alignment spacers. For someone who loves the look of wainscoting or picture frame molding but doesn’t own a compound miter saw, this is a genuine lifeline. You’re not sacrificing quality for convenience either—these kits typically use high-density polyurethane or primed wood that resists warping, moisture damage, and the tiny dents that come from everyday living.
Materials That Stand Up to Real Life
Not all molding materials behave the same way after installation, and that’s where premium kits earn their price tag. Cheaper options made from lightweight foam can crumble under a vacuum cleaner bump or show every fingerprint, while solid wood might twist as humidity changes through the seasons. The sweet spot in most high-end kits is durable polyurethane or resin-based composites that feel substantial but remain lightweight enough to attach with construction adhesive and a few pin nails. These materials accept paint beautifully, hold crisp detail on ornate profiles, and resist the expansion and contraction that causes miters to open up over time. In a bathroom or kitchen, where steam and temperature swings are daily realities, this durability becomes especially valuable—your elegant wall treatment won’t develop mysterious gaps six months later.
Choosing the Right Pattern for Your Room’s Personality
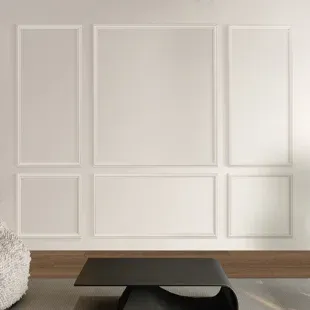
A molding kit should complement your space, not compete with it. For narrow hallways or powder rooms, tall vertical paneling or simple rectangular grids add height and interest without overwhelming the eye. In a spacious living room or dining area, you might lean into larger box patterns, layered frames, or even arched-top designs that mimic classic plasterwork. Contemporary kits now include asymmetrical arrangements and slim, minimalist profiles that suit modern farmhouse or mid-century aesthetics. Before buying, tape off sample shapes on your wall and live with them for a day—you’ll quickly see whether a busy pattern feels cozy or chaotic. The best kits offer design flexibility, allowing you to space panels closer together for a traditional library feel or farther apart for breezy coastal charm.

Installation Steps That Actually Make Sense
Even with a premium kit, installation requires patience, but the process follows a logical rhythm that most DIYers can handle over a long weekend. You’ll start by mapping your wall layout directly on the surface using a level and painter’s tape, which lets you adjust spacing before any permanent attachment. Next comes cutting—if your kit requires mitered corners, use a fine-tooth saw and a miter box for accuracy; many modern kits now feature butt-joint designs that eliminate angled cuts entirely. Apply a continuous bead of heavy-duty construction adhesive to the back of each molding piece, press it firmly against the wall following your tape guide, and reinforce with a few 18-gauge pin nails at stud locations. Fill nail holes, caulk the seams where molding meets the wall, and stand back to admire how the sharp lines instantly elevate the entire room.
Painting and Finishing Like a Pro
Raw molding from a kit rarely arrives in your final color, which is actually good news because it lets you match your trim exactly to your wall scheme. Before installation, apply a quality primer—especially important for polyurethane, which can repel paint otherwise. Once the molding is up and all gaps are caulked, use a small foam roller for the broad faces and an angled brush to cut into corners and details. For a seamless, built-in look, paint the molding the same color as your wall but in a glossier sheen, such as satin or semi-gloss. This creates subtle shadow lines where light hits the profile without screaming for attention. Prefer high contrast? White or cream molding against a deep navy or charcoal wall delivers dramatic elegance that feels both classic and current.
Maintaining Your Molding for Years of Beauty
Unlike trendy decor that fades after a season, well-installed wall molding ages gracefully with minimal effort. Dust weekly with a soft microfiber cloth or the brush attachment on your vacuum—those decorative grooves do collect particles over time. For deeper cleaning, a barely damp cloth with mild dish soap works wonders, but avoid abrasive scrubbers that can dull the paint finish. Inspect corners and seams every six months; if a tiny gap appears due to seasonal movement, a bead of paintable latex caulk and a touch-up coat of paint will make it vanish. The real maintenance secret is simply treating the molding as part of your room’s architecture rather than as an accessory—once it’s painted and in place, it becomes as permanent and low-fuss as your baseboards or window casings.
The Unexpected Value Boost of Architectural Detail
Real estate professionals will tell you that buyers notice trim work, often subconsciously, as a marker of quality and care. A room with well-proportioned wall molding feels finished, intentional, and more expensive than its square footage suggests. While a full gut renovation might recoup sixty or seventy percent of its cost at resale, a few hundred dollars spent on a premium molding kit can shift a buyer’s entire impression of a home’s upkeep. Beyond the financial aspect, though, there’s the daily reward of walking into a space that feels special. That first morning coffee in a dining room with elegant panels, or the quiet satisfaction of a hallway that now has rhythm and purpose—those are the moments that turn a house into a home, one carefully placed piece of molding at a time.


Sign in to leave a comment.