A rear window can look “mostly fine” and still be unsafe.
Sometimes it’s obvious — the glass is smashed after a break-in or a reversing mishap. Other times it’s subtle: a spreading crack, a leaking seal, or the demister that stops working in winter. Either way, the rear window isn’t just a bit of glass. It affects visibility, cabin pressure, water tightness, and how the car behaves in an emergency.
If you’re in Sydney or nearby (Wollongong, the Central Coast, Newcastle), the challenge is usually the same: you want it fixed properly without your car being off the road longer than it needs to be, which is exactly why having access to a rear glass replacement service for cars and utes in Sydney can make the situation far less stressful.
This guide walks through when replacement is needed, what happens during the job, what influences cost, and how to make good decisions under pressure.
One quick truth: rear glass is less forgiving than people think.
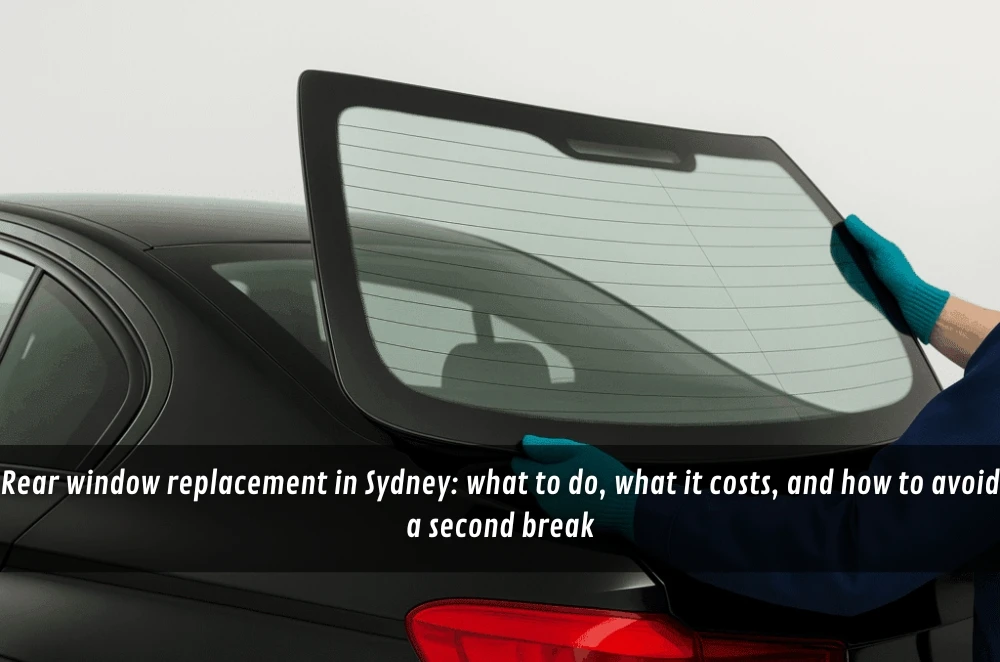
What counts as “rear window” glass, and why it’s different
The rear window is normally made from toughened (tempered) safety glass. That matters because it behaves differently from a front windscreen.
A windscreen is typically laminated (layers with a plastic interlayer), so it can crack and stay in place. The rear glass usually can’t be “repaired” the same way. When it fails, it tends to shatter into small cubes, which is safer for impact but messy and disruptive.
Rear windows also commonly include:
- Demister lines (the heating element)
- Antenna elements in some models
- Camera or sensor mounts (varies by vehicle)
- Tinting or factory privacy glass
- Trim and seals that are easy to damage if removed roughly
So even if it sounds like a straightforward swap, the details matter.
A lot.
The most common causes we see around Sydney and the surrounding areas
Rear window damage usually comes from a handful of scenarios:
- Break-ins (rear glass shatters fast and is quieter than you’d expect)
- Reversing impacts (poles, low walls, garage doors, tow bars)
- Falling objects (tree limbs after storms, loose items in a garage)
- Thermal stress (less common, but it happens with rapid temperature changes)
- Body flex after a previous repair or minor accident (cracks return)
If you’re near the coast — Central Coast, Wollongong, Newcastle — salt air can also speed up wear in trims and seals, which can contribute to leaks and rattles over time.
Replace or wait: how to tell if it’s urgent
Not all damage is equal, but rear glass problems tend to get worse quickly.
It’s urgent if:
- The glass is shattered or missing
- You can’t see clearly through it (shards, deep scratches, heavy cracking)
- Rain can enter the cabin (or you can smell damp)
- The window is loose, vibrating, or “popping” under pressure
- The demister is damaged and you drive early mornings or at night
Even if you can still drive, a compromised rear window can become a safety issue fast — especially in wet weather or heavy traffic.
And Sydney weather loves a surprise downpour.
You can sometimes plan it (but don’t ignore it) if:
- There’s a small crack with no spreading and no water ingress
- The seal looks intact and the glass is stable
- You can keep the car secure and dry until it’s fixed
A practical rule: if you wouldn’t be comfortable doing the M1 in the rain with it, treat it as urgent.
Step 1: What to do immediately after the rear window breaks
When rear glass shatters, the first hour matters — mostly for safety and preventing further damage.
- Check for injuries first. Those small glass cubes can still cut, especially in fabric seats and child seats.
- Don’t slam doors. With an open rear window, cabin pressure changes can blow loose shards into the car.
- Remove loose glass carefully. Thick gloves and a brush help. Avoid sweeping glass into seat rails.
- Cover the opening temporarily. A proper plastic sheet and tape is better than cardboard. Don’t tape directly to paint if you can avoid it.
- Secure the vehicle. Rear windows are an easy entry point — park somewhere safe and well-lit.
One-line reality check: driving at 80 km/h with a plastic sheet flapping behind you is nobody’s idea of fun.
Operator experience moment: what we notice on real jobs
Over the years, one thing stands out: most “rear window jobs” aren’t only about glass.
It’s often the trim clips, the seal condition, and the cleanup that decide whether the car feels normal again. The cars that come back with rattles or leaks usually had rushed prep — tiny shards left in the hatch, old adhesive not fully removed, or trim forced back on.
It’s the unglamorous stuff that makes the difference.
What happens during a rear window replacement
A proper replacement is a sequence of careful steps, not brute force.
Assessment and prep
The technician confirms the exact glass type for your model (including tint, demister, and any integrated elements). The area is masked to protect paint and trim.
Removal
Damaged glass is removed safely, and the old adhesive/seal material is cleaned back to the correct surface. This part needs patience.
Cleanup (the part people underestimate)
Glass fragments hide everywhere: hatch cavities, seat folds, spare wheel wells, and under floor mats. A good cleanup is not “nice to have”. It prevents rattles, torn upholstery, and future injuries.
Installation
The new rear glass is installed with the correct adhesive and positioned precisely. Connections for demister/antenna are handled carefully.
Curing and checks
Adhesives often need a set time before the vehicle can be exposed to heavy water or high-pressure washing. The demister and basic sealing are checked.
If you want to see what a proper rear glass replacement service looks like in practice, this overview from Windscreen Replacers' rear window replacement in Sydney gives a clear sense of what’s typically included without the fluff.
What influences the cost (without guessing numbers)
People understandably ask, “How much will it be?” The honest answer: it depends on the vehicle and the glass.
Here are the main drivers:
- Vehicle make/model and glass availability (some are common, some are niche)
- Factory tint or privacy glass
- Demister/antenna integration
- Hatchback vs sedan vs SUV (access and trim complexity differ)
- Extent of cleanup needed (especially after a full shatter)
- Mobile service vs workshop (travel and setup can affect pricing)
- Aftermarket vs OEM-equivalent glass (quality and fit can vary)
One-line tip: if the quote seems oddly low, ask what they’re excluding — especially cleanup and trim re-fit.
Insurance and claims: quick, practical notes for NSW drivers
Many comprehensive policies in Australia include windscreen/glass cover, but the detail varies. Some cover one claim without affecting no-claim bonuses, some don’t. Some treat rear glass differently to front windscreens.
Before you authorise anything, it helps to:
- Check whether glass cover is listed separately
- Ask about excess for glass claims
- Confirm whether your policy prefers a certain process (you can usually choose, but check)
It’s also worth taking clear photos of the damage right away, especially after a break-in.
Step 2: How to choose a rear window replacement service without overthinking it
You don’t need a PhD in auto glass. You just need a few good checks.
Ask these questions
- Is the replacement glass tinted to match (if required)?
- Will the demister be connected and tested?
- What’s included in cleanup (and where will they clean)?
- Are trim clips/seals inspected and replaced if needed?
- What’s the safe driving / curing guidance after the job?
- If mobile, do they have the setup to handle full shatter cleanup on-site?
Look for these signs
- Clear explanation of what’s being done (not just “swap the glass”)
- Attention to sealing and trim, not only the glass panel
- Willingness to put practical care instructions in writing
One-line truth: you’re not paying for “glass”; you’re paying for the car to be watertight, quiet, and safe again.
A mini walkthrough: an Aussie small business vehicle in the real world
A Sydney-based electrician rocks up to the van and finds the rear glass smashed after a break-in.
First, they photograph the scene and check the tool storage for missing gear.
They carefully remove loose glass, then cover the opening with plastic so the van can be moved.
They ring their insurer to check if glass is covered and what the excess is.
They book a replacement that includes full interior and hatch-area cleanup.
After the job, they avoid high-pressure washing for the recommended cure period.
Then they do a quick vacuum pass a week later to catch any stray cubes that worked loose.
That’s the difference between “replaced” and “sorted”.
Three practical opinions (to keep you out of trouble)
Prioritise a proper seal and cleanup over chasing the cheapest quote.
If you drive early or do highway commutes, don’t downplay a dead demister.
Mobile replacement is great — as long as the provider can handle full shatter safely.
Aftercare: how to avoid leaks, rattles, and repeat issues
Once the rear window is replaced, a few habits help:
- Avoid slamming doors for the first day if advised (pressure changes can stress fresh adhesive)
- Don’t use high-pressure washing near the edges until the adhesive is fully cured
- If you notice a rattle, get it checked early — it’s often a shard or clip, not the new glass
- Test the demister on a cool morning; it should clear evenly
- Keep an eye out for fogging or water trails after rain
One-line reminder: water always finds the weak spot.
Rear window replacement timeline: what to expect
Many rear window replacements can be completed within the day, but the limiting factor is often glass availability and adhesive cure guidance.
If your car is exposed to heavy rain, parked under trees, or used on motorways daily, it’s worth following the care advice closely — not because it’s precious, but because it prevents rework.
And rework is the annoying kind of expensive.
Key Takeaways
- Rear windows usually need replacement, not repair, because they’re typically toughened safety glass.
- The quality of the job often comes down to cleanup, trim handling, and sealing, not the glass alone.
- Cost depends on factors like tint, demister integration, vehicle type, and glass availability.
- Ask clear questions about what’s included, especially cleanup and aftercare guidance.
Common questions we hear from Australian businesses
Do I have to stop driving straight away if the rear window is cracked but not shattered?
Usually, if the glass is stable and visibility is fine, you can drive short distances — but treat it as time-sensitive. A rear crack can spread quickly with bumps, temperature swings, or door pressure changes. The practical next step is to take a few photos, avoid high-speed trips if you can, and line up a replacement before the next wet-weather day hits.
How do you match tint so it doesn’t look odd from the outside?
It depends on whether your car has factory privacy glass or aftermarket tint film. Many rear windows come as tinted glass from the factory spec, but some cars also have film applied over clear glass. Your next step is to confirm what your vehicle currently has (glass tint vs film) so the replacement doesn’t end up noticeably lighter or darker — which is especially obvious in bright Sydney sun.
Is mobile rear window replacement safe, or is a workshop always better?
In most cases, mobile is perfectly fine if the technician has the right setup and can manage a full shatter cleanup. The key is whether they can safely remove glass, protect trim, and leave the car sealed properly on-site. Your next step is to ask what their process is for interior and hatch-area cleanup, because that’s where mobile jobs can vary.
What should I do if I keep finding little glass cubes weeks later?
Usually, that’s normal after a full shatter — glass hides in seat seams, hatch cavities, and carpet fibres. The next step is a methodical clean: vacuum slowly with a crevice tool, check the spare wheel well and cargo pockets, and do another pass a week later. If you’re still hearing rattles or finding clusters, it’s worth having the hatch trim checked because shards can sit behind panels and drop out over time.


Sign in to leave a comment.