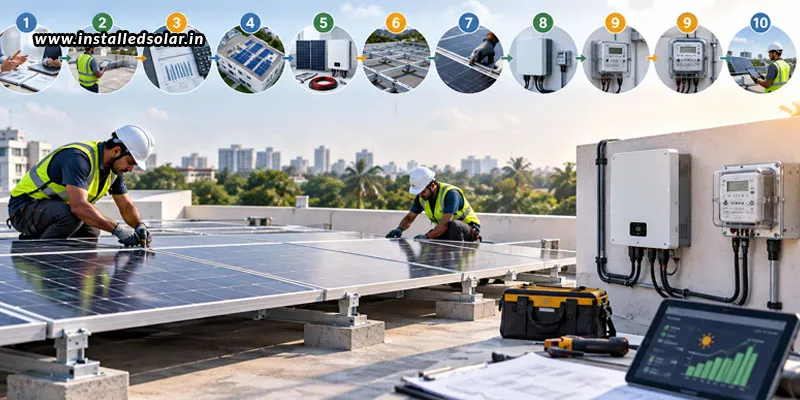

Rooftop solar installation involves much more than placing solar panels on a roof and connecting them to the electrical system. A successful installation begins with understanding the property’s energy requirements and ends with a properly tested system ready to generate electricity. Every stage, from initial consultation and site assessment to system design, installation, grid connection, and commissioning, contributes to the performance and reliability of the finished setup. For homeowners and businesses considering rooftop solar, understanding the installation process makes it easier to know what to expect at each stage. It also highlights why proper planning, suitable components, professional installation, and regular monitoring are important for getting lasting value from a solar energy system.
Beginning with a solar consultation
The installation process begins with understanding why the property is considering solar energy. The primary goal may be to reduce electricity bills, make better use of available rooftop space, increase renewable energy use, or reduce dependence on conventional electricity. During the initial consultation, electricity consumption, existing power requirements, property type, and expectations from the solar system can be discussed. Recent electricity bills can provide useful information about consumption patterns and help establish a starting point for system planning. This stage creates the foundation for the subsequent site assessment and system design.
Assessing the property and rooftop
A site survey is one of the most important stages of rooftop solar installation. The available roof area is assessed to determine whether it can accommodate the required number of solar panels. The assessment considers factors like the available and usable rooftop area, roof condition, orientation and layout, sunlight exposure, shading from surrounding structures or trees, and existing rooftop equipment. The goal is to identify a suitable location and layout for the solar array, while ensuring that the roof can support the proposed installation.
Evaluating the electricity consumption
Solar capacity should be selected according to the property’s actual electricity requirements rather than simply the available roof area. Understanding when and how electricity is consumed helps determine an appropriate system size and configuration. Electricity bills from previous months can help establish average consumption and identify variations throughout the year. Future requirements should also be considered during planning. Changes in occupancy, additional appliances, increased business operations, or other electrical loads can affect future consumption.
Determining the appropriate solar system size
The system size should balance electricity consumption, available installation space, sunlight conditions, budget, and the property’s energy goals. Installing too little capacity may limit potential savings, while selecting unnecessary capacity can increase the initial investment. The number and arrangement of solar panels are determined according to the required capacity and available roof area. Proper sizing also ensures that other system components, particularly the inverter and electrical infrastructure, are appropriately matched.
Designing the solar panel layout
Solar panel placement has a direct influence on energy generation. The layout should make effective use of available rooftop space, while maintaining suitable spacing and access. Nearby buildings, parapet walls, water tanks, trees, and other structures can affect how much sunlight reaches the panels during different parts of the day. A well-planned layout aims to provide consistent exposure to sunlight, while making the installation accessible for inspection and maintenance.
Selecting the major system components
A rooftop solar installation consists of several components that work together to generate and manage electricity, which include solar panels, solar inverter, mounting structures, cables, protection and safety equipment, and metering equipment. The selection of these components should be based on system capacity, property requirements, installation conditions, and compatibility, to support safe and reliable system operation.
Installing the mounting structure
The mounting structure holds the panels in their planned configuration, which is why it must be installed correctly to provide stability. Its placement also needs to account for panel orientation, spacing, accessibility, and the condition of the roof. Careful installation of the mounting structure provides the foundation for the solar array. Proper alignment helps ensure that the solar panels are positioned according to the system design.
Installing the solar panels
The arrangement of the panels depends on the required system capacity, inverter specifications, rooftop layout, and electrical configuration. During installation, attention must be given to secure connections, appropriate cable routing, and protection of electrical components. Neat and properly planned installation helps reduce the possibility of damage and makes future inspection and maintenance easier.
Installing the solar inverter and electrical connections
Solar panels generate DC electricity, while most household and commercial electrical loads use AC electricity. The inverter converts the generated electricity into a suitable form for use. The inverter is installed at an appropriate location and connected to the solar array and the property’s electrical system. Cables, protection devices, isolators, and other electrical components are installed according to the system design.
Connecting the system to the property
This stage involves connecting the solar generation system to the appropriate electrical distribution arrangement. The configuration depends on whether the property uses an on-grid, off-grid, or hybrid solar system. For a grid-connected installation, the system must be designed to work safely alongside the utility supply. The required metering and connection arrangements also need to be completed according to applicable requirements. This integration allows the electricity generated by the rooftop system to be used according to the selected configuration.
Completing net metering and grid formalities
For eligible grid-connected rooftop solar systems, net metering can allow surplus electricity generated by the solar system to be supplied to the electricity grid. The process can involve applications, documentation, inspections, approvals, and installation or replacement of the appropriate meter, depending on the applicable electricity distribution authority and local regulations. The exact process and requirements can vary by location and system type.
Testing the complete system
Before the system begins regular operation, the installation needs to be inspected and tested. This stage helps confirm that the different components have been installed correctly and are operating as intended. Testing can include checking electrical connections, panel configuration, inverter operation, safety equipment, voltage levels, and system communication or monitoring features where applicable.
Why professional solar installation matters
The performance of a rooftop solar system depends not only on the quality of its components, but also on how those components are designed, installed, connected, and commissioned. Professional installation helps ensure that the rooftop is properly assessed, the system is appropriately sized, the solar panels are correctly positioned, and electrical connections are completed safely. For homeowners looking for solar panel installation in Banashankari, iNSTALLED offers solutions designed around the property’s specific energy requirements, helping ensure a well-planned and efficiently installed rooftop solar system. From initial site assessment to installation and commissioning, professional support can make the transition to rooftop solar simpler and more reliable.
A rooftop solar installation is a complete process rather than a single installation activity. Each stage has a role in creating a system that can reliably generate electricity over the long term. From assessing the rooftop and understanding electricity consumption to installing solar panels, completing electrical connections, managing grid requirements, and testing the system, careful planning remains essential. For homeowners and businesses considering solar energy, understanding this process can make the decision easier and help set realistic expectations. With suitable system design, quality components, proper installation, and ongoing care, rooftop solar can turn available roof space into a dependable source of renewable electricity.
Resource: Step-By-Step Rooftop Solar Installation Process

























Sign in to leave a comment.