Venetian plaster is a time-honoured technique that has been used for centuries to create stunning, luxurious wall finishes. The key to achieving the desired result lies in understanding the various techniques and application methods involved. In this article, we will delve into the world of it, exploring the step-by-step process, tools required, and advanced techniques that can be used to create exquisite decorative finishes.
Preparation for Venetian Plaster Application
Before you begin the exciting process of applying it, it's crucial to properly prepare the surface and gather the necessary tools and materials. By following these steps, you'll ensure a smooth and successful application.
Surface Preparation
Cleaning and Priming the Surface
Start by thoroughly cleaning the surface where you plan to apply the Venetian plaster. Remove any dirt, dust, grease, or existing coatings that could interfere with adhesion. Use a mild detergent and water solution, followed by rinsing and allowing the surface to dry completely.
Once clean, it's essential to prime the surface. Priming helps to seal the surface, promotes better adhesion, and prevents moisture issues. Choose a primer suitable for the specific surface material, whether it's drywall, plaster, wood, or masonry. Apply the primer evenly using a paintbrush or roller, following the manufacturer's instructions, and allow it to dry fully before proceeding.
Patching and Repairing
Inspect the surface for any imperfections, such as cracks, holes, or uneven areas. Use an appropriate patching compound or filler to repair these flaws, ensuring a smooth and even substrate for them. Follow the product instructions for application, drying time, and sanding, if necessary.
Basic Application Techniques
Once you have prepared the surface and gathered the necessary tools and materials, it's time to delve into the basic application techniques for it. These techniques form the foundation of the plaster application process and lay the groundwork for achieving a beautiful and durable finish.
Applying the Base Coat
Mixing the Plaster
Follow the manufacturer's instructions for mixing it. Typically, it involves adding the plaster powder or paste to a mixing container and gradually incorporating the appropriate amount of water or liquid additive. Use a spatula or mixing stick to blend the materials thoroughly until you achieve a smooth and homogeneous mixture. Consistency is key, so aim for a creamy and workable texture.
Techniques for Applying the Base Coat
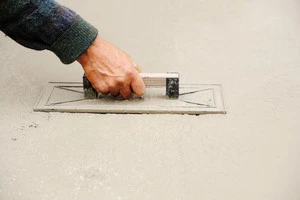
Start by applying the base coat of it onto the prepared surface. Using a trowel, scoop a portion of the mixed plaster onto the trowel's flat edge. Hold the trowel at a slight angle and apply the plaster in a thin and even layer. Use broad, sweeping motions to distribute the plaster across the surface smoothly. Keep the trowel flat against the surface for better control and consistency.
Work in small sections, gradually covering the entire surface. Overlap each stroke slightly to ensure uniform coverage. Avoid pressing too hard, as it may result in an uneven application. Maintain a consistent thickness throughout the base coat, typically around 1/16 to 1/8 inch. Take care to avoid trapping air bubbles in the plaster as you apply it.
After completing the first layer, allow it to dry according to the manufacturer's instructions. This drying time will vary depending on the specific plaster product and environmental conditions.
Advanced Application Techniques
Once you have become proficient in the basic application techniques of it, you can explore advanced techniques to elevate your finishes to new heights. These techniques allow you to add depth, texture, and intricate details to your plaster surfaces, creating truly unique and captivating effects.
Burnishing
Burnishing is a technique used to polish the surface of it, resulting in a smooth and lustrous finish. It involves gently rubbing the dried plaster with a specialised burnishing tool or a smooth, hard object, such as a trowel or spatula. Burnishing enhances the reflective properties of the plaster, intensifies its colour, and imparts a silky sheen.
Steps Involved in the Burnishing Process
Once the Venetian plaster has completely dried, examine the surface for any imperfections or roughness. Use fine-grit sandpaper to smooth out any uneven areas or ridges.
Starting from one corner, apply light pressure and make circular or figure-eight motions with the burnishing tool across the surface. Maintain a consistent motion and avoid applying excessive pressure that could damage the plaster.
Continue burning the entire surface, ensuring even coverage and paying extra attention to edges and corners. As you burnish, you will notice the plaster becoming smoother and acquiring a gentle sheen. Periodically wipe away any residue or dust with a clean, damp cloth to reveal the true beauty of the finish. If desired, you can apply a thin layer of wax or sealer after burnishing to further enhance the gloss and protect the plaster.
Creating Special Effects and Finishes
It offers endless possibilities for creating special effects and finishes. We'll examine the addition of colour pigments, allowing you to customise your plaster with a vast array of hues. Techniques for achieving uniform colour distribution will be shared. Additionally, we'll explore mottling and veining techniques, enabling you to replicate the elegance of natural marble on your surfaces.
Troubleshooting and Tips
Even with proper techniques, challenges may arise during the application process. We'll address common issues such as cracking and bubbling, providing troubleshooting techniques and solutions. Furthermore, we'll share valuable tips for achieving a professional-looking finish, including considerations for lighting, ventilation, and maintaining consistent pressure and motion during application.
Conclusion
Mastering the art of it requires dedication and practice, but the results are undoubtedly worth it. By understanding the techniques and application methods discussed in this article, you'll be well-equipped to embark on your Venetian plaster projects. Remember, experimentation and exploration are key to developing your unique style and achieving breathtaking decorative finishes. So, grab your trowels and let your creativity flow as you embark on the journey of mastering it.


Sign in to leave a comment.