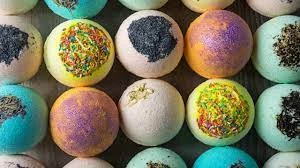
Bath bombs are not just a luxury; they\'re a delightful indulgence that can transform your bath time into a spa-like experience. Crafting your own bath bombs allows you to customize scents, colors, and ingredients to suit your preferences. Here\'s how to make the best bath bombs that will elevate your self-care routine to the next level.
- Gather Your Ingredients:
The foundation of any great bath bomb is a blend of key ingredients. You\'ll need baking soda, citric acid, Epsom salts, cornstarch or arrowroot powder, essential oils, and a carrier oil such as coconut or almond oil. Ensure your ingredients are of high quality for the best results.
- Perfect Your Ratios:
Achieving the right balance of ingredients is crucial for bath bomb success. A typical ratio is 2 parts baking soda to 1 part citric acid, with Epsom salts and cornstarch making up the rest. Experiment with different ratios to find the perfect formula for your preferences.
- Add essential Oils:
Essential oils not only provide a luxurious scent but also offer therapeutic benefits. Choose oils based on their properties – lavender for relaxation, peppermint for rejuvenation, or citrus for a refreshing boost. Remember, a little goes a long way, so use oils sparingly to avoid overpowering fragrances.
- Incorporate Colorants:
Bath bombs come alive with vibrant colors that turn your bathwater into a kaleidoscope of hues. Opt for skin-safe colorants like mica powders, natural pigments, or food coloring. Start with small amounts and gradually add more until you achieve your desired color intensity.
- Mix with Care:
Thoroughly combine dry ingredients in a large bowl, ensuring there are no clumps. Slowly add the liquid ingredients, such as essential oils and carrier oils, while continuously mixing. Aim for a texture that resembles wet sand – moist enough to hold its shape when squeezed together.
- Shape and Set:
Pack the mixture tightly into molds of your choice, whether spherical, cylindrical, or novelty shapes. Press firmly to prevent cracking and ensure a solid bath bomb. Allow the bath bombs to dry in the molds for at least 24 hours before carefully removing them.
- Test and Enjoy:
Before indulging in a luxurious bath, it\'s essential to test your creations. Drop a bath bomb into warm water and observe its fizzing action, scent release, and color dispersion. Once satisfied, immerse yourself in the soothing waters and let the bath bomb work its magic.
- Experiment and Have Fun:
The beauty of making your own bath bombs lies in the endless possibilities for creativity and experimentation. Mix and match scents, colors, and ingredients to create unique combinations that suit your mood and preferences.
In conclusion, mastering the art of making bath bombs is a rewarding journey that enhances your self-care routine and allows for personalized indulgence. With the right ingredients, techniques, and a dash of creativity, you can craft the perfect bath bombs that elevate every bath into a blissful retreat. So, roll up your sleeves, unleash your inner alchemist, and let the magic of bath bombs transform your bathing experience.

Sign in to leave a comment.