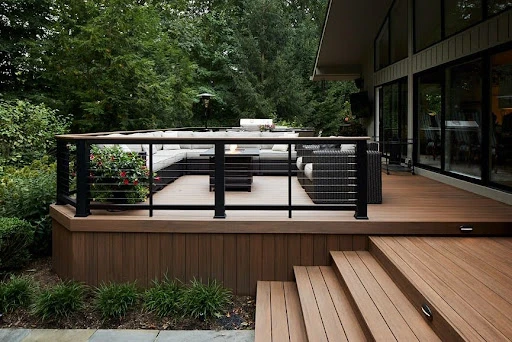
When your deck is outdoors (where it is of course!), it fights sun, rain, spills and foot traffic day by day. A good deck sealer is the unseen muzzle that makes sure that said wood does not absorb so much water, dry up, and cracks within no time. Imagine it as sunscreen and a raincoat, lightweight, protective, the thing that will save you major uncomfortable expenses down the line.
A deck sealer is a coating that prevents water and minimizes UV degradation and wear on wood decks. You do it to lengthen the life of your deck, to maintain color and grain, to minimize repair. Be sprayed on fresh or freshly cleaned decks and then re-spreaded after 1-3 years, depending on product and climate.
What Exactly Is a Deck Sealer?
A deck sealer is a liquid finish, brushed, rolled or sprayed over deck boards to stop water and provide protection against the sun. It either permeates to the wood fibers or it develops a thin layer on top.
Penetrating vs. Film-Forming Sealers
- Penetrating sealers enter the wood and get stronger inside. They do not peel easily, they are also easy to maintain and are best suited when you want a natural matte appearance.
- The top is coated with film-forming sealers (imagine very thin, clear coats) that give greater surface protection and can provide a richer finish, though they can peel when prep or maintenance are not done.
Clear, Toner, Semi-Transparent, and Solid Finishes
- Clear: Maximum wood grain visibility, least UV protection.
- Toner: A hint of color adds UV defense while still showing grain.
- Semi-transparent: More pigment = Better fade resistance while preserving texture.
- Solid (like paint): Highest color coverage and UV protection but hides grain and can peel if neglected.
Deck Sealer vs. Stain vs. Paint vs. “Waterproofer”
How They Differ in Protection and Look
- Sealer: Water repellency and a bit of UV coverage; may or may not be colored.
- Stain: provides color and sealer qualities (particularly semi-transparent).
- Paint: Opaque paint with film over it; very strong UV shield, but peels easily and covers grain.
- Waterproofer: Sometimes used interchangeably with sealer; is generally concerned with water repellency.
When to Choose Each
- Want the natural look with easy maintenance? Go penetrating sealer or semi-transparent stain-sealer.
- Want bold color and don’t mind periodic scraping and repainting? Choose paint.
- Don’t know? A semi-transparent stain-sealer is a smart middle ground for most decks.
Top Benefits of Sealing Your Deck
Waterproofing & Rot Resistance
Moisture is wood’s #1 enemy. Sealing reduces water absorption, stopping swelling, cupping, and rot before they start.
UV Fade Protection
Sunlight breaks down wood lignin, leading to graying and brittleness. Tinted sealers include UV absorbers that slow down fading dramatically.
Crack, Warp, and Splinter Control
Repeated wet-dry cycles stress wood fibers. A sealed deck stays dimensionally stable longer, so you get fewer splits and splinters.
Mold, Mildew, and Algae Defense
Many sealers contain mildewides or create a less hospitable surface, reducing slimy growth and keeping the deck safer and cleaner with the help of exterior wood cleaner.
Long-Term Cost Savings
Preventing damage is cheaper than replacing boards. A few hours of sealing every couple of years pays off with years of extra life.
Types of Deck Sealers by Chemistry
Water-Based Sealers
- Low odor, quick dry, low VOCs, easy soap-and-water cleanup.
- Great for hot or humid areas where fast recoat times help.
- Usually retain color better; modern formulas penetrate well.
Oil-Based Sealers
- Deep penetration, rich “wetted” look, excellent water repellency.
- Often need longer dry times and solvent cleanup.
- Can amber slightly (some people love this warm tone).
Hybrid / Low-VOC Options
Newer tech combines oil-like penetration with water-based cleanup, delivering durability without heavy fumes, ideal if you’re eco-conscious.
How Deck Sealers Work (The Science in Simple Words)
Repelling Water: Beading vs. Sheeting
Sealers line wood pores so water can’t soak in. Some cause water to bead on the surface; others promote sheeting so water slides off. Either way, less absorption = less damage.
UV Absorbers & Pigments
Tinted sealers use UV-absorbing pigments (think sunglasses for your deck). The more pigment, the better UV protection—but the less you’ll see of the natural color.
When Should You Seal a Deck?
New Decks: Cure, Clean, Then Seal
Fresh-cut lumber may be too wet. Let it dry for 1–3 months (varies by climate), then clean and brighten before sealing. Do a water-sprinkle test: if water beads heavily, it’s not ready; if it darkens and absorbs, you can seal.
Existing Decks: Signs It’s Time
- Water no longer beads and soaks in.
- Wood looks dry, gray, or fuzzy.
- You see hairline cracks or splinters.
- Most decks appreciate a fresh coat every 12–36 months, depending on sun exposure and product type.
Season, Temperature, and Humidity Windows
Aim for 10–32°C (50–90°F) with no rain for 24–48 hours and shade or indirect sun. Avoid scorching midday heat; early morning or late afternoon is your friend.
Wood Species & Regional Climate Considerations
Pine, Cedar, Redwood, and Hardwoods
- Softwoods (pine, cedar, redwood): Love penetrating sealers or semi-transparent stains.
- Hardwoods (teak, ipe, mahogany): Dense fibers resist penetration; choose specialized hardwood formulas and expect more frequent maintenance.
Hot, Humid, Rainy, or Snowy Climates
- Hot & sunny: Go with tinted/semi-transparent for stronger UV protection.
- Humid & rainy/monsoon: Prioritize water repellency and mildew resistance.
- Freeze–thaw/snow: Seal before winter, and keep snow cleared to prevent ice damage.
How to Choose the Right Sealer for Your Deck
Appearance Goals
- Love natural grain? Pick clear or toner.
- Want color with texture visible? Choose semi-transparent.
- Prefer solid color? Solid stains or paint, but be ready for peel-management.
Maintenance Interval
Penetrating, lightly pigmented products = easier recoats with minimal sanding. Film-forming or solid finishes = longer intervals but more prep later.
Foot Traffic & Lifestyle
Kids, pets, parties? Look for scuff resistance and fast dry to get back on the deck quickly.
Environmental & Safety Factors
Check VOC limits, choose low-odor if sensitive, and follow safe rag disposal (especially for oil-based products).
Step-by-Step: How to Prepare a Deck for Sealer
Inspection & Repairs
Tighten loose screws, reset popped nails, and replace rotted boards. Fix problems first; finish later.
Deep Cleaning & Brightening
- Sweep and remove debris from gaps.
- Wash with a deck cleaner (oxygen bleach for grime/mildew).
- Rinse thoroughly.
- Apply a wood brightener (often oxalic acid) to restore color and open pores for even absorption.
- Let dry fully.
Sanding: When and How
- Sand splinters and rough patches (80–120 grit).
- Lightly scuff film-forming finishes if you’re recoating them.
- Vacuum dust; don’t trap it under the sealer.
Dryness & Moisture Tests
- Water-sprinkle test as above.
- If you have a meter, aim for ≤15% moisture content before sealing.
Step-by-Step: How to Apply Deck Sealer Like a Pro
Tools You’ll Need
- Deck brush/pad on a pole, 3/8"–1/2" nap roller, and a quality brush for edges.
- Pump sprayer (optional) for fast coverage—always back-brush for even penetration.
- Drop cloths, painter’s tape, and a mixing stick.
Cut-In, Roll, or Spray?
- Cut-in borders, posts, and tight spaces with a brush.
- Roll or pad the field boards for speed.
- Spray + back-brush for railings and spindles—fast and consistent.
Number of Coats, Coverage, and Dry Times
- Typical coverage: 150–250 sq ft per gallon (3.7–6.1 m²/L) on the first coat; more on subsequent coats.
- Many penetrating sealers are 1–2 coats, “wet-on-wet” (apply the second coat before the first fully dries so it bonds and evens out).
- Touch-dry in 1–4 hours; light foot traffic after 24 hours; full cure in 48–72 hours (check your product label).
Edges, Railings, and Hard-to-Reach Spots
Work top-down (rails first, then boards) to avoid drips on finished surfaces. Keep a rag handy to catch runs immediately.
Troubleshooting & Fixing Common Sealing Mistakes
Blotches, Lap Marks, and Sticky Spots
- Work in manageable sections and maintain a wet edge.
- If tacky after 24–48 hours, you likely over-applied. Lightly wipe with a mineral spirits-damp cloth (oil-based) or warm soapy water (water-based), then allow to cure. In stubborn cases, light sanding and a thin recoat fix it.
Peeling vs. Graying
- Peeling = film forming product failed or previous finish wasn’t prepped. Remove loose areas, sand/strip, then recoat.
- Graying = sun exposure on unprotected fibers. Clean, brighten, and re-seal with UV tint.
Over-Application & How to Correct It
If the wood won’t absorb more, stop. Wipe off excess within 15–20 minutes to prevent gloss patches and stickiness.
Maintenance Plan: Keep Your Deck Looking New
Annual Wash & Quick Water Test
Each season, do a gentle wash and a quick sprinkle test. If water soaks in quickly, it’s time to recoat.
Recoat Frequency by Product Type
- Clear/toner penetrating: 12–18 months.
- Semi-transparent: 18–36 months.
- Solid/film-forming: 2–4 years, but expect more prep before recoating.
Winterizing & Monsoon Prep
Before heavy weather, remove dirt, leaves, and planters. Keep snow/slush off boards and ensure water can drain.
Costs, Coverage, and Budgeting
Product Quantities & Price Ranges
- Expect 1–2 gallons for a small deck; 3–5 gallons for medium; 6+ for large spaces, depending on porosity.
- Prices vary widely by chemistry and brand. Plan for recoat cycles in your budget; maintenance keeps replacement costs far away.
DIY vs. Hiring a Pro
DIY saves labor costs and is very doable with good prep. For large, intricate, or previously painted decks, a pro may be more efficient and cost-effective.
Safety, Cleanup, and Environmental Tips
VOC Awareness & Ventilation
Choose low-VOC or water-based if indoor air quality or local regulations matter. Work with good airflow and wear gloves and a mask when sanding or spraying.
Rag Disposal (Spontaneous Combustion Risk)
Oil-soaked rags can self-heat and ignite. Lay them flat to dry outdoors on a non-combustible surface, then dispose of per local guidelines.
Conclusion
An outdoor deck sealer is the simplest, smartest way to protect your deck from water, sun, and daily wear. Whether you prefer a natural look or a hint of color, sealing extends the life of your wood, keeps it safer underfoot, and saves money over time. With the right prep and a thoughtful product choice, you’ll get a durable, beautiful finish that’s easy to maintain season after season.
The easiest and most intelligent solution to keep your deck dry, sun- and water-free, and daily wear-resistant is an outdoor deck sealer. You might want a natural appearance or a touch of color, but in either case, sealing will increase the life of your wood, make it safer on the floor, and save money in the long run. It will last forever, have a beautiful finish, and be easy to maintain season after season with the right preparation, and a careful choice of product.
FAQs
1) How do I know if my deck needs sealing right now?
Do the sprinkle test. If water absorbs within a minute instead of beading, it’s time. Visible graying, fuzz, or dryness are also clear signs.
2) Can I seal a new deck immediately after installation?
Usually no. Let it dry 1–3 months, then clean/brighten and check with the sprinkle test. Sealing too soon can trap moisture and cause failure.
3) What’s better: water-based or oil-based sealer?
Both work. Water-based is low-odor, quick-dry, and easier to clean. Oil-based penetrates deeply and gives a warm look. Choose based on climate, odor sensitivity, and maintenance preferences.
4) Can I apply sealer over old stains or paint?
You can re-seal over a compatible penetrating stain after cleaning. If the deck is painted or has a peeling film, you’ll need to strip/sand first for best adhesion.
5) How long should I stay off the deck after sealing?
Plan 24 hours for light foot traffic and 48–72 hours for full cure. Cooler, humid weather may extend those times—always read your product label.


Sign in to leave a comment.