Remember how your Windows operating system performed when you bought the computer for the first time? A brand-new computer works flawlessly until we clutter it. We install a lot of applications and download files that take up a lot of space on our computer. It requires periodic maintenance to keep it as good as new. Here are a few tips & tricks to free up space on Windows.
Clear Temp Files
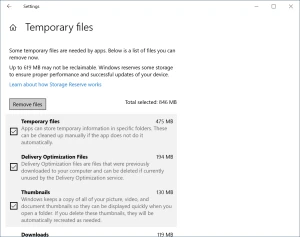
Whenever we use our computer, open files, or browse the internet, it accumulates a lot of temp files and junk files. These files need to be cleared on a regular basis.
Step 1. Click on the Start button and select the gear icon for Settings.
Step 2. Click on Systems and then select Storage from the left tabs.
Step 3. Click on the Temporary Files option at the right.
Step 4. It will list out all the temp files that can be removed. Put a check on all the listed files and click on the Remove Files button at the top of the list.
Step 5. Follow the on-screen instructions and delete all the temporary files.
Clear Downloads
We download a lot of setup files, apps, PDFs, movies, and videos on a regular basis. We should check them back if we still need them on our computer.
Step 1. Press (Win + E) to access Windows Explorer.
Step 2. Click on the Downloads folder in the left panel.
Step 3. Press and hold the Ctrl key and click on the downloaded files that you don’t need anymore. Hit the Delete key to move selected files to the Recycle Bin.
Uninstall Applications
We install multiple apps as and when needed. It is important to check and uninstall unwanted apps.
Step 1. Click on the Start button and select the gear icon for Settings.
Step 2. Click on Apps and it will list out all the installed apps on your computer.
Step 3. Sort Apps by size and check out the list. Identify removable apps to free up space on Windows.
Step 4. Click to select the app that need to be uninstalled, hit the Uninstall button. Follow the uninstallation wizard and remove the app from your computer. do the same with other removable apps to clear storage space.
Run Disk Defragmenter
Creating and deleting files on Windows can create fragmented sectors on the storage. These blank spaces cannot be used to store files on Windows. It is required to timely defrag the fragmented sectors.
Step 1. Click on the Start button and type Disk Defrag in the search bar.
Step 2. Select the Defragment and Optimize Drives App from the search results.
Step 3. Select the C: Drive and click on the Analyze button. If it shows any fragmented percentage, select it and click on the Optimize button. It will defrag the drive partition and organize the blank and used hard drive space.
Step 4. Select other partitions and perform the same action on other drives. Restart the computer once you are done with the defragmentation process.
Delete Duplicate Photos
Duplicate photos and media files can take up a lot of space in your storage. You can delete duplicate photos manually if they are in the same album.
Step 1. Visit Windows Explorer (Win + E) and go to the Pictures folder.
Step 2. Click on the View menu and under the Layout section, select Large Icons. It will show thumbnails of all the images in the folder.
Step 3. Press and hold down the Ctrl key and click on the duplicate photos that need to be deleted.
Step 4. Press the Delete key to send the photos to the Recycle Bin or (Shift + Delete) key to permanently delete them from your computer.
If you deal with a lot of photos, you can automate the process with the help of the Best Duplicate Photos Fixer for Windows in 2022. Duplicate Photos Fixer Pro can perform a quick and deep scan and list out all the duplicate photos for removal. You can preview duplicate photos from the group and select what to remove or keep or click on the Auto-Mark button to permanently delete duplicate photos.
Perform Disk Cleanup
Disk Cleanup is one of the best Windows utilities to quickly list out all the removable files, temp files, junk files, cache, and cookies.
Step 1. Click on the Start button, type Disk Cleanup in the Search bar and select Disk Cleanup app.
Step 2. Select the C: drive partition and click on the Ok button.
Step 3. It will scan and list out all the removable files that can be deleted. Put a tick on all the listed removable files and click on the Ok button to delete them.
Step 4. Once done, come back to the same window and click on the Clean Up System Files button at the bottom left.
Step 5. Select the listed files to delete and click on the Okay button to remove all of them. Restart the computer once done.
Delete Large Files
Large Files, videos, movies, or backup files also take up a lot of space on the hard drive. You can periodically visit these folders and clear storage space on your computer.
Step 1. Press (Win + E) to get into Windows Explorer.
Step 2. Click on the This PC tab in the left-hand side panel.
Step 3. Click on the search bar and search for *.MP4, *.WMA, *.AVI, *MOV, *.FLV one by one. You can also visit the videos folder or the downloads folder to look for the large files.
Step 4. Check out the list of found video files, sort them by size and identify files that can be removed.
Step 5. Press and hold down the Ctrl key and click on the files to select. Hit the Delete key to send them to the Recycle Bin.
“Please Note: Once you are done with the cleanup process, don’t forget to empty the Recycle Bin.”
Summing Up
The process to free up space on Windows can be tiring and time taking, however, it is worth spending time for overall better performance of the PC. You can clear storage space and regain access to precious storage. Find duplicate photos and remove them to keep it dupe-free. Make room for upcoming files and manage your files wisely. Keep it Clean!
Also read: How to Fix Outdated Drivers Error on Windows 11
0


Sign in to leave a comment.