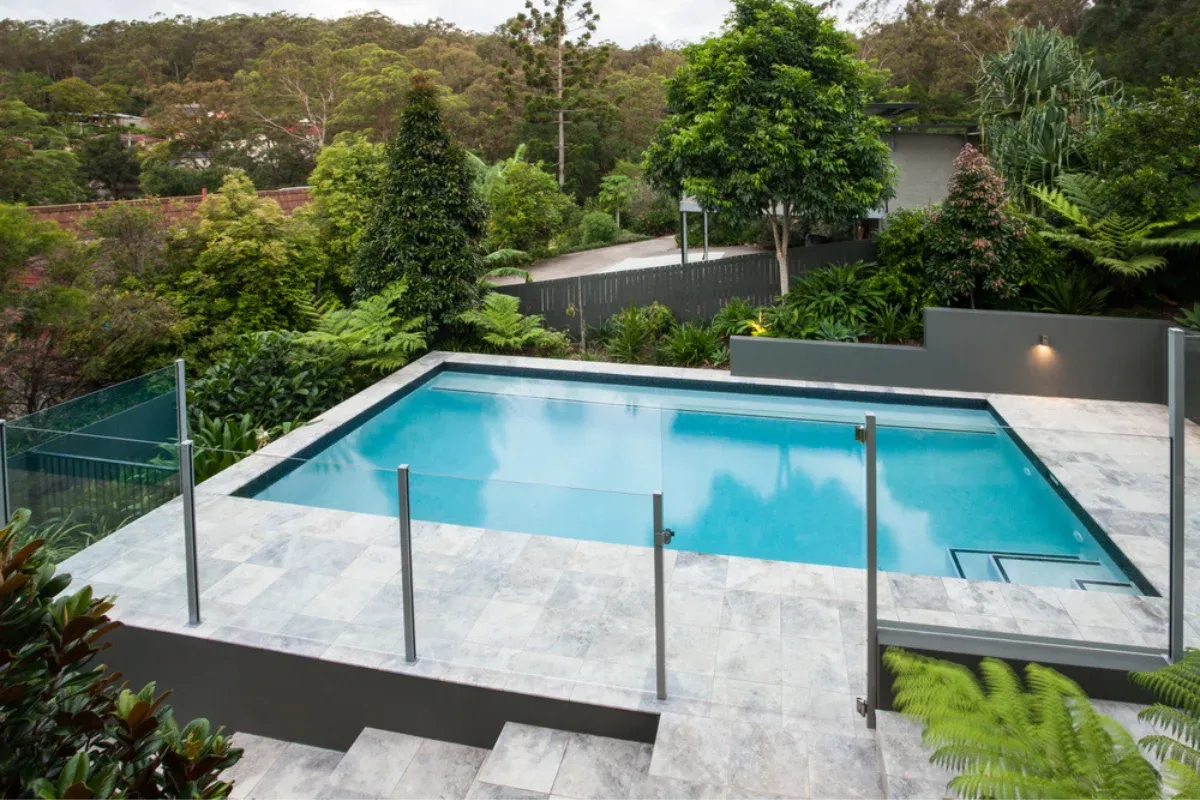
If you've been dreaming of that sleek, open-view pool area where nothing interrupts your view of the water, frameless glass pool fencing is exactly what you need. And the good news? With the right preparation, the installation process is a lot more straightforward than most people think.
This guide walks you through every single step from measuring up your pool area to securing that very last spigot. Whether you're a confident DIYer or just want to understand what the professionals are doing on your property, you'll find this breakdown genuinely useful.
Understand the Rules Before You Touch Anything
Before you order a single glass panel, you need to get familiar with your local pool fencing regulations. In Australia, pool fencing is governed by Australian Standard AS 1926.1, and every state has its own additional requirements layered on top of that.
Here's what the rules generally cover:
• Minimum fence height (usually 1200mm from finished ground level)
• Maximum gap between the bottom of the fence and the ground (typically no more than 100mm)
• Non-climbable zones around the fence perimeter
• Gate requirements — self-closing, self-latching, and opening away from the pool
• Approved glass thickness (usually 12mm toughened safety glass)
Pro tip: Contact your local council or a licensed pool fence inspector before you start. Getting this wrong isn't just a fine risk, it's a safety risk. Always have your fence certified by a licensed inspector once it's done.
Measure Your Pool Area Accurately
Accurate measurements are the foundation of a smooth installation. Get this wrong and you'll be dealing with panels that don't fit, gaps that fail compliance checks, or unnecessary cutting costs.
What to measure:
• Total perimeter of the fenced area
• Location of gates and entry points
• Any corners, curves, or obstacles (garden beds, retaining walls, steps)
• The surface type (concrete, pavers, decking, grass) this affects the type of spigots and fixings you'll need
Use a steel tape measure and record everything in a simple sketch. You'll need this when ordering your glass panels and hardware from your supplier.
Choose Your Glass Panels and Hardware
Not all frameless glass pool fencing is the same. Here's what you'll need to decide before placing your order:
Glass thickness
The standard is 12mm toughened safety glass. Some premium installations use 15mm for a more substantial look. Both are compliant 12mm is the most common and cost-effective choice.
Glass finish
Clear glass gives the most open look. Low-iron glass (sometimes called 'ultra-clear') removes the slight green tint standard glass has. It's worth the small extra cost if your home has white or light-coloured fittings.
Spigots (the fixings that hold the glass)
Spigots are either surface-mounted (bolted to the top of a surface) or core-drilled (set into the ground or concrete). Core-drilled spigots give a cleaner look and are stronger — they're the preferred choice for most residential installations.
Gates
Your gate needs to match your panels in thickness and finish. Make sure it comes with a self-closing hinge and a compliant self-latching mechanism. Don't cut corners here the gate is the part that gets inspected most closely.
Mark Out Your Spigot Positions
With your panels ordered and your measurements confirmed, it's time to mark out exactly where each spigot will go. This is the step that determines whether your fence looks perfectly even or slightly off so take your time.
How to do it:
1. Use a chalk line or string line to mark the inside edge of the fence run
2. Mark spigot positions at equal intervals typically 1000–1200mm apart
3. Check each mark is square using a builder's square, especially at corners
4. Double-check your spacing against the actual panel widths before drilling anything
Remember: measure twice, drill once. Repositioning a core-drilled spigot after the fact is an expensive and frustrating exercise.
Install the Spigots
This is the most physically demanding part of the job. The method varies depending on whether you're surface-mounting or core-drilling.
For core-drilled spigots (into concrete or pavers):
5. Use a diamond core drill bit (typically 76mm diameter) to drill your holes to the required depth — usually 120mm
6. Vacuum or blow out the dust and debris from the hole
7. Mix your anchoring epoxy according to the manufacturer's instructions
8. Insert the spigot, checking it's perfectly plumb (vertical) with a spirit level
9. Hold or brace it in place while the epoxy sets follow the set time on your product (usually 30–60 minutes)
For surface-mounted spigots (onto decking or pavers):
10. Position the spigot base plate on your marked location
11. Mark and drill pilot holes through the base plate
12. Secure with stainless steel bolts and check vertical alignment with a spirit level
Allow all spigots to fully cure before loading any glass panels. Don't rush this; the spigots are what keep your fence standing.
Install the Glass Panels
This is the part that transforms your space. Glass panels are heavy (a standard 12mm panel can weigh 30–40kg), so you'll need at least two people for this step ideally three.
13. Start at a corner or gate post and work your way around the fence run
14. Lift each panel into the spigot clamps using glass suction cups (these are essential — don't try to grip the glass by hand)
15. Slide the rubber setting blocks under the panel to support it at the correct height
16. Check the panel is plumb on both faces using a spirit level
17. Tighten the spigot clamp bolts evenly on both sides don't overtighten; you're securing glass, not a car wheel
18. Maintain a consistent gap between panels (usually 5–8mm) and use plastic shims if needed to keep gaps even
Work slowly and check alignment as you go. It's much easier to adjust a panel before the next one is in place than to backtrack later.
Fit the Gate
Your gate is the centrepiece of the fence it needs to look good, operate smoothly, and most importantly, be fully compliant.
19. Install the hinge post first, ensuring it's perfectly plumb
20. Attach the self-closing hinges to the gate panel according to the manufacturer's guide
21. Hang the gate and test the closing action it must swing shut and latch without any manual assistance
22. Adjust hinge tension as needed using the tension screw on the hinge body
23. Install and test the self-latching mechanism — the latch must be positioned at least 1500mm from the ground, or be located on the pool side so children can't reach it from outside
Test the gate repeatedly from both sides and in both directions. If it doesn't close and latch every single time — adjust it until it does.
Apply Finishing Touches
You're almost there. A few final touches will make a real difference to the finished look.
• Apply a glass sealant or nano-coating to repel water spots and reduce cleaning frequency
• Install rubber edge buffers or clear anti-chip caps on panel edges at corners where panels are close together
• Tighten all spigot bolts one final time once all panels are in place
• Clean the glass thoroughly with a non-abrasive glass cleaner to remove finger marks, dust, and any installation residue
Stand back and take it all in. That uninterrupted view of the water you've been imagining? It's real now.
Get Your Fence Inspected and Certified
This is the step people sometimes skip — don't be that person. In Australia, pool fences must be inspected and certified by a licensed pool fence inspector before the pool can be legally used.
The inspector will check panel heights, gaps, gate operation, latch height, and non-climbable zones. If anything doesn't comply, they'll issue a defect notice and you'll need to rectify it before certification is granted.
Book your inspection promptly — some areas have waiting times, and you won't want your newly installed fence sitting idle for weeks while you wait for a slot.
Bonus: Keeping Your Frameless Glass Pool Fence Looking Great
One of the biggest advantages of frameless glass fencing is how low-maintenance it is compared to timber or aluminium alternatives. Here's a simple routine to keep it in top shape:
• Rinse glass panels with fresh water weekly to remove pool chemical residue and salt (especially near the coast)
• Use a soft cloth or squeegee with a non-abrasive glass cleaner for a streak-free shine
• Inspect spigot bolts every 6–12 months and tighten if needed
• Check the gate hinge tension and latch function regularly — especially after heavy use in summer
• Re-apply glass nano-coating every 12–18 months for maximum water-beading performance
Final Thoughts
Installing frameless glass pool fencing is one of those home improvements that looks incredible, adds genuine property value, and genuinely improves everyday safety all at the same time. Done right, it'll last decades with minimal upkeep.
The key is to not cut corners on compliance, take your time with the spigot installation, and always get a licensed inspector to certify the work. Whether you're taking on the installation yourself or bringing in a professional team, this guide gives you the full picture of what's involved.


Sign in to leave a comment.