
In today's fast-paced world of manufacturing and prototyping, CNC (Computer Numerical Control) milling stands as a cornerstone of modern fabrication. From custom parts for aerospace to intricate jewelry designs, CNC milling transforms digital concepts into tangible, precise realities. But how exactly does an idea go from a computer screen to a perfectly machined piece of metal or plastic?
Let’s walk through the essentials of CNC milling—what it is, how it works, and why it’s become a go-to solution for engineers, designers, and makers alike.
Step 1: Digital Design – The Blueprint of Creation
Every machined part begins with a design. This is typically created using CAD (Computer-Aided Design) software like SolidWorks, Fusion 360, or AutoCAD. In this phase, designers define every dimension, hole, curve, and feature the part needs to have.
The goal here is precision. The final product will only be as good as the digital blueprint it's based on. That’s why attention to detail is critical—tolerances, material thickness, and mechanical constraints all come into play.
🎯 Pro Tip: Always design with manufacturing in mind—sharp internal corners, for instance, may not be machinable with round tools.
Step 2: CAM Programming – Turning Design into Instructions
Once the digital model is complete, the next step is to prepare it for the CNC machine using CAM (Computer-Aided Manufacturing) software. This toolpath programming process tells the CNC machine how to move, what tools to use, and how fast to cut.
You’ll define:
- Tool types (e.g., end mills, drills)
- Cutting speeds & feeds
- Machining strategies (e.g., roughing, finishing, pocketing)
The result? A G-code file—essentially the “language” that CNC machines understand.
Step 3: Material Selection – Choosing the Right Stock
The choice of material can make or break your part. Aluminum is a popular option for its machinability, while harder materials like titanium or stainless steel are chosen for strength and durability. Plastics like Delrin or ABS are great for lightweight or non-conductive parts.
You need to consider:
- Strength and stiffness
- Thermal and chemical resistance
- Surface finish requirements
- Machinability
Step 4: Machine Setup – Getting Ready to Cut
Now it’s time to set the stage. The raw material, or stock, is clamped securely onto the machine bed. Tools are loaded into the spindle, and the machine is calibrated—zero points are set so the machine knows where “home” is.
Proper setup minimizes errors and ensures repeatability, especially in production runs.
🧰 Safety Note: Always double-check clamps and toolpaths before starting a job. A small oversight can lead to broken tools or damaged parts.
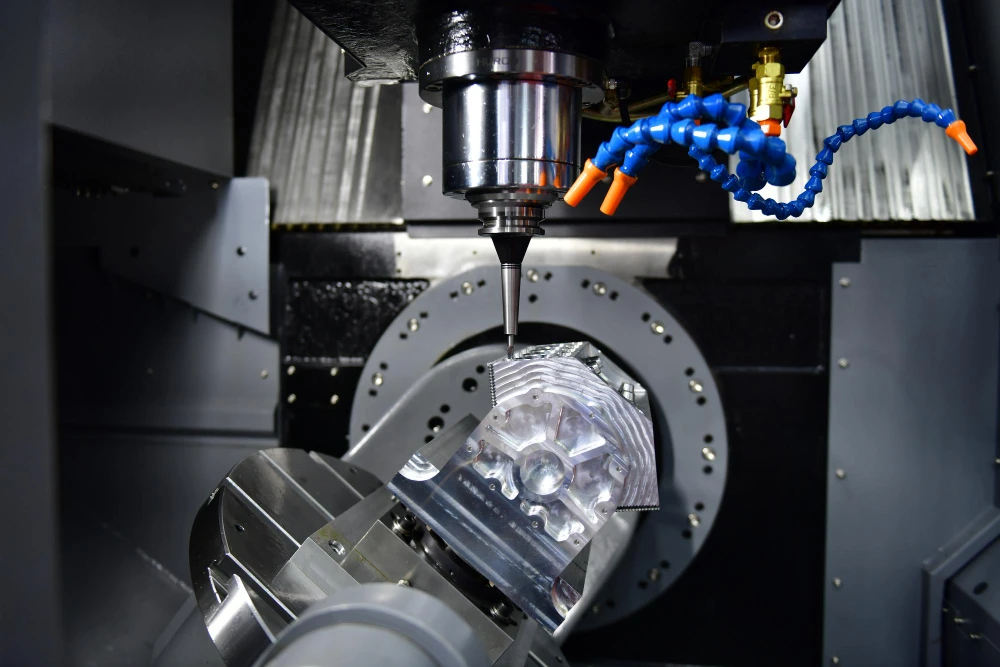
Step 5: Machining – From Virtual to Physical
This is where the magic happens. The CNC milling machine interprets the G-code and begins cutting the material, layer by layer, with extreme precision. This process may include:
- Facing: Flattening the top surface
- Pocketing: Removing material from enclosed areas
- Drilling: Creating holes to tight tolerances
- Contour milling: Following the outline of a part
Depending on the complexity, a single part can take minutes—or hours—to complete.
Step 6: Post-Processing – The Finishing Touches
After machining, parts often go through finishing processes like deburring, sanding, anodizing, or powder coating. These steps improve surface quality, durability, and appearance.
Inspection is also crucial here. Measuring tools like micrometers, calipers, or CMMs (Coordinate Measuring Machines) ensure each part meets design specifications.
Why CNC Milling Matters
CNC milling offers:
- Unmatched accuracy
- Repeatability
- Material flexibility
- Rapid prototyping and production capability
Whether you're crafting a one-off prototype or scaling to full production, CNC milling gives you the control and precision that traditional methods often can’t match.
Final Thoughts
CNC milling is more than just machining—it’s a seamless fusion of digital design and mechanical mastery. Understanding each phase, from design to finish, empowers creators to bring their ideas to life with confidence and precision.
So the next time you see a beautifully machined part, remember: it all started with a digital vision and a bit of code.


Sign in to leave a comment.