
Every piece of paper we throw into the recycling is money wasted. Managing raw materials is basically the most important aspect of profit for any commercial printing company.
The right prepress printing services will better use every single sheet and help minimize avoidable waste during the production process.
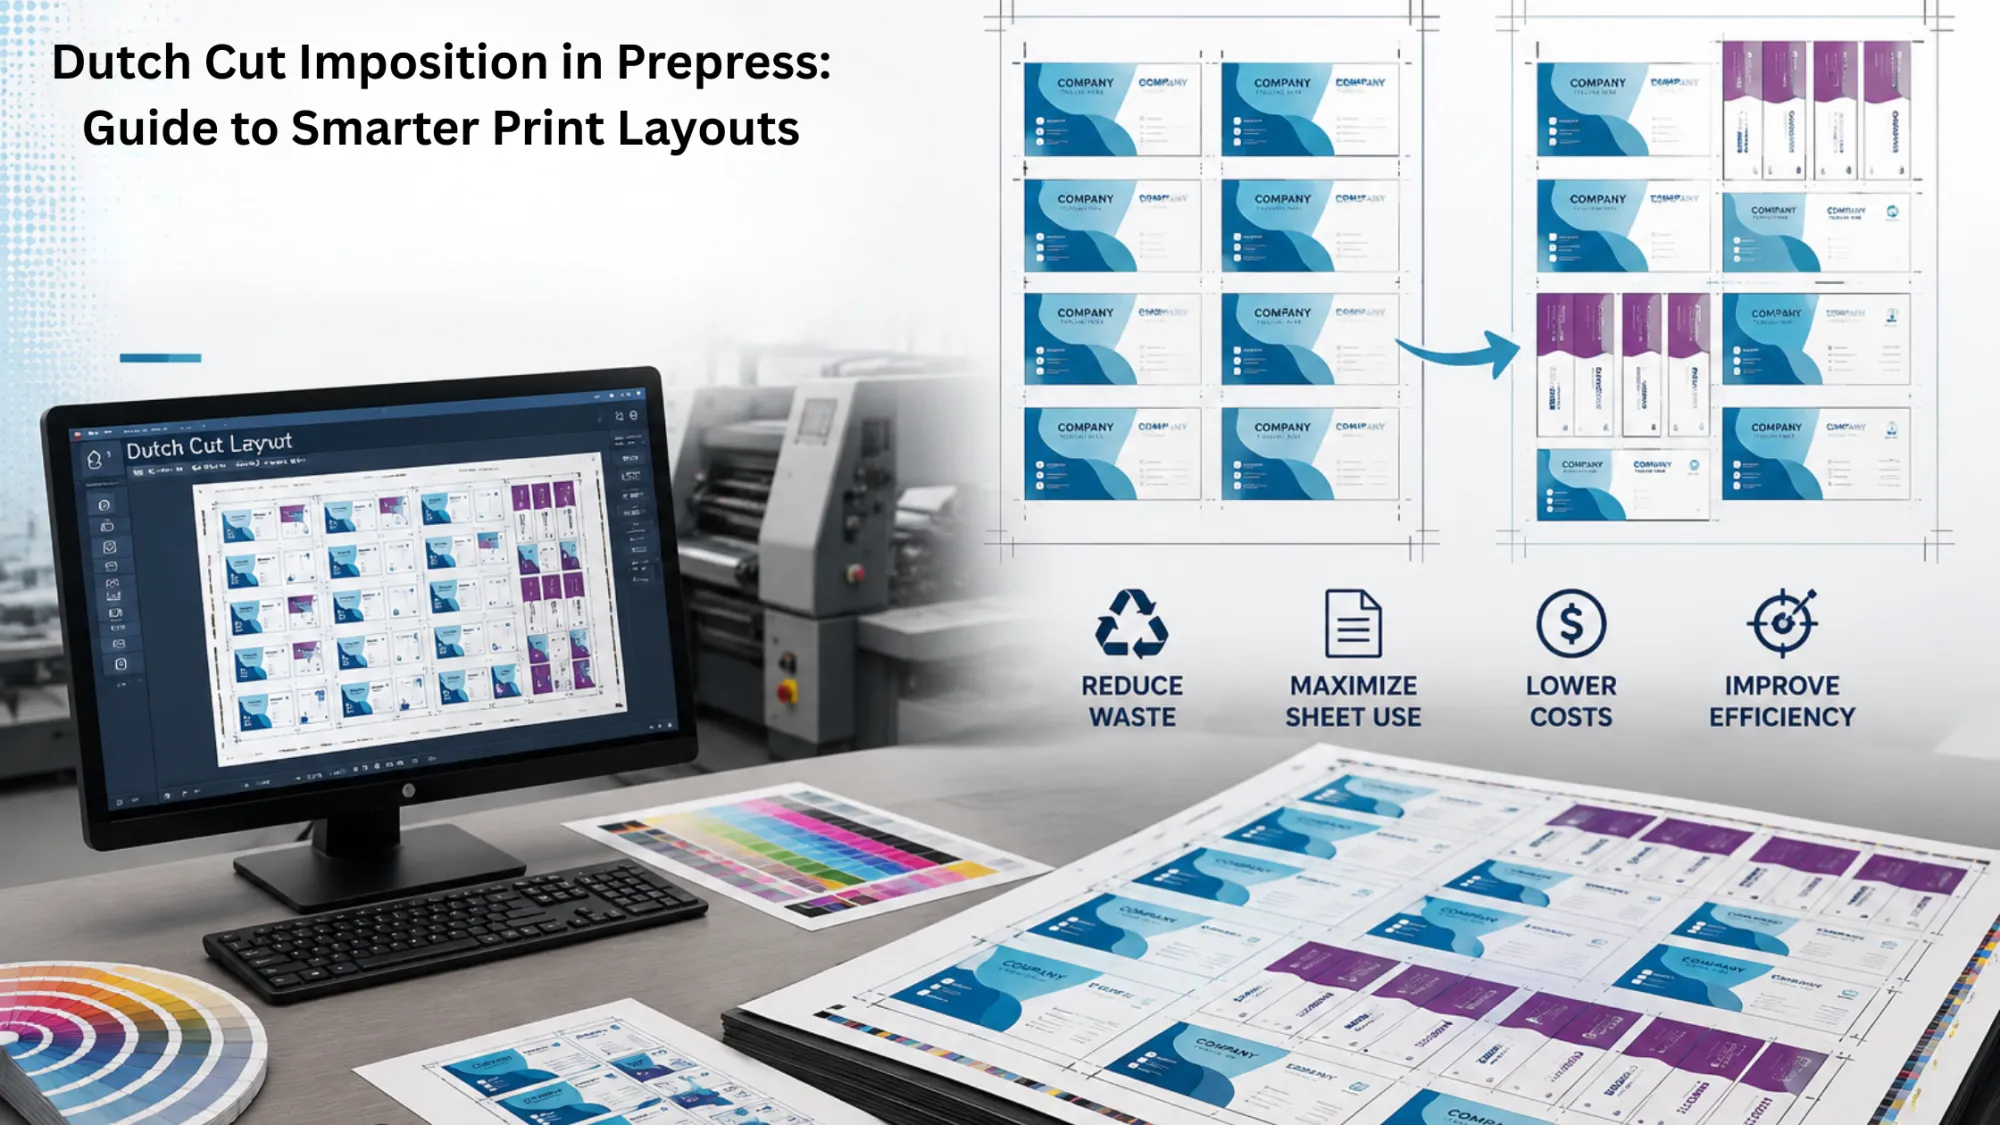
An example of an efficient sheet-optimizing technique is known as “Dutch Cut Imposition,” where a combination of the standard orientation and rotated pieces of an imposition is done to create the best press-sheet usage.
Here is everything you need to know about the Dutch cut techniques and how to better organize print jobs for optimal use of resources.
What Is Dutch Cut Imposition?
Standard layouts use a step-and-repeat system. In this layout system, a grid of identical pieces is established. A Dutch cut layout adds a secondary group of pieces rotated 90 degrees when that arrangement improves sheet usage.
A Dutch cut imposition (sometimes called a combination or mixed layout) breaks this standard grid. It rotates a portion of the artwork 90 degrees, placing standard and rotated pieces on the same press sheet.
By filling the awkward blank margins that traditional grids leave behind, a Dutch cut dramatically improves your overall sheet utilization, allowing you to print more units per sheet of paper.
How Dutch Cut Imposition Works
The mechanics behind a Dutch cut layout rely on modern prepress software capable of mixed-orientation grid calculation and precise spatial calculation.
Instead of locking artwork into uniform columns, Dutch cut software creates a main grid and a secondary rotated grid. Dutch imposition focuses on parameters to determine the best way to arrange the pieces to fit the greatest practical number of pieces on a single sheet.
Important Limits of Dutch Cut Imposition
- The Direction of Paper Grain: Paper folds more cleanly with the grain. Rotating a piece may place its fold line across the grain, increasing the risk of cracking, especially on coated or heavy stocks.
- Double-Sided Alignment: As sheets are turned to print on the other side, great care and extra work are needed to ensure that the previously printed pieces are in the right position.
When Dutch Cut Imposition Is Used
Standard grids can be applied to various projects. However, in some unique production situations, Dutch cut layouts have certain advantages.
1. Odd-Sized Artwork
Not all artwork can be designed on the paper sizes that are standard press-sheet sizes. If an item leaves awkward white space on a sheet, a Dutch cut turns that space into usable real estate.
2. Gang Sheet Printing
Gang sheet printing is when there are several different jobs or pieces that make up a single campaign that are run together as a single large print job. A Dutch cut enables prepress operators to arrange positions of smaller cards, bookmarks, or tags alongside larger flyers or brochures.
3. High-Cost Paper Stocks
Papers with heavy coatings and specialty textured papers are pricey. In long runs, especially, waste on these can make things really costly. High-density Dutch Cuts help keep costs down as they use fewer sheets.
Benefits of Dutch Cut Imposition
1. Material Waste Reduction
Paper use in printing can create a lot of waste. Dutch Cuts help reduce this because there is a smaller need to order large quantities of paper, which usually gets wasted and thrown out.
2. Optimized Print Sheets
Optimized print sheets mean more total pieces on the sheet, and savings are related to time and resources spent on the paper and press.
3. Lower Cost of Production
More pieces on a sheet means less paper is run, which also makes the job more efficient. The print shop can either charge less to produce the job or make the job more efficient and earn more.
Common Dutch Cut Layout Examples
Here are some standard ways prepress teams use Dutch cuts.
- Postcards and Business Cards: An arrangement of horizontal 4 x 6 inch postcards in a Dutch cut is often left with a thin leftover margin on one side of the layout. These leftover margins can be filled by sliding and rotating vertical 2 x 3.5 inch business cards.
- Booklet Covers & Inserts: Large booklet covers can be accompanied by the remaining booklet inserts by placing small cards in the leftover spaces.
- Carton panels and rectangular inserts: A rotated secondary row of inserts may fit beside larger rectangular packaging panels when grain direction and cutting requirements permit.
- Modified Step-and-Repeat Layouts: Combining standard step-and-repeat layout grids with turned end-pieces to fill up the border edges of a wide-format press sheet.
Key Setup Considerations
Saving paper is great, but only if the sheet can still be cut cleanly and efficiently after printing. When setting up, consider these three factors:
Optimization of Guillotine Cutting
Think about how the cutter operator will handle the sheet before locking in a layout. Guillotine cutting optimization relies on straight, edge-to-edge cut paths (called "guillotine cuts"). If a layout forces the operator to make complex pinwheel or L-shaped cuts, the extra cutting time will quickly wipe out any paper savings.
Bleeds and Trim Margins
Each design printed on the page needs the correct bleed (usually 1/8 of an inch) as well as adequate double cut gutters to avoid cutting into the adjacent designs.
Gripper and Color Bar Space
Offset presses need space for the gripper and control bars. Digital presses have their own non-printable spaces, but they don't have a margin for a mechanical gripper.
Common Mistakes to Avoid
- Ignoring Grain Direction on Folded Items: If a rotated piece needs to be folded later, folding against the grain can cause ugly cracking along the spine. Always double-check fold lines against paper grain before rotating artwork.
- Creating Uncuttable Layouts: Adding extra pieces is not worthwhile if it creates a slow or complicated cutting sequence. Even small paper savings may not be worthwhile if the cutter operator must spend additional time making complex manual cuts. Keep trim lines as continuous as possible.
- Misaligned Bleeds: When items in a layout are placed too close together, or are too misaligned, they incorrectly share space for the bleed. This makes weird colored lines show up.
- Ignoring Press Checks: Press checks are one of the most important steps to align something in the prepress process. If you skip these checks, you could totally ruin the layout.
An imposed PDF can help verify that layout items are aligned correctly, but does not guarantee that the printing equipment will actually align items.
Improve Sheet Use With Careful Prepress Planning
The Dutch cut layout allows printing companies to use space on the printing sheet to fully optimize the layout, reduce waste, and keep product quality high. A successful Dutch cut layout begins with accurate prepress file preparation and careful coordination between imposition, printing, cutting, and finishing.
Finding that balance between savings on paper and the practical needs of finishing and cutting results in a smooth prepress workflow in print production, reduced costs for materials, and improved profitability.






















Sign in to leave a comment.