The SMOK Nord is getting on in years, yet it remains a very popular vape. In fact, it is one of SMOK's most popular items.
But what are your best alternatives for coils with the SMOK Nord?
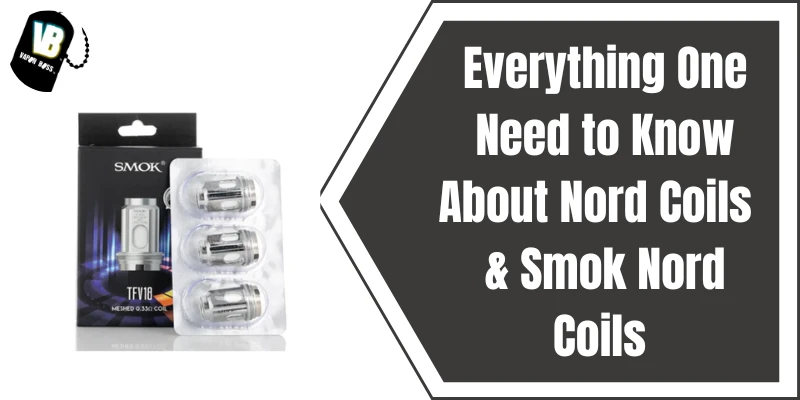
Prepare to upgrade your compact with the Smok Nord Coils. This fantastic 5-pack of high-quality Nord Replacement Coils from Smok is meant to keep your Nord working at the high level you've come to expect. Smok Nord Coils provide a dynamic atomizer structure choice for the Nord Pod System, with 0.6-ohm Mesh Coil, 0.8-ohm Mesh-MTL, 1.4-ohm Ceramic Coil, and 1.4-ohm Traditional Coil. The Nord Coils come in a set of 5 replacement coils and include 2 o-rings on the top and 1 o-ring on the bottom for an easy plug and play system.
As a result, these Nord Coils are available in an exotic range of resistances ranging from 0.6-ohm to 1.4-ohm, as well as coil configurations that provide incredible build quality from top-of-the-line materials and have been designed to deliver intense, flavorful, and more satisfying vape when used with the Nord ultra-portable pod-based system.
Nord Coils Features
It is available in three different styles: mesh, regular, and ceramic.Each pod has a resistance of 0.06 ohm mesh, 1.4 ohm normal, and 1.4 ohm ceramic.These have coil designs that can be replaced.0.6-ohm Nord Regular DC Coils have a twin coil configuration and are rated at 20W.0.6-ohm Nord Mesh Coils are tuned for the Sub-Ohm Experience, with 25. 0.8-ohm resistance. Nord Mesh-MTL Coils have a power rating of 16W.The 1.4-ohm Nord Regular Coils are designed for MTL use.1.4-ohm Nord Ceramic Coils can withstand extreme temperatures.According to the SMOK Nord Coil Family:
Nord Mesh is 0.6-ohm with MTL, Nord Regular is 1.4-ohm as Direct Lung, Nord Mesh MTL is 0.8-ohm MTL, Nord Ceramic is 1.4-ohm MTL, Nord DC MTL is 0.8-ohm with Dual Coil MTL, and Nord DC MTL is 0.8-ohm with Dual Coil MTL.
What is Included
1 x SMOK Nord Coil (5 in a Pack).
WARNING: This is a sophisticated item, therefore use at your own risk and always take proper precautions and handling after carefully reading the directions, since these are highly sensitive to charging characteristics and may explode or burn if not handled correctly. Please keep in mind that there is an inherent danger in using any and all rechargeable batteries under any conditions. We shall not be liable for any harm or defect caused by the inappropriate use or mistreatment of Li-ion, Lithium-ion Polymer, and any rechargeable batteries or chargers.
Note: This is a vaping product that is not suited for pregnant women, those with respiratory difficulties, or anyone under the age of 21.
Replace your vape coils on a regular basis.
The coils of a vape should be replaced every 1-2 weeks, according to vapers. Your coil replacement frequency may vary depending on your vape wattage, how frequently you hit, and even the type of e-liquid you use. However, changing the coil is a simple and quick process.
Changing the Coil on Your Vape
In the first step, expose the coil.
When you remove the tank from the body of the vape, you can see the coil in the centre of the device. Next, carefully peel the top piece of the tank away from the bottom to uncover the coil. This is best done when the tank is entirely dry, but you may use a paper towel to minimise the mess and avoid getting juice on your hands.
Empty the tank of all its contents.
Even if you still have juice in your tank, dump it into a rubbish can straight away. Replace the coil with as little old juice in the tank as possible, as is suggested when replacing coils. You might as well take advantage of this time to clean your tank and drip tip!
Remove the coil from the holder.
The coil, also called an "atomizer head," is the metal and cotton component in the tank's centre. Depending on your particular device, this may be linked to the top or bottom area of your tank. Turn the coil counterclockwise until it completely pops out. You may keep your hands clean and avoid slippage when grasping the coil by wiping them together with a piece of paper towel. Then you're finished! Your new coil's installation and priming have already been performed satisfactorily.
It is now important to include some E Juice. Unplug the rubber stopper located on the right side of the top piece to fill her up. At this stage, the device should be left to rest upright for 4-9 minutes. As a consequence, the E Juice will seep into the cotton, preventing dry impacts.
What is the reason for your delay? This is simple: if you take a draw straight away and any of the cotton within the coil is dry, it will burn, thus destroying the coil.
Wrapping It Up
The SMOK Nord is a fantastic device with extremely simple operation that is a must-have for vaping lovers. It not only has an amazing battery life, especially when utilising its MTL coils, but it also has a fantastic flavour (with both styles of coils). Aside from that, the SMOK Nord Coils are a fantastic buy.


Sign in to leave a comment.