Why two steps matter
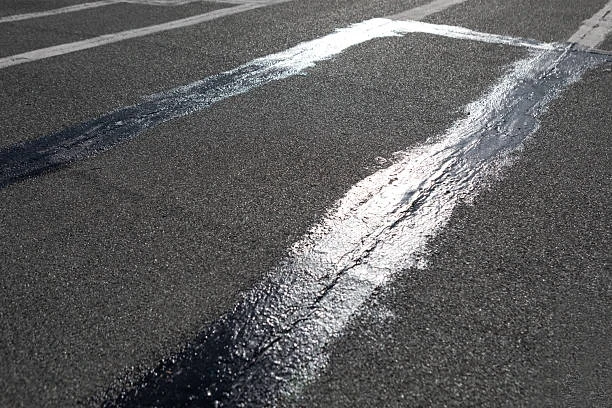
As a contractor who’s patched more lots than I’ve had hot lunches, I’ll tell you straight: sealcoating protects asphalt from UV, oil, and water damage, while crack repair prevents water from undermining the base—skip either and you’ll pay for it later with potholes and angry tenants. I once watched a freshly seal coated lot fail because the owner ignored a network of hairline cracks; the sealcoat looked great for a week, then the cracks widened and the base washed out. Lesson learned: do both, not one.
Materials and timing
For sealcoating, use a high-quality coal-tar or asphalt emulsion product and apply when temperatures are steady and dry—ideally 70–85°F with no rain for 24–48 hours. For crack repair, choose hot-pour rubberized sealant for working cracks and polymer-modified fillers for static cracks. Proper surface prep—cleaning, routing, and drying—makes the difference between a repair that lasts and one that ghosts you by spring. I always tell clients: timing beats technique if you’re racing the weather.
Step-by-step two-step plan
- Inspect and prioritize. Walk the lot and mark cracks, oil spots, and drainage issues. I do this with a thermos of coffee and a stubborn sense of optimism.
- Clean cracks. Wire brush, vacuum, or compressed air—no dirt, no adhesion. I once tried skipping this step to save time; the filler popped out like a bad tooth.
- Route and backer rod. For moving cracks, route to a uniform width and depth; use backer rod on deep gaps.
- Apply crack sealant. Follow manufacturer temps and pour slowly; tool the surface smooth.
- Prep for sealcoat. Sweep, remove oil stains, and let repairs cure fully.
- Sealcoat application. Spray or squeegee even coats; one good coat every 3–5 years is a solid rule for commercial lots. I prefer two thin passes to one thick one—less chance of tracking and faster curing.
Cost vs. value
Sealcoating and crack repair are cost-effective preventive measures—they add curb appeal and delay expensive overlays or full replacement. In my experience, routine maintenance saves owners thousands over a decade compared with reactive repairs. Think of it as investing in a warranty for your pavement’s next ten years.
Common pitfalls (and how I avoid them)
- Applying sealcoat over uncured repairs: wait the full cure time.
- Using rigid fillers on moving cracks: they’ll fail fast.
- Ignoring drainage: standing water is the silent killer. I always check drains first; if water’s not leaving, nothing else matters.
Final contractor wisdom
Consistency wins. Inspect twice a year, fix cracks promptly, and sealcoat on a predictable schedule. Do that and your lot will behave like a well-trained dog—mostly obedient, occasionally needy, and far less likely to bite your budget. If you want, I’ll tell you the story about the strip mall that tried to save money by skipping sealcoat—spoiler: it didn’t end well, but it did make for a great cautionary tale at the next crew lunch.


Sign in to leave a comment.