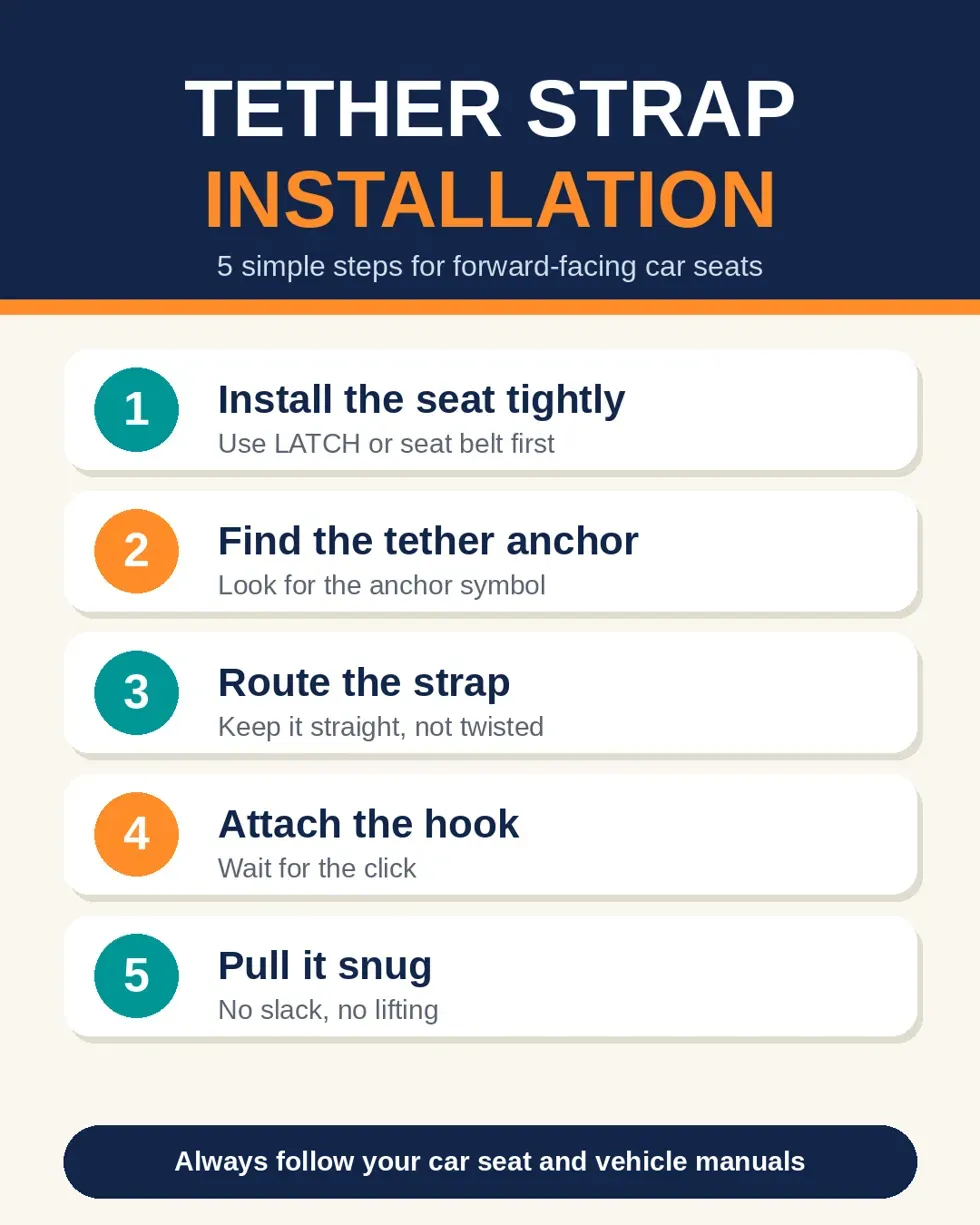

A car seat only protects your child if it is installed correctly, and one of the most skipped steps is attaching the top tether. Many parents tighten the seat belt or lower anchors, then forget the strap at the top. This guide walks you through tether strap installation, common mistakes, and simple checks so your child's seat stays secure.
What is Tether and Why Does It Matter?
A tether is a strap attached to the top of a forward-facing car seat. It has a hook on one end that connects to a dedicated anchor point in your vehicle. When a crash happens, the tether limits how far the seat and your child's head move forward. Safety experts say it can reduce forward head movement by several inches, which lowers the risk of the head striking the front seat or other hard surfaces.
The top tether works together with the seat belt or lower anchors (LATCH). It does not replace them. Think of it as the third point of contact that keeps the seat stable.
Before You Begin
Gather these items first:
- Your car seat manual
- Your vehicle owner's manual
- A flashlight, since anchors can be hidden in dark corners
- The tether strap that came with the seat
Read both manuals. They show where the tether anchors are and how your specific seat connects to them. Instructions vary by car and seat model, so the manuals always come first.
Step-by-Step Tether Strap Installation
Step 1: Install the Seat Securely First
Place the car seat on the back seat facing forward. Install it with either the lower anchors or the seat belt, following the manual. The seat should move no more than one inch side to side or front to back at the belt path. Do this before attaching the tether so you do not use the tether to hide a loose installation.
Step 2: Find the Tether Anchor
Look for a small symbol that shows a child seat with an anchor and a strap. Depending on your vehicle, the anchor may be located:
- On the back of the seat (common in sedans and hatchbacks)
- On the rear shelf behind the seat
- On the ceiling or the floor of the cargo area (common in SUVs and wagons)
If you cannot find it, check the owner's manual. Do not guess, and do not attach to anything that is not marked as a tether anchor.
Step 3: Route the Strap Correctly
Take the strap from the top of the car seat and guide it over the top of the vehicle seatback. Some vehicles require the strap to pass under or around the head restraint. Your manual will show the right path. Make sure the strap is straight and not twisted.
Step 4: Attach the Hook
Connect the tether hook to the anchor point. You should hear or feel a click and see the hook fully seated. Give it a gentle tug to confirm it is locked.
Step 5: Remove Slack and Tighten
Pull the loose end of the strap until it is snug. The tether should be tight enough to remove slack but should not lift or pull the car seat away from the seatback. While tightening, press down on the car seat with your hand to keep it firmly in place.
Step 6: Final Check
Shake the seat at the belt path and pull on the tether. Nothing should feel loose. Check that the harness is snug on your child and the chest clip sits at armpit level.
Common Tether Mistakes to Avoid
- Attaching to the wrong point. Cargo hooks, luggage tie-downs, and seat frames are not designed for crash forces.
- Leaving the strap loose. A slack tether gives no benefit in a crash.
- Twisted strap. A twist weakens the tether and makes it hard to tighten properly.
- Using the tether on a rear-facing seat without approval. Most seats use the top tether only when forward-facing. A few models allow tethering in other modes, so follow your seat manual exactly.
- Forgetting to re-check. Straps can loosen over time, especially if you move the seat between cars.
Extra Safety Tips
- Re-check the tether each time you reinstall the seat.
- If your car has no tether anchor, ask the manufacturer or a certified technician about retrofit options.
- Book a free check with a certified car seat technician if you have any doubt.
- Replace a seat after a moderate or severe crash, and also replace any damaged tether strap.
Final Thoughts
Tether strap installation takes only a couple of minutes, yet it adds a major layer of protection for a forward-facing child. Find the correct anchor, route the strap properly, attach the hook, and tighten it snugly. Always follow both manuals, and never skip this step just because the seat feels secure without it.
Frequently Asked Questions
1. Is the top tether required for forward-facing car seats?
Yes, it is strongly recommended and, in many regions, required by the seat manufacturer's instructions. Always use it whenever the manual says so.
2. Can I use the tether with a seat belt installation?
Yes. The top tether can be used with both the seat belt and lower anchor installations for forward-facing seats.
3. How tight should the tether strap be?
It should be snug with no slack, but it should not pull the seat out of position. If the seat lifts or tilts, loosen it slightly and re-check.
4. What if my car does not have a tether anchor?
Check your owner's manual for retrofit options or contact the vehicle maker. A certified technician can also advise you on safe alternatives.
5. Can I attach the tether to the cargo hook or any metal loop?
No. Only use the anchor marked with the tether symbol. Other hooks and loops are not built to handle crash forces.


























Sign in to leave a comment.