Removing tile flooring might seem like a straightforward DIY project, but making the wrong move can cost you time, money, and even your health. Whether you're preparing for a full renovation or simply updating your floors, it's critical to know what not to do. In this article, we’ll cover the most common mistakes homeowners make during tile removal, and how to avoid them.
1. Underestimating the Complexity of Tile Removal
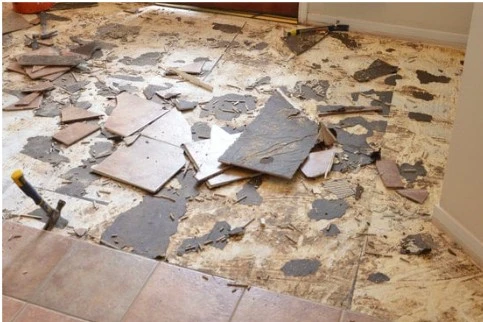
Many people assume tile removal is as easy as grabbing a chisel and hammer. But the reality is far more challenging. Tiles are often set with strong adhesives or mortar that make them incredibly difficult to lift. What’s underneath—concrete or plywood subfloor—can also determine how hard the job will be.
Solution: Research your tile type and what's beneath it before starting. Consider hiring a professional for an assessment.
2. Skipping Proper Safety Precautions
Tile removal is messy and hazardous. Dust, sharp edges, and heavy tools all pose serious risks.
Solution: Always wear safety goggles, gloves, knee pads, and a dust mask or respirator. If working in enclosed spaces, consider using an air purifier or opening windows for proper ventilation.
3. Not Testing for Asbestos in Older Floors
If your home was built before the 1980s, there’s a real chance that tile adhesives contain asbestos—a highly dangerous substance when disturbed.
Solution: Test the materials for asbestos before you begin removal. If asbestos is present, call a licensed abatement professional.
4. Damaging the Subfloor
Ripping up tiles too aggressively can gouge, crack, or otherwise damage the subfloor, especially if it’s wood. This can lead to additional repair costs and delays.
Solution: Use the right tools—a rotary hammer with a tile chisel attachment is often safer and more precise. Go slow and check your progress regularly.
5. Failing to Contain Dust and Debris
Tile removal creates a shocking amount of dust. Letting it spread throughout your home can lead to HVAC issues and respiratory problems.
Solution: Seal off the room using plastic sheeting and painter’s tape. Turn off your HVAC system during removal. Use a shop vacuum with a HEPA filter for cleanup.
6. Using the Wrong Tools
Using basic hand tools might seem cost-effective, but they can be inefficient and even dangerous.
Solution: Invest in or rent professional-grade tools such as a floor scraper, angle grinder, or demolition hammer. This will speed up the process and reduce strain.
7. Not Removing Thinset Properly
After tiles are removed, you’ll often find a stubborn layer of thinset (mortar) stuck to the floor. Leaving it in place will interfere with new flooring installation.
Solution: Use a floor grinder or rotary hammer with a scraping bit to remove the thinset. The surface must be smooth before new flooring can be laid.
8. Ignoring Structural or Moisture Issues
Sometimes, tile is used to cover up deeper problems like subfloor rot, water damage, or foundational cracks.
Solution: Once tiles are up, inspect the area thoroughly. If you see signs of moisture or structural damage, address them before moving forward.
9. Improper Waste Disposal
Tile debris isn’t just heavy—it can’t be tossed into regular trash bins in most areas.
Solution: Check with your local waste management company for tile disposal regulations. You may need to rent a dumpster or take the debris to a specific landfill.
10. Rushing the Process
DIYers often get excited and try to finish the job in a day or two. But rushing can lead to mistakes, injuries, and low-quality results.
Solution: Plan your project timeline carefully. Build in time for cleanup, repairs, and inspections.
11. Not Having a Follow-Up Plan
Once the tile is removed, what comes next? Failing to plan for the next steps can leave you stuck with an unusable space.
Solution: Decide in advance whether you’re installing new tile, hardwood, laminate, or carpet. Each flooring type may require different prep work.
12. Overlooking Professional Help
While DIY can be rewarding, some tile removal projects are better left to the pros, especially in larger areas or homes with complex layouts.
Solution: Get quotes from licensed contractors and weigh the pros and cons. Sometimes, the cost of professional work is worth the savings in time and effort.
Conclusion
Removing tile flooring is a task many homeowners are eager to tackle, but it's not without its pitfalls. From skipping safety measures to damaging the subfloor, the mistakes covered here can lead to expensive repairs and delays. By understanding these common errors and taking steps to avoid them, you can ensure your tile removal project goes smoothly and safely. Whether you're going the DIY route or calling in a professional, preparation and caution are key to a successful renovation.
Remember: Take your time, use the right tools, and don’t hesitate to call in experts when needed. Your floors—and your budget—will thank you. For professional tile removal and installation services, visit Salem Tile Setters.


Sign in to leave a comment.