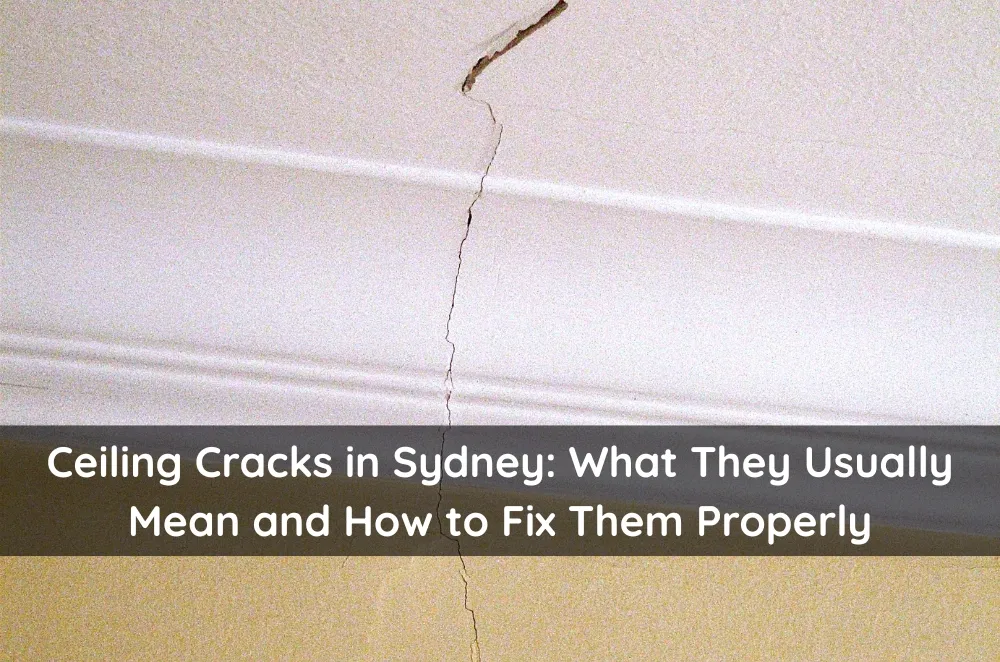
Ceiling cracks have a special talent for showing up at the worst possible time.
You notice them the week guests are coming, right after you’ve painted, or when you’re trying to get a rental ready for new tenants.
They’re also hard to ignore because ceilings catch light differently, so small flaws can look big from the right angle.
The mistake is rushing to patch and paint without working out what kind of crack it is and whether anything is still changing.
This guide walks through the most common ceiling crack types, what typically causes them in Sydney homes, and how to plan a repair that won’t announce itself the next time the sun hits the room.
The common types of ceiling cracks
Not all ceiling cracks behave the same way, and that’s why “a quick patch” sometimes works and sometimes fails fast.
Hairline cracks along joins
These are fine lines that run in long, straight paths, often following plasterboard joins or changes in ceiling direction.
They’re common in rooms with downlights because the lighting exaggerates shadows.
If they stay thin and don’t change much over time, they’re often more about finishing and movement at joins than a bigger issue.
Cracks around cornices and ceiling edges
Cracks that trace the edge where the ceiling meets the wall can point to small movement, shrinkage, or older joint lines showing through.
They’re also common after repainting because fresh paint can highlight tiny separations you didn’t notice before.
Stair-step or spreading cracks
Cracks that branch, widen, or show up in multiple directions can indicate more movement than a simple joint line.
These are worth documenting carefully, especially if you can see new cracking in more than one room.
Cracks with staining or bubbling
If you see a crack plus a stain, soft patch, bubbling paint, or a “tide mark,” treat it as a moisture problem until proven otherwise.
A repair over moisture damage is usually temporary, even if it looks neat for a week.
Sagging or “dipping” sections
A sagging ceiling is different from a crack. It can be a safety concern depending on the cause and severity.
If anything looks soft, bowed, or unstable, keep the area clear and organise assessment rather than poking, drilling, or scraping.
What typically causes ceiling cracks in Sydney homes
Ceilings can crack for several reasons, and the same visible line can come from different drivers.
Normal movement and settling
Homes move. Timber frames expand and contract, and even small shifts can show up at the weakest points: joins, corners, and edges.
Sydney’s seasonal humidity changes can make movement more noticeable in certain months, especially in older or mixed-renovation homes.
Jointing issues and tape failure
Many ceiling cracks are simply joint problems.
If the original tape wasn’t embedded properly, if compound was rushed, or if drying times weren’t respected, the joint can crack along a clean line.
These are often the cracks that return after a basic filler job, because the underlying joint still wants to move.
Vibration and “life load”
Slamming doors, renovations nearby, heavy foot traffic upstairs, and even ongoing building vibration can contribute to cracks appearing where the ceiling is already under stress.
This is one reason cracks sometimes show up after renovations, even when the renovation wasn’t “on” the ceiling.
Moisture ingress
Moisture is the fastest way to turn a cosmetic ceiling issue into a recurring one.
Leaks from bathrooms, roofs, gutters, or plumbing can soften plasterboard, weaken fixings, and cause staining and sagging.
If moisture is suspected, controlling the source is the real first step, not the patch.
Previous repairs that didn’t blend or seal properly
A lot of “my ceiling looks worse after fixing it” comes down to flashing and texture mismatch.
Ceilings often have subtle texture and paint build-up that a patch changes. Without the right sealing and feathering, the repair becomes a visible island.
Common mistakes that make ceiling repairs obvious under paint
Ceiling work looks unforgiving because light skims across it, especially with downlights and large windows.
Mistake 1: Repairing too narrowly.
Small patches leave hard edges that become visible as a rectangle once painted.
Mistake 2: Using the wrong approach for joint cracks.
A repeated joint crack usually needs proper joint treatment, not just a skim of filler on top.
Mistake 3: Painting before the repair has cured.
Even if it feels dry, the compound can still be curing. Paint too soon, and you can get sinking, cracking, or texture changes later.
Mistake 4: Skipping sealing and expecting the topcoat to behave.
Unsealed repairs absorb paint differently and can flash under certain light.
Mistake 5: Sanding for “smooth” instead of sanding for “flat.”
Over-sanding can create dips that are more noticeable than a slightly textured ceiling.
Decision factors: DIY vs pro, and how to choose a repair approach/provider
Some ceiling cracks can be handled as a simple maintenance task. Others need a more careful approach because the consequence of a poor repair is repeated work and visible ceilings.
When DIY is usually fine
- Very fine, stable hairline cracks that haven’t changed over a couple of weeks
- Tiny separations at paint lines where there’s no staining or softness
- Low-visibility areas where perfection isn’t critical
A sensible next step is to monitor first. Take photos now and again in 7–14 days to confirm the crack is stable before you commit to repair.
When it’s usually better to call a pro
- Cracks that return after you’ve repaired them
- Multiple cracks forming a pattern across rooms
- Any staining, bubbling, or soft patches
- Areas that catch strong daylight or downlights, where finish quality is crucial
- Any sagging or dipping sections that raise safety concerns
This isn’t about assuming the worst. It’s about matching the repair method to the risk.
How to choose the right approach
When comparing options, focus on these factors.
1) Cause management
Is the crack linked to moisture or ongoing movement, and how will that be handled?
2) Repair method
Will the approach involve proper joint treatment, reinforcement, broader feathering, or simply surface filling?
3) Finish standard
What does “paint-ready” mean in practice for a ceiling with downlights and raking light?
4) Timing and drying
How will cure time affect your painting schedule, especially if you’re coordinating other trades?
5) Scope clarity
Does the quote explain inclusions, exclusions, and what could change once work begins?
You’re not just buying time on site. You’re buying a plan that won’t look like a plan after the paint dries.
Simple 7–14 day plan to get clarity and comparable quotes
If you want quotes you can actually compare, give each provider the same information and constraints.
Days 1–2: Document properly
Take a close-up and a wide shot of each crack. Note the room, the location, and what lighting hits it (downlights, window glare, skylights).
Days 3–5: Check for moisture signals
Look for stains that grow, soft areas, damp smells, bathroom leaks, roof issues, or gutter overflow marks. If you suspect moisture, prioritise confirming and stopping it.
Days 6–7: Write a one-page ceiling note
List each area, approximate length/size, ceiling height, access constraints (stairs, furniture, strata rules), and your finish expectation after paint.
To make quotes comparable, bring the same photos, room notes, and access details to each call, and the ceiling crack repair is a simple way to organise that prep.
Days 8–10: Get 2–3 quotes and compare the method
Ask each provider how they prevent flashing and visible patch edges on ceilings. Notice who asks questions about moisture and movement rather than assuming.
Days 11–14: Lock the sequence with painting and other work
Ceiling repairs come before painting. If you’re changing lighting, cornices, or doing bathroom work above, schedule it so new work doesn’t damage fresh repairs.
Operator Experience Moment
Ceiling jobs go best when expectations are named early. “Fix the crack” can mean anything from “make it less noticeable” to “make it disappear under downlights.” Once the finish standard is clear, the repair method becomes clearer too, and the result is usually more consistent.
Local SMB mini-walkthrough: Sydney, NSW
Photograph ceiling cracks when the lights are on and again with daylight, because raking light shows edges.
If there’s a stain, map it against recent rain and bathroom use before booking cosmetic repairs.
Note whether cracking sits near stairwells, doorways, or renovated wet areas.
For strata, confirm approved work hours, access, and protection requirements before scheduling.
If there’s sagging or softness, keep the area clear and organise safe access for assessment.
Share the same photos and scope note with every provider so pricing is comparable.
Book ceiling repairs before a whole-room repaint to avoid patch lines showing later.
Practical opinions
If the crack is repeating, treat the joint properly instead of skimming over it again.
If moisture is even a possibility, solve the water source first or the repair won’t last.
For downlit rooms, pay for blending and sealing because ceilings are unforgiving.
Key Takeaways
- Ceiling cracks vary: hairline join lines behave differently to stained, spreading, or sagging areas.
- Moisture changes the job; stop the source before repairing the surface.
- The best quotes come from shared photos, shared scope notes, and clear finish expectations.
- A paint-ready ceiling repair is mostly prep, feathering, sealing, and cure time.
Common questions we hear from businesses in Sydney, NSW, Australia
1) Should I patch a ceiling crack straight away or wait?
Usually, it’s worth watching a small crack briefly to see if it’s stable, especially if there’s no staining or softness. A practical next step is to photograph it now and again in 7–14 days and note any change in length or width. In many Sydney homes, seasonal humidity and temperature shifts can make fine cracks look worse at certain times of the year.
2) Why did my ceiling crack come back after I repaired it?
It depends on the cause: joint movement, tape issues, or moisture can all lead to repeat cracking. A practical next step is to check whether the crack follows a straight joint line and whether it changes after rain or steamy bathroom use. In most cases around Sydney, recurring ceiling cracks need proper joint treatment and sealing, not just more filler.
3) What’s the biggest reason ceiling patches show under paint?
In most cases, it’s flashing or edge visibility from narrow feathering, uneven sanding, or skipped sealing. A practical next step is to ask how the repair will be blended and sealed before topcoats, especially in downlit rooms. In Sydney, properties with lots of natural light and modern lighting, small ceiling imperfections become very noticeable.
4) When is a ceiling crack a safety concern?
Usually, the concern rises if there’s sagging, softness, widening cracks, or signs of water damage. A practical next step is to keep the area clear and organise the assessment rather than poking, drilling, or scraping. In many Sydney homes with a history of roof or bathroom leaks, ceiling issues can worsen if the underlying moisture source isn’t addressed.


Sign in to leave a comment.