Have you heard about Kubernetes and feel like it's time to explore what it's all about? Or maybe you have some experience with it and want to enhance your knowledge.
If you're new to Kubernetes, expect to dedicate approximately a month to comprehend and deploy your initial production-ready pod application. But where should you start?
Don't worry. This guide will provide you with a summary of Kubernetes, its terminology, and how it can help optimize your containerized applications. By the end of this article, you should have a solid understanding of the fundamental concepts, which will help you better comprehend more advanced Kubernetes tutorial for beginners.
What Is Kubernetes?
Kubernetes is a platform that automates the deployment, scaling, and management of containerized applications. It organizes containers into logical units to simplify management and cloud deployment.
This involves managing the cluster of machines and the states in which the containers operate. It also involves managing the groups of containers that constitute an application, referred to as pods.
Lastly, the Kubernetes scheduler is used to schedule containers on the cluster (which we will discuss later).
Kubernetes provides enhanced resilience to your application by allowing static and dynamic scaling. Unlike Docker Compose, which operates on a single node, Kubernetes functions as a cluster across multiple nodes, increasing its effectiveness.
Kubernetes enables automated scaling, ensuring that resources are allocated efficiently. For example, if there is an influx of requests that exceed the capacity of the available pods, Kubernetes can automatically adjust the number of replications based on CPU/memory utilization.
Similarly, if there is minimal traffic during the early stages of your project, Kubernetes can reduce resources to prevent idle clusters.
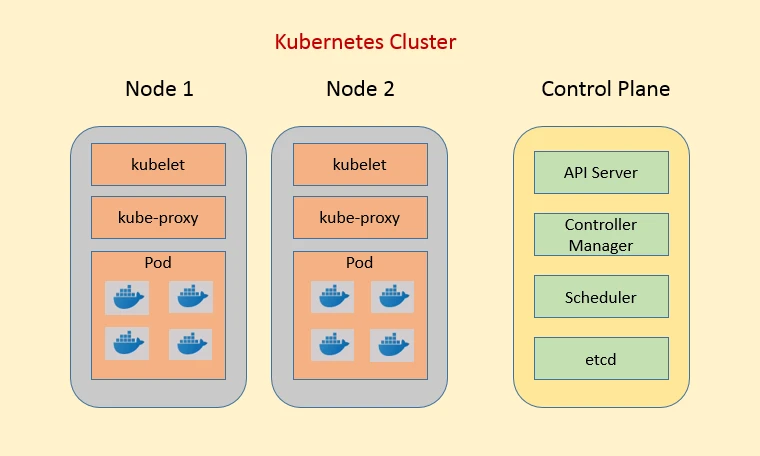
What Is Clusters?
A Kubernetes cluster consists of a group of nodes/VMs running the Kubernetes software with identical computing and memory resources. These nodes are referred to as a node pool.
When scaling horizontally by adding more nodes to the node pool, Kubernetes redistributes all pods to the new nodes. The Scheduler section, which we'll cover later, discusses how Kubernetes tracks various metrics to determine node availability.
It is essential that all nodes in a Kubernetes cluster have the same CPU and memory specifications.
Additionally, it is recommended to distribute nodes across different regions (e.g., Google Cloud's zonal, regional, or global locations) to ensure that applications remain available if a catastrophic incident occurs in one region.
Thankfully, cloud infrastructures such as AWS, Google Cloud, and DigitalOcean manage Kubernetes clusters by default.
You can buy these courses at a discount price using CKA exam voucher on Linux Foundation's official website and improve your skills in Kubernetes.
The cloud provider manages the master node where kubectl and other components like kube-APIserver, etcd, kube-scheduler, kube-cloud-manager, and kube-controller-manager reside. The only requirement is to provision the number of nodes and physical specifications.
Google introduced GKE Autopilot, which simplifies the process further. With Autopilot, you don't have to manage node pools or kubectl commands; you only need to specify the pod configuration.
How To Deploying an Application?
To deploy an application in Kubernetes, you need a YAML configuration file, similar to docker-compose.yml. In this YAML file, you specify your application's name, the containers to be used, and the necessary CPU/memory resources to build your application. You then deploy the application with the previously mentioned kubectl apply command.
When deploying applications, you also need to specify disk volume attachment, services to expose the application, and the roles available for application use. Next, we'll discuss this in detail.
Kubernetes provides its own role-based access control, called Kubernetes RBAC, as an open-source system. RBAC enables you to control access to two things:
Namespaces in cluster resourcesRole bindings within a namespace.Creating a namespace in cluster resources can be beneficial when multiple departments need cluster resources or when multi-staging environments, such as dev, staging, QA, and production, are required.
With roles and role bindings, you can restrict which users have read-only, write-only, or both types of access to a specific namespace.
What Are Service?
Kubernetes services are responsible for exposing your application through a network service. There are three types of services available:
The first service is ClusterIP, which is the default. Each pod has its own IP address that can be accessed by other pods within the same cluster. However, this IP address is only accessible within the cluster.
The second option is NodePort. Kubernetes assigns the same port number across all pods, which means that you cannot assign a different port to each pod. Kubernetes also includes an automatic internal load balancer, so you do not need to specify all three nodes to load balance traffic for a specific pod. All traffic from any node IP is routed to the NodePort service and then redistributed to the actual application pods.
The third option is to use an external load balancer, which is typically provided by cloud providers such as Google and Amazon. This time, only the IP of the external load balancer is exposed to the internet, not the node IP.
Final Thoughts
After learning about the essential functionalities of Kubernetes and its components, you may be interested in integrating CI/CD to your Kubernetes and creating a continuous deployment process.
Fortunately, Qovery can help you with this. By using Qovery, you can easily deploy your application on AWS with Kubernetes working behind the scenes. All you have to do is push your code, and Qovery will take care of the rest.


Sign in to leave a comment.