Homeowners who understand the full process of garage floor epoxy flooring are better prepared for the installation day and more appreciative of the quality they receive. The process is more involved than most people realize, which is exactly why professional results look so different from DIY attempts.
Step One: The Free Estimate and Design Consultation
The project begins before any equipment arrives on site. Reese Magnant visits the space to assess the concrete condition, understand the homeowner's vision, and determine the appropriate system for the specific floor. This consultation also covers color options, finish styles, and any specific requirements the homeowner has for the finished floor.
This step is where the project takes shape visually and technically. It is also where the honest assessment of the concrete condition happens, including identifying cracks, previous coatings, moisture issues, or contamination that need to be addressed in the preparation phase.
Step Two: Industrial Concrete Grinding and Repair
On installation day, the first thing that happens is concrete grinding. The industrial machines process the entire floor surface, removing the top layer and opening the concrete to receive the coating system. This step creates the mechanical profile that allows the epoxy base coat to achieve lasting adhesion.
After grinding, all cracks and voids are filled and repaired. This is what makes the finished garage floor epoxy coating surface truly seamless. Without this repair step, cracks would eventually telegraph through the coating, creating visible lines in the finished floor.
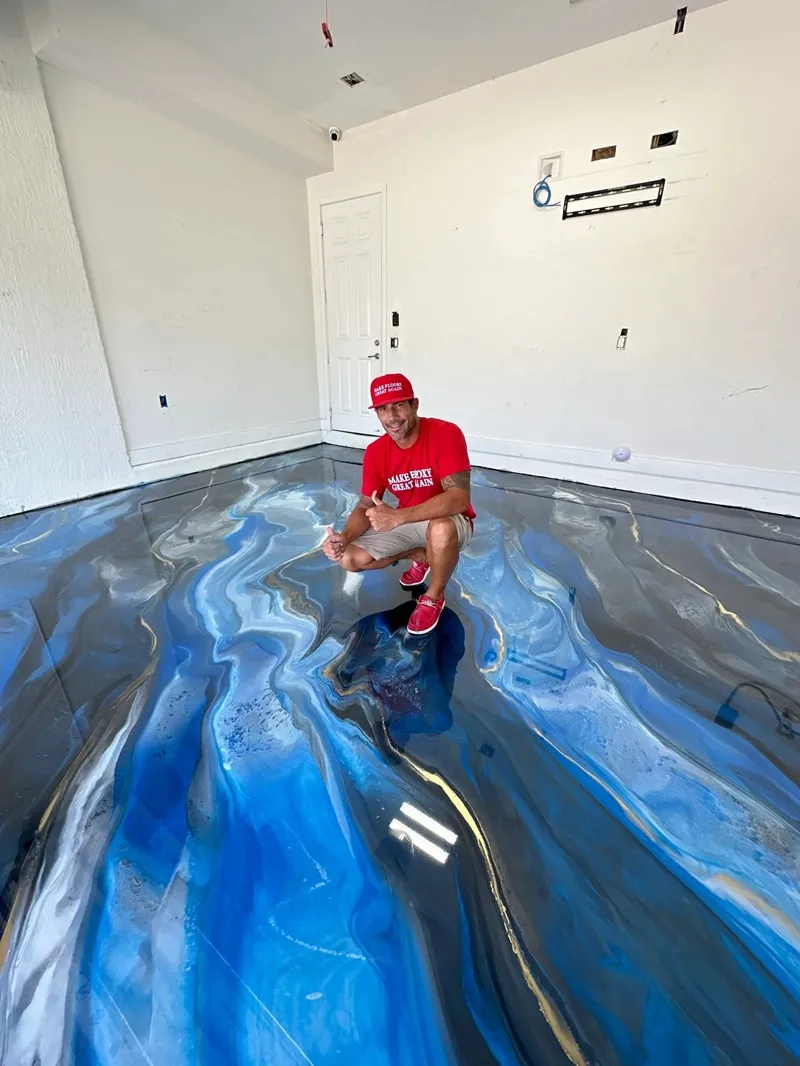
Step Three: The Layered Coating Application
With the surface prepared, the coating system goes down in sequence. The base coat is applied first, followed by the decorative layer, whether flake or metallic, and finally the industrial grade topcoat. Each layer is applied within the working window of the previous layer to maximize inter-coat adhesion.
For garage floor epoxy coating projects, Magic Mike Epoxy uses fast cure materials throughout this sequence, allowing all layers to be applied within a single day without extended waiting periods between coats.
Step Four: The Cure Window
After the final topcoat is applied, the floor needs time to achieve full hardness. During the cure window:
- Foot traffic is typically possible within hours on fast cure systems
- Vehicle parking requires waiting for full hardness, generally around 72 hours
- Pressure washing can begin after the 72 hour mark
- Heavy equipment or vehicle lifts should wait for confirmed full cure
Following the cure guidelines ensures the floor reaches its full performance potential before being put under stress.
Step Five: Enjoying Your New Floor
Once the cure window passes, the garage floor is ready for everything. Cars can be parked. Cleaning can begin with the leaf blower method. And every time you use the garage, you experience the difference that professional garage floor epoxy flooring makes in how the space looks, functions, and feels.


Sign in to leave a comment.