
Direct-to-Film (DTF) printing has become one of the most popular methods for custom apparel decoration, and for good reason. It works on almost any fabric, doesn't require weeding like vinyl, and produces vibrant, full-color designs that hold up to repeated washing. But what actually happens between "click print" and a finished garment? Here's a clear breakdown of the real production process a DTF printing service follows behind every transfer it makes.
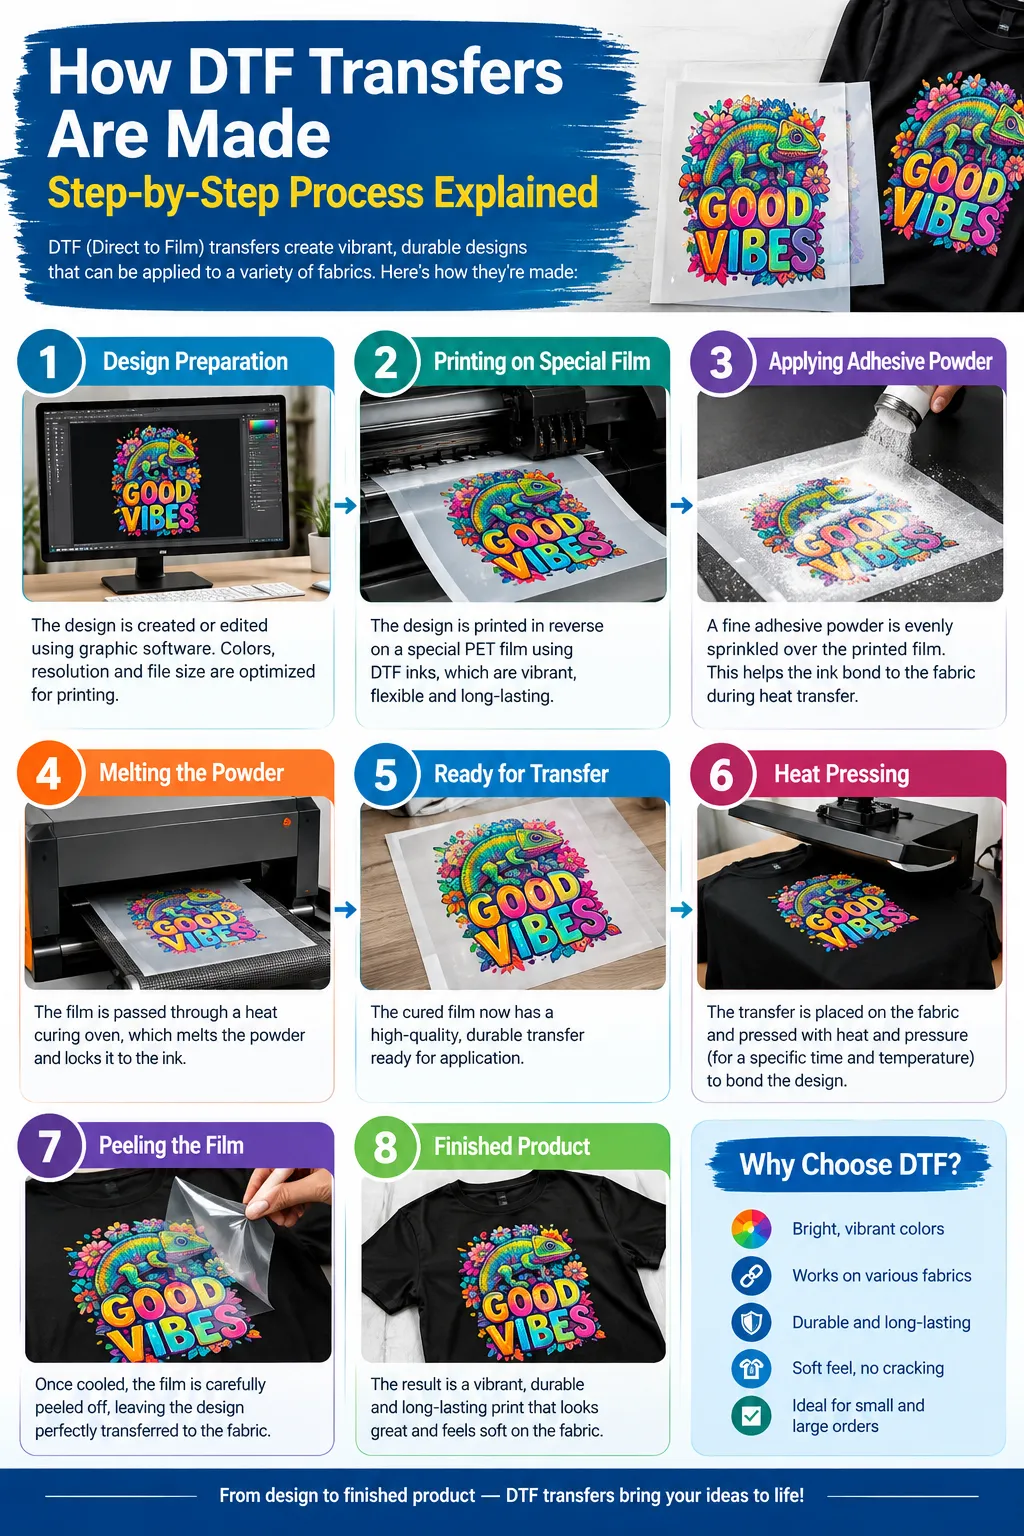
Step 1: Design Creation and File Preparation
Every DTF transfer starts as a digital file, usually created in software like Adobe Illustrator, Photoshop, or Canva. The artwork needs to be high resolution (generally 300 DPI or higher) so fine details and text stay crisp once printed at full size. Files are typically set up in CMYK color mode to match how the printer will lay down ink, and transparent backgrounds are used so only the design itself transfers onto the fabric, not a rectangular block of white.
At this stage, a good DTF printing service also checks the design for print readiness — resolving any low-resolution images, cleaning up stray pixels, and making sure text and thin lines aren't too fine to hold up during the heat press stage.
Step 2: Printing the Design onto PET Film
Once the artwork is ready, it's sent to a specialized DTF printer loaded with pigment-based inks and run through RIP (Raster Image Processor) software. This software is essential — it controls ink layering, color profiles, and the crucial white ink underbase, and a standard printer driver can't do this job on its own.
The design is printed in reverse (mirrored) onto a roll or sheet of PET film, a clear, heat-resistant plastic film. The printer typically lays down the CMYK color layer first, then prints a white ink layer directly on top as an underbase. This white layer is what allows the design to appear vibrant and opaque on dark or colored fabrics — without it, colors would look washed out or nearly invisible on anything but white garments.
Step 3: Applying the Adhesive Powder
This is the step that separates DTF from ordinary film printing. While the ink is still wet, the printed film is coated with a hot-melt adhesive powder (sometimes called DTF powder or TPU/PA powder). The film is usually placed in a container or tray and the powder is sprinkled generously over the design, then the sheet is gently shaken or tilted so the powder sticks evenly across every inked area.
Excess powder — the portion that lands on non-printed areas — is shaken off and can typically be reused. This adhesive layer is what will eventually bond the design to the fabric during pressing, so even coverage here directly affects how well (and how evenly) the finished transfer adheres.
Step 4: Curing the Powder
Next, the powdered film goes through a curing stage, where heat is applied to melt the adhesive powder into a smooth, even layer without fully printing it onto anything yet. Shops do this one of two ways: passing the film briefly under a heat press without pressing down, or running it through a dedicated curing oven or conveyor dryer.
A curing oven is generally considered the safer and more consistent option for production environments, since hovering film under a heat press can release fumes that are better handled with proper ventilation or a filtered curing unit. Once cured, the transfer is essentially "finished" from a production standpoint — it can be applied immediately or stored flat for later use without the ink smudging.
Step 5: Pressing the Transfer onto the Garment
When it's time to apply the transfer, the printed film is positioned face-down on the garment, precisely aligned where the design should sit. Heat-resistant tape is often used to hold it in place so it doesn't shift during pressing.
The garment and film are then run through a heat press at a specific temperature, pressure, and time setting — this varies depending on the ink, powder, and film manufacturer's specifications, so shops typically follow the recommended settings for their particular materials rather than a single universal number.
Step 6: Peeling the Film
After pressing, the PET film is peeled away from the garment, leaving the design bonded to the fabric. Depending on the type of film used, this is either a "hot peel" (removed immediately while still warm) or a "cold peel" (left to cool before peeling). Using the wrong peel method for a given film can affect how cleanly the design releases, so a reliable DTF printing service follows the film manufacturer's instructions closely at this stage rather than guessing.
Step 7: Second Press (Optional but Common)
Many shops finish with a second, shorter press directly over the transferred design — either bare or with a protective sheet (like parchment paper or a Teflon cover) between the press and the garment. This second press helps fully seat the adhesive into the fabric fibers, improving durability and giving the print a smoother, more integrated feel rather than sitting on top of the fabric.
The Result
What comes out the other end is a design that's soft to the touch, stretches with the fabric, and holds color well across washes — all without needing separate screens, stencils, or pretreatment for different garment colors. That flexibility is exactly why DTF has become such a go-to option for print shops handling small runs, one-off orders, and multi-color designs that would be costly to produce with traditional screen printing.
Understanding this process also helps when choosing a DTF printing service — quality differences between providers usually come down to how carefully each of these steps is handled, from ink and powder quality to press calibration and curing consistency. A dependable DTF printing service will be transparent about how it handles curing, film peel type, and press settings, since those details are what separate a print that lasts through dozens of washes from one that cracks or peels early.


















Sign in to leave a comment.