As the winter months approach, keeping your home warm and your energy bills low becomes a top priority. Many homeowners focus on heating systems and thermostats, but one often-overlooked area can have a significant impact on energy efficiency: your pipes. Proper thermal pipe insulation is a simple, cost-effective way to reduce heat loss, protect your plumbing, and save money on your energy bills.
In this article, we’ll explore how thermal pipe insulation works, why it’s important, and practical tips for installing it in your home.
Understanding Pipe Insulation
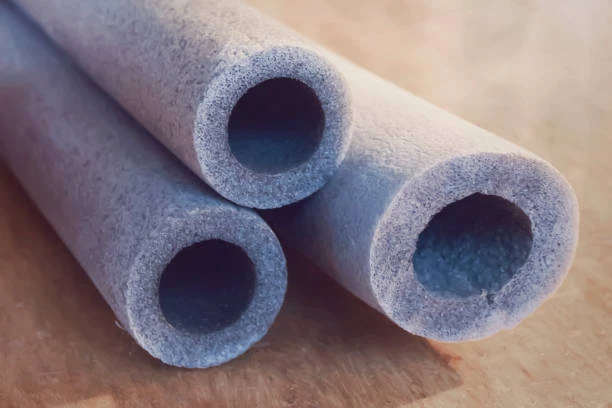
Pipe insulation is a protective covering, usually made of foam, rubber, or other insulating materials, that wraps around your water pipes. Its primary purpose is to reduce heat loss from hot water pipes and prevent cold water pipes from freezing.
During winter, uninsulated pipes allow heat to escape, meaning your boiler or water heater has to work harder to maintain the desired temperature. This extra effort leads to higher energy consumption and, ultimately, higher bills. By insulating your pipes, you can retain more heat within your water system, making it more efficient and reducing overall energy usage.
How Pipe Insulation Saves Energy
1. Minimises Heat Loss
Hot water travelling through uninsulated pipes can lose significant amounts of heat before reaching taps or showers. Pipe insulation slows down this heat loss, ensuring that the water stays hotter for longer. This means your boiler or water heater cycles less frequently, using less energy overall.
2. Protects Against Freezing
Frozen pipes are a common winter problem, especially in colder regions. When water freezes, it expands, which can cause pipes to crack or burst. Repairing burst pipes can be expensive and time-consuming. Insulating your pipes keeps water flowing even in low temperatures, reducing the risk of costly damage and energy loss associated with thawing frozen pipes.
3. Reduces Boiler Workload
By maintaining the temperature of hot water as it travels through your home, insulated pipes reduce the amount of energy your boiler needs to heat water. This leads to lower fuel consumption and, over the course of the winter, noticeable savings on energy bills.
4. Improves Hot Water Delivery
Insulated pipes deliver hot water more efficiently to taps and showers. Less heat loss means the water reaches the desired temperature faster, reducing the need to run taps for long periods. This not only saves energy but also conserves water, contributing to a greener home.
Types of Pipe Insulation
There are several types of pipe insulation available, each suited for different applications:
- Foam Tube Insulation: Lightweight, flexible, and easy to install, foam insulation is ideal for most household pipes.
- Rubber Insulation: More durable than foam and suitable for areas exposed to higher temperatures or mechanical stress.
- Sleeve or Wrap Insulation: Often made from fibreglass or other heat-resistant materials, these are ideal for older or irregularly shaped pipes.
- Self-Adhesive Insulation: Comes with an adhesive strip for easy installation on straight runs of pipe.
Choosing the right type of insulation depends on your pipe material, location, and budget. For most homes, foam or rubber insulation provides excellent results at a reasonable cost.
Installing Pipe Insulation
Installing pipe insulation is a straightforward process that most homeowners can do themselves. Here’s a simple step-by-step guide:
- Measure Your Pipes: Determine the length and diameter of the pipes you want to insulate.
- Select the Right Insulation: Choose insulation that fits your pipe diameter and suits the environmental conditions.
- Cut to Size: Cut the insulation to match the length of each pipe section.
- Fit Insulation: Slide the insulation over the pipes. For split foam tubes, open the seam and wrap around the pipe.
- Seal Joints: Use insulation tape or adhesive to seal joints and ends, ensuring minimal heat loss.
- Check for Gaps: Inspect all pipes to ensure there are no unprotected sections, particularly around bends, valves, or elbows.
Professional installation is recommended for larger or more complex plumbing systems, but DIY installation is often sufficient for most domestic pipes.
Cost Savings of Pipe Insulation
The cost of pipe insulation is relatively low compared to potential energy savings. On average, insulating your hot water pipes can reduce heat loss by up to 45%, resulting in lower energy consumption. Depending on the size of your home and the extent of insulation, households can save between £50 to £150 per year on energy bills.
Additionally, by preventing frozen or burst pipes, insulation can save hundreds, if not thousands, in emergency repair costs. Over time, the small investment in insulation pays for itself many times over.
Additional Benefits of Pipe Insulation
- Noise Reduction: Insulation can help reduce the noise of water flowing through pipes.
- Increased System Longevity: By reducing temperature fluctuations and preventing freezing, insulation can extend the lifespan of your plumbing system.
- Environmentally Friendly: Lower energy consumption means fewer carbon emissions, making your home more sustainable.
FAQs
1. Can I insulate cold water pipes as well as hot water pipes?
Yes. Insulating cold water pipes prevents condensation, reduces the risk of mould growth, and protects against freezing in winter.
2. How thick should pipe insulation be?
For domestic hot water pipes, 9–13mm insulation is usually sufficient. For areas prone to very low temperatures, thicker insulation may be recommended.
3. Is pipe insulation suitable for outdoor pipes?
Yes. Outdoor pipes should be insulated with weather-resistant materials such as rubber or foam specifically designed for external use.
4. How long does pipe insulation last?
High-quality insulation can last 10–20 years, depending on material and environmental conditions. Regular checks ensure it remains effective.
5. Can I install pipe insulation myself, or do I need a professional?
For most household pipes, DIY installation is straightforward. However, complex systems or large-scale installations may require professional expertise.
Discover Quality Pipe Insulation for Your Home
For homeowners looking for reliable, high-quality pipe insulation, Low Energy Supermarket offers a wide selection of products designed for safety, durability, and energy efficiency. Our range includes foam, rubber, and self-adhesive options suitable for all types of domestic piping. Browse our collection today to keep your home warm, reduce energy bills, and protect your plumbing this winter.


Sign in to leave a comment.