As remote work and virtual consultations become the standard for professionals across Pakistan, the reliance on built-in laptop microphones has revealed a significant flaw: poor audio quality often undermines professional credibility. Whether you are conducting a high-stakes board meeting, a telehealth session, or an online workshop, clear audio is non-negotiable. While many creators initially look at the rode mic price in pakistan to find premium solutions, the Synco wireless series offers a highly effective and budget-friendly way to achieve studio-grade sound for your Zoom calls.
Connecting a wireless microphone system like the Synco G2 or G3 to a laptop is not as daunting as it may seem. By following a few technical steps and optimizing your software settings, you can transform your virtual presence from muffled and distant to crisp and authoritative. This guide provides a comprehensive walkthrough on the hardware requirements, connection methods, and Zoom-specific optimizations needed to get the most out of your Synco microphone.
Understanding the Hardware Requirements
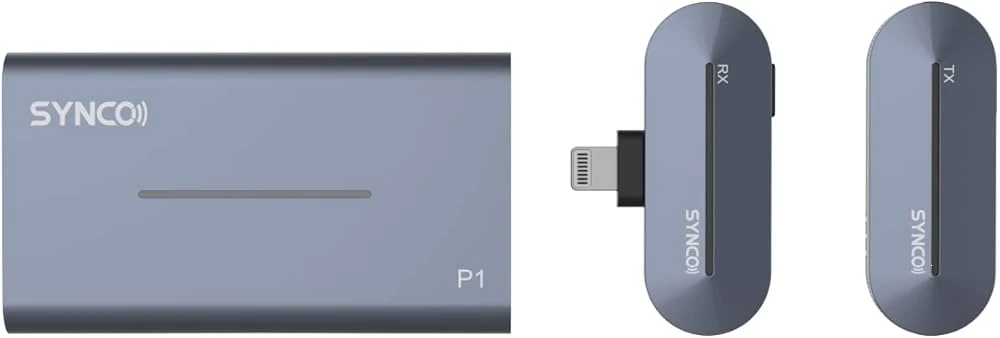
Before attempting to connect your Synco system, it is vital to understand the difference between the various ports on a modern laptop. Most contemporary laptops, such as those available at Fusion Max, utilize a 3.5mm TRRS combo jack or a USB-C port. The Synco receiver typically outputs a TRS signal, which is designed for cameras. To bridge this gap, you must use the correct interface or cable to ensure the laptop recognizes the microphone as an input device rather than a set of headphones.
The Synco G2 and G3 series usually include both a TRS-to-TRS cable (for cameras) and a TRS-to-TRRS cable (for phones and laptops). The TRRS cable is identifiable by its three black rings on the jack. If your laptop lacks a 3.5mm port entirely, you will need to utilize the USB-C digital output on the Synco receiver. This direct digital connection is often superior as it bypasses the laptop’s internal sound card, which can sometimes introduce unwanted electronic hiss or interference.
Step-by-Step Connection Guide
Establishing a physical connection is the first step toward professional audio. For the most stable results, it is recommended to use the digital USB-C output if your Synco model supports it. If you are using the analog 3.5mm connection, ensure the cable is pushed firmly into the laptop's headset jack. If your laptop has separate ports for "Mic" and "Headphones," ensure you are using the dedicated microphone input.
Once the receiver is physically connected to the laptop, power on both the transmitter and the receiver. Within seconds, the units should pair automatically. At this stage, it is helpful to check the transmitter’s screen to ensure your voice is registering on the gain meter. If you see movement on the bars when you speak, the system is capturing audio correctly. This reliability is why many professionals consider a wireless setup the best microphone for vlogging and professional conferencing alike, as it allows for movement without sacrificing clarity.
Configuring Windows and macOS Settings
Connecting the hardware is only half the battle; your operating system must be told to prioritize the external microphone over the built-in one. On a Windows machine, navigate to the Sound Settings by right-clicking the speaker icon in your taskbar. Under the "Input" section, you should see your device listed as "USB Audio Device" or "External Microphone." Set this as your default input.
For macOS users, go to System Settings and select "Sound," then click on the "Input" tab. Select the Synco receiver from the list of available devices. In both operating systems, it is crucial to test your levels before opening Zoom. Speak at your normal volume and ensure the input meter reaches about 75% of the way across. If the levels are too low, increase the gain on the Synco receiver rather than the laptop’s software settings to maintain a cleaner signal with less background hiss.
Optimizing Zoom for High-Fidelity Audio
Zoom has built-in audio processing designed to suppress background noise, but these features can sometimes make a high-quality wireless microphone sound "robotic" or over-processed. To hear the full frequency response of your Synco mic, you should adjust a few settings within the Zoom application itself. Open the Zoom settings menu and navigate to the "Audio" tab.
First, ensure the "Microphone" dropdown menu has the Synco device selected. Uncheck the box that says "Automatically adjust microphone volume." This prevents Zoom from constantly changing your gain levels, which can result in inconsistent audio for your listeners. Under "Audio Profile," select "Original Sound for Musicians." This disables Zoom’s aggressive echo cancellation and noise suppression, allowing the natural warmth of the Synco microphone to shine through. However, only use this if you are in a relatively quiet room and are using headphones to prevent feedback.
Managing the Wireless Signal in an Office Environment
One challenge of using 2.4GHz wireless systems like Synco in a modern office or home is interference from Wi-Fi routers. To ensure your Zoom call doesn't suffer from audio dropouts, keep the Synco receiver in a clear line of sight with the transmitter. If you are sitting at your desk, try to mount the receiver on top of your laptop or on a small tripod next to you, rather than letting it hang behind the computer where the screen can block the signal.
Battery management is another critical factor for long virtual meetings. While Synco mics offer impressive battery life, often exceeding six or seven hours, it is best practice to start every major meeting with a full charge. If you are using a model with a charging case, keep the case nearby. For marathon sessions, many Synco receivers can actually be powered via USB-C while they are in use, ensuring that your audio never cuts out during a critical presentation.
Why External Audio Enhances Professional Trust
From an E-E-A-T perspective, the quality of your audio directly impacts how your expertise is perceived by your audience. Research into digital communication suggests that listeners associate clear, high-quality audio with higher levels of intelligence and reliability. When you use a dedicated wireless system, you remove the "room echo" and "hollow" sound associated with laptop mics, making you sound as though you are in the room with your participants.
Investing in a proper audio setup demonstrates a commitment to quality and a respect for your audience's time. By taking the time to properly interface your Synco wireless microphone with your laptop, you are ensuring that your message is heard exactly as intended, without the distractions of technical glitches or poor sound. This transition from basic setup to professional studio quality is one of the most impactful upgrades any remote professional can make.
Final Troubleshooting Tips
If you find that your laptop is still not recognizing the microphone, the most common culprit is a faulty or incorrect adapter. Many budget USB-C to 3.5mm dongles do not support microphone input; they are output-only. Always ensure you are using a "communications" grade adapter or the original cables provided by Synco. Additionally, always check your privacy settings in Windows or macOS to ensure that the system has permission to access the microphone for the Zoom application.
By following these steps, you can confidently enter your next Zoom meeting knowing that your audio is of the highest possible standard. The Synco wireless system provides the flexibility to move, the clarity to be understood, and the professional edge required in today’s digital world.


Sign in to leave a comment.