Upgrading from fluorescent lighting to LED tubes is one of the most effective ways to improve energy efficiency, reduce maintenance, and get better light quality. Among the different LED tube options available today, double-ended direct-wire LED tubes are especially popular for commercial and residential upgrades.
However, many people feel unsure about the wiring process. Questions about safety, ballast removal, and correct connections often lead to mistakes or hesitation. The good news is that once you understand how direct-wired double-ended LED tubes work, installation becomes straightforward and reliable.
This guide explains what double-ended LED tubes are, why direct wiring is beneficial, and how to wire them correctly. Whether you’re upgrading a garage, office, warehouse, or retail space, this article will help you do it safely and correctly using quality products from LEDMyPlace.
What Is a Double-Ended Direct-Wire LED Tube?
A double-ended LED tube is designed to receive power from both ends of the tube—just like a traditional fluorescent lamp. Unlike plug-and-play LED tubes, these do not rely on a ballast to operate.
Key characteristics:
- Line voltage is supplied to both ends of the tube
- Ballast is removed or completely bypassed
- Power flows directly to the LED driver inside the tube
- Compatible with standard G13 (double-pin) sockets
This design closely mimics traditional fluorescent wiring, which makes installation simpler compared to single-ended LED tubes.
Why Choose Direct-Wire LED Tubes?
Direct-wiring may require a bit of upfront work, but the long-term benefits are significant.
Advantages of direct-wire LED tubes:
- No ballast failures (one of the most common lighting issues)
- Lower maintenance costs
- Improved energy efficiency
- Stable light output with no flicker
- Longer fixture lifespan
Because ballasts are removed, the system becomes simpler and more reliable. Many professional installers prefer direct-wire LED tubes from LEDMyPlace for this exact reason.
Double-Ended vs Single-Ended LED Tubes
Understanding the difference helps avoid installation errors.
Double-ended LED tubes:
- Power supplied to both ends
- Easier wiring for most retrofits
- Lower risk of wiring mistakes
- Familiar layout for electricians
Single-ended LED tubes:
- Power supplied to one end only
- Requires non-shunted sockets
- Higher risk if wired incorrectly
For many upgrades, double-ended LED tubes are the safer and more straightforward option.
Safety First: What to Do Before Installation
Before starting any wiring project, safety must come first.
Always follow these precautions:
- Turn off power at the circuit breaker
- Use a voltage tester to confirm power is off
- Wear insulated gloves and safety glasses
- Follow local electrical codes
If you’re unsure or working in a commercial space, hiring a licensed electrician is strongly recommended.
Tools & Materials You’ll Need
Prepare everything before starting to avoid mistakes.
Basic tools:
- Screwdriver
- Wire cutters/strippers
- Wire connectors
- Voltage tester
Materials:
- Double-ended direct-wire LED tubes
- Existing fixture with G13 sockets
- Wiring diagram (provided with LEDMyPlace tubes)
Step-by-Step Guide: How to Direct-Wire a Double-Ended LED Tube
Step 1: Turn Off Power Completely
Shut off the circuit breaker and verify with a tester. Never rely on the wall switch alone.
Step 2: Remove the Fluorescent Tube
Carefully twist and remove the old fluorescent lamp. Dispose of it properly, as fluorescent tubes contain mercury.
Step 3: Open the Fixture
Remove the fixture cover to access internal wiring, ballast, and lampholders.
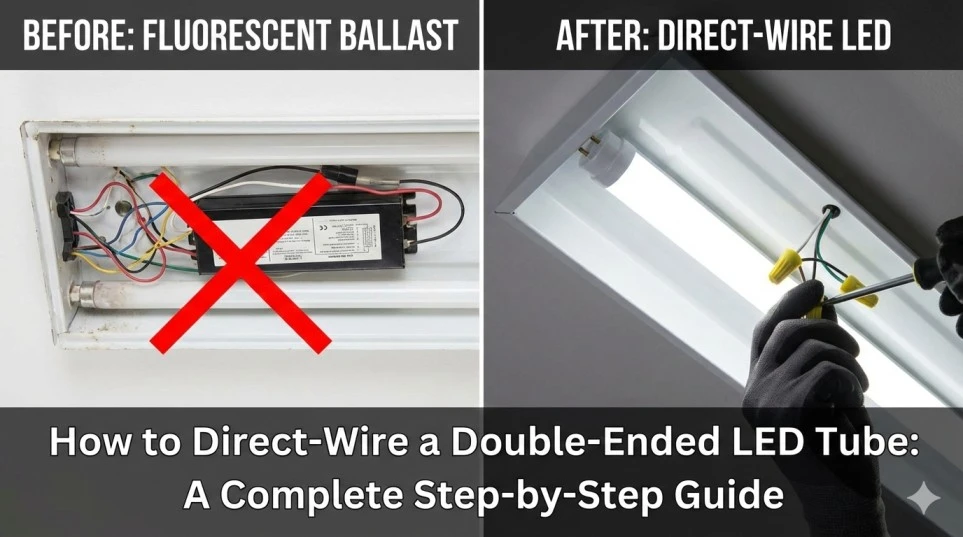
Step 4: Disconnect and Remove the Ballast
This is the most important step.
- Cut or disconnect wires going into the ballast
- Remove the ballast entirely from the fixture
- Cap off unused wires
Once removed, the fixture will be powered directly from the supply voltage.
Step 5: Identify Line and Neutral Wires
In most fixtures:
- Black wire = Line (Hot)
- White wire = Neutral
Confirm with a voltage tester or fixture diagram.
Step 6: Wire the Lampholders (Both Ends)
For double-ended LED tubes:
- Connect line (hot) to one lampholder
- Connect neutral to the opposite lampholder
Each pin set at each end will carry power.
⚠️ Important: Do not connect line and neutral to the same end.
Step 7: Secure All Connections
Use wire connectors to secure connections tightly. Loose wiring can cause flicker or failure.
Step 8: Install the LED Tube
Insert the LED tube into the sockets and rotate until it locks into place.
Step 9: Test the Installation
Restore power at the breaker. The LED tube should turn on instantly with no flicker or delay.
Common Mistakes to Avoid
Many LED tube failures happen due to simple wiring errors.
Avoid these mistakes:
- Leaving the ballast connected
- Mixing ballast-compatible and direct-wire tubes
- Incorrectly wiring line and neutral
- Using damaged or worn lampholders
- Skipping fixture inspection
Using clear wiring instructions from LEDMyPlace significantly reduces these issues.
When Should You Replace the Fixture?
Sometimes the fixture itself is the problem.
Replace the fixture if:
- Lampholders are cracked or loose
- Wiring insulation is brittle
- Housing shows heat damage
- Fixture is not rated for LED retrofits
In such cases, upgrading to a new LED fixture from LEDMyPlace may be the safer and more cost-effective option.
Energy & Cost Benefits of Direct-Wire LED Tubes
Direct-wire LED tubes offer long-term savings.
Benefits include:
- Reduced energy consumption
- Elimination of ballast replacement costs
- Longer operating life
- Fewer service calls
For warehouses, offices, and parking garages, these savings add up quickly.
Why Choose LEDMyPlace Direct-Wire LED Tubes?
LEDMyPlace offers a wide range of double-ended direct-wire LED tubes designed for performance and reliability.
Why customers trust LEDMyPlace:
- High-quality LED drivers
- Clear wiring diagrams included
- Commercial-grade durability
- Multiple color temperatures and lumen options
- Expert support for retrofit projects
Whether you’re upgrading a single fixture or an entire building, LEDMyPlace provides solutions you can rely on.
Final Thoughts
Direct-wiring a double-ended LED tube is one of the smartest lighting upgrades you can make. While it requires removing the ballast and adjusting wiring, the payoff is long-lasting performance, reduced maintenance, and consistent, flicker-free light.
By following the correct steps, using safe wiring practices, and choosing reliable LED tubes from LEDMyPlace, you can complete the upgrade with confidence and enjoy better lighting for years to come.


Sign in to leave a comment.