If you run an online business, an ERP system, or any order‑to‑invoice flow, EDI services can help you automate data exchange with your customers, suppliers, and logistics partners. When you use .NET (or .NET Core), you can plug EDI services directly into your application.
In this post, we’ll cover how to integrate EDI services to .NET application in clear steps, without jargon or buzzwords. You’ll learn:
- What EDI is and why it makes sense for .NET apps.
- How to choose the right EDI service or library.
- Basic steps to connect EDI to your .NET application.
- Simple code‑level ideas you can adapt to your own project.
What Is EDI and Why Use It with .NET?
EDI stands for Electronic Data Interchange. It is a way to send business documents (like orders, invoices, shipping notices) between systems in a standard format instead of using emails, PDFs, or spreadsheets.
Examples of EDI documents:
- Purchase orders (X12 850)
- Invoices (X12 810)
- Shipment notices (X12 856)
Why use EDI with .NET?
- Your .NET application can read, send, and receive EDI files automatically.
- You reduce manual data entry and human errors.
- Large retailers, logistics companies, and government agencies often require EDI for integration.
So if you ask,
How to integrate EDI services to .NET application?
- Use a .NET‑friendly EDI library or EDI service API.
- Design a clean flow between your database, business logic, and EDI layer.
Step 1: Choose the Right EDI Service or Library
Before you write code, decide how you will handle EDI:
Option A: Use a .NET‑based EDI library
Some libraries are built for .NET and let you parse, generate, and validate EDI files directly in C# or VB.NET.
Common patterns:
- You load an EDI template (X12 or EDIFACT) into your project.
- The library reads an EDI file stream and converts it into objects.
- Your .NET app reads those objects and maps them to your internal models (orders, invoices, etc.).
Examples of EDI‑ready libraries or components you can use (you can plug them into .NET 6/8 or .NET Framework projects):
- EDI Tools for .NET
- Framework EDI .NET components
- Other NuGet‑based EDI libraries that support X12, EDIFACT
As a developer, you install the package, add the references, and then call EDI parsing and generation methods from your code.
Option B: Use an EDI API / hosted service
Some EDI providers give you HTTP APIs instead of .NET libraries. In this case, your .NET app:
- Sends raw EDI files (or JSON‑like documents) to their API.
- Receives back parsed EDI or sends EDI‑ready documents.
This option is good if:
- You don’t want to manage EDI translation and validation logic.
- You want to deploy quickly and scale.
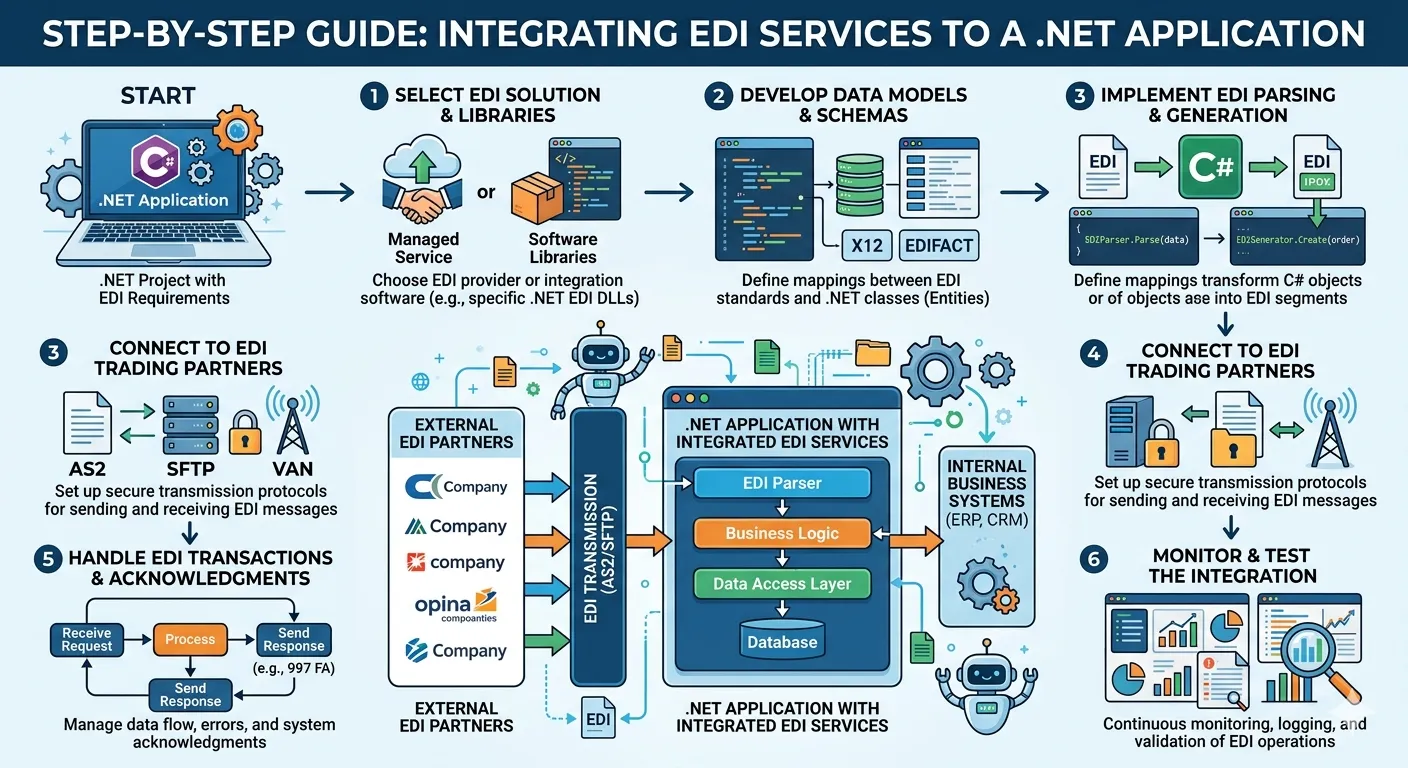
Step 2: Plan the Data Flow Between Your .NET App and EDI
Even if the technology seems complex, the flow is simple:
- Your .NET app reads business data (orders, invoices, shipments) from a database or queue.
- Your app formats that data into an EDI‑ready structure.
- You send it to an EDI service (library or API).
- The EDI service creates the proper EDI document and sends it to your trading partner.
- Incoming EDI from partners is read by the EDI service, parsed, and passed back to your .NET app.
You can think of it like this chain:
Database → .NET logic → EDI layer → EDI service / library → Trading partner
Step 3: Set Up the .NET Project for EDI
Here’s how you practically integrate this in your .NET application:
3.1 Create or choose the right project type
Most developers use:
- ASP.NET Core Web API (for systems that receive or send EDI over HTTP).
- Console / Windows Service (for background jobs that read files from disk or queues).
- Azure Function / background worker (for serverless EDI‑based workflows).
Choose one that fits your infrastructure.
3.2 Add EDI dependencies
If you use a .NET EDI library, you typically:
- Install the package via NuGet.
- Add the DLL or SDK reference in your project.
- Include the template assembly (for X12/EDIFACT) so the parser knows how to read 850, 810, 856, etc.
For example, in many EDI‑for‑.NET setups, you:
- Read the EDI file as a stream.
- Create an EDI parser object (provided by the library).
- Let the library parse the stream and return a model object.
Then your .NET code can inspect that object and move data into your own entities.
Step 4: Basic Code Pattern for “How to Integrate EDI Services to .NET Application”
Even though exact code depends on the library you use, the overall pattern is:
- Read the EDI file or request.
- Parse it into models.
- Map to your internal objects.
- Send confirmations or acknowledgments back.
Here’s a conceptual C#‑style example (no heavy AI jargon, just clear logic):
// 1. Read EDI file stream
using var fileStream = new FileStream(“input.edi”, FileMode.Open, FileAccess.Read);
// 2. Create EDI parser instance (from library)
var ediParser = new X12Reader(fileStream, templateAssembly);
// 3. Parse the EDI
var ediResult = ediParser.ReadToEnd();
// 4. Loop through parsed documents
foreach (var invoice in ediResult.EDI810)
{
var orderRef = invoice.OrderNumber;
var amount = invoice.InvoiceAmount;
// 5. Map to your business model
var myInvoice = new MyInvoiceModel
{
ExternalId = orderRef,
TotalAmount = amount,
Status = “EDIReceived”
};
// 6. Save to database or trigger business logic
db.Invoices.Add(myInvoice);
}
// 7. Generate EDI acknowledgment (e.g., 997)
using var ackStream = new MemoryStream();
var ediAck = new ACKGenerator();
ediAck.GenerateAck(ediResult, ackStream);
// 8. Send ACK back to sender (via file, queue, or API)
File.WriteAllBytes(“ack997.edi”, ackStream.ToArray());
This is a high‑level view, but it shows the key idea:
- The EDI service (library) reads the file.
- Your .NET app takes the result and connects it to your own logic.
Step 5: Connecting EDI Services to Your UI or API Layer
If your .NET app has a web layer (MVC or API), you can expose EDI actions via endpoints:
- POST /api/edi/upload → Upload an EDI file for parsing.
- GET /api/edi/queue → View pending EDI documents to send.
- POST /api/edi/send → Trigger EDI file generation and send to a partner.
Pattern:
- User or system uploads an EDI file or sends a normal HTTP request with data.
- Controller calls EDI service or library and converts it to internal models.
- App stores result in the database and returns success / error.
From the end user’s point of view, it feels like a normal API.
From the developer’s point of view, it’s “how to integrate EDI services to .NET application” done through clean endpoints.
Step 6: Handling Errors and Logging
When you integrate EDI services, errors happen. A file may be malformed, a mapping may be missing, or a trading partner may reject it.
To keep things stable:
- Log all EDI input (file or request body) for troubleshooting.
- Save EDI‑level status (e.g., “received”, “parsed”, “sent”, “rejected”) in your database.
- Create alerts if EDI documents fail more than a few times in a row.
This helps you answer questions like:
- Was the EDI file valid?
- Did the .NET app map it correctly?
- Was the acknowledgment sent back?
Good logging also makes it easier to support customers and internal teams.
Step 7: Security and File Management
EDI often deals with sensitive business data like orders, invoices, and shipment details.
Some basic security steps in .NET:
- Store EDI files in secured folders with proper permissions.
- Encrypt sensitive fields if needed.
- Use HTTPS for any EDI‑related APIs.
- Restrict access to EDI endpoints (authentication / authorization).
You don’t need fancy AI‑style systems; a few clear rules plus standard .NET security practices are enough.
Step 8: How to Test EDI Integration in .NET
Before going live, test the flow:
- Use sample EDI files (X12 or EDIFACT test files).
- Send them through your .NET app and verify:
- The EDI parser reads them correctly.
- Your database shows the right records.
- The acknowledgment (like 997) is generated and sent.
- Use simple tools (Postman, a file watcher, or a console app) to automate the tests.
Many EDI tool providers also share sample programs that show how to read, generate, and acknowledge EDI files from .NET applications. You can use those as a reference for your own setup.
Step 9: When to Use a Professional EDI Service
If you are:
- Not an EDI expert,
- Managing multiple partners with different formats,
- Or under tight timelines,
then it may be better to use a professional EDI service that:
- Handles translation, validation, and routing.
- Exposes clean APIs or files for your .NET app.
In that case, “how to integrate EDI services to .NET application” becomes simpler:
- Your app talks to an API or drops files in a folder.
- The EDI service does the hard work.
- You focus on business logic.
Summary: How to Integrate EDI Services to .NET Application (Simple Steps)
If you want to remember this in simple points:
- Understand your EDI needs. What documents do you send and receive?
- Choose an EDI approach: .NET library or hosted EDI API.
- Plan the flow: database → .NET → EDI → partner → back.
- Set up the .NET project with the right dependencies.
- Write a clear parse‑generate‑map pattern in your code.
- Connect EDI actions to your API or UI so other systems can trigger it.
- Log everything and handle errors gracefully.
- Test thoroughly with sample EDI files.
Using this clear, step‑by‑step approach, you can integrate EDI services to .NET application without over‑complicating the design.


Sign in to leave a comment.