Again, I am ready with my new tool, Cricut Maker. Using this machine, I am going to teach you how to use Cricut Maker to create your own shirt in a couple of minutes. At one time, I was also a beginner, and it was not easy for me to learn it. Somehow, I learned it from the internet. However, it took me a lot of time to gain practical expertise on this tool but believe me, it was worth learning.
Moreover, the machine is very easy to use, and it has a simple setup process, which I have already covered in this blog. My intention in writing this blog is for beginner crafters who have just bought the machine and want to learn how to use it from the beginning. So, are you ready to join me on this journey of learning about the Cricut Maker from the ground up? If yes, let’s get started!
The Process to Setup a Cricut Maker Machine
When I got my new Maker machine, I was too excited to unbox it. But after unboxing, I had to set it up. In the beginning, I was nervous as hell! I really didn’t want to make any mistake that would cause a technical problem. But the Cricut’s guide finally helped me. In addition, the setup is also easy for different platforms like Windows, iOS, Mac, and Android.
To learn how to setup Cricut Maker on computer and mobile device, follow the instructions given below:
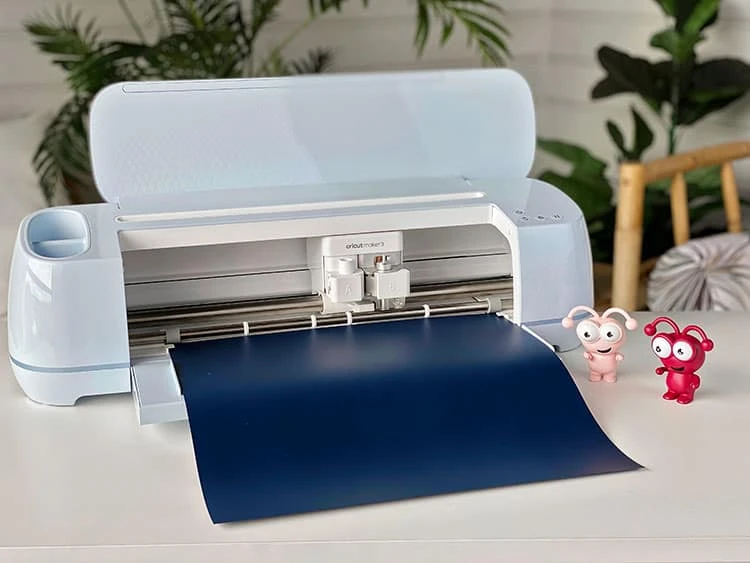
First of all, plug the power cable into the back of the machine and connect it to the power source.Next, you have to connect the machine to the computer. Here, you can either use a USB cord or Bluetooth feature.Now, open a browser such as Chrome and search for cricut.com/setup.On the next page, you will need to download the Design Space and then install it.Here, you can simply follow the instructions available to you on the screen and set up your account.Finally, you will be notified about the completion of the Cricut setup.As soon as we complete our setup, we are always prompted to perform a test cut. This is easy, and you can do it by following the steps given to you on the screen.
What Supplies Will I Need to Make a Custom Shirt?
Before I teach you how to use Cricut Maker, let’s discover some of the essential Cricut supplies needed for making a shirt. Here is what you need to make your own shirt on Maker:
Iron-on Vinyl MaterialCotton Blank T-shirtCricut Maker (or any other cutting machine)LightGrip cutting mat (or Standard Grip mat)Weeding toolsEasyPressEasyPress MatI have specifically chosen the cotton shirt, which has smooth textured and high-quality cotton. It really works well with Iron-on vinyl.
Important Note: I would recommend pre-washing your blank shirt before applying the vinyl on it. In this way, your vinyl won’t crack if the shirt shrinks. In addition, pre-washing will help you remove the dirt or any impurity that can hinder the ability to adhere to vinyl on the shirt.
How to Use Cricut Maker for the First Time?
So, are you ready to learn the process of making a shirt on the Maker machine? If yes, follow the steps one by one:
Step 1: Create a New Design or Upload
If you have a beautiful idea that you can create your own, go ahead. If not, then you can also find ready-made designs on Design Space. Once you find your design, add it to the Canvas and edit it if required. But, in my tutorial, I am adding free images, shapes, and text. Here, you may need to resize the design accordingly to fit your shirt.
Step 2: Load the Vinyl and Cricut Mat
Now, you need to place the material on the mat for cutting. For this, you need to load the vinyl onto the mat. Make sure you are using the mat that has lost its stickiness a little bit. After that, you have to use the brayer tool to flatten and adhere the vinyl to the cutting mat.
Remember: The shiny side of the vinyl should be facing down. For patterned vinyl, the pattern side should be down.
Once done, you are ready to tap on the Load button to start the loading process of the cutting mat into the Maker machine. Next, you will need to send your design to the Cricut Maker.
Step 3: Send Your Design to the Cricut Machine
Navigate to the Cricut app and click on the Make It button in the top-right corner.Next, select the toggle button to turn on the Mirror.Afterward, you will be moved to the next screen, where you need to choose the base material. Choose the Everyday Iron-on from the list.Step 4: Cut and Weed Out the Design
After choosing the material, you need to load the Fine-Point blade and the mat.To start cutting, you need to press the Go button to cut the design.Once cutting is done, unload the mat and weed the design using the weeding tools.Step 5: Transfer Your Design
This is the step where your EasyPress comes into play. Preheat the blank shirt and then place your design on it. After that, set the recommended temperature and press gently on the design.
Wrapping Up
In this blog, I have explained to you how to use Cricut Maker along with the full setup process. This guide not only explores the setup process but also how to make a shirt using it. The process is easy for both setup and shirts. However, this guide can also help you if you want to add your design to a tote bag or any other fabric. The process will be almost the same for every project.
FAQs
Question 1: How to use smart vinyl with Cricut Maker?
Answer: Smart Materials doesn’t require you to use a cutting mat, making it easy to use. Below are the steps given that explain the usage of vinyl.
First, you need to load the material and ensure a 10-inch gap behind the machine.Next, try to position the material. For example, keep the color side facing up.Then, feed the material into the guides.Now, you have to press the Load button and gently push the material forward.Finally, it’s time to apply the vinyl on the clean, blank surface.Question 2: How to use Cricut Maker for stickers?
Answer: Find the steps below to create amazing stickers using the Maker machine.
First, you need to create a sticker design on Design Space.After that, print the image using a compatible printer.Once you have printed the image, set the materials on the Cricut app.Next, you should load the mat into the cutting machine.After that, press the Go button to cut stickers.Once the sticker is cut, unload the mat and remove the stickers.Question 3: How to use pens with Cricut Maker?
Answer: In order to use the pens with Cricut Maker, you have to follow the instructions provided below:
First, you need to place the laser copy paper on a LightGrip mat and then load it.On Design Space, create the design that fits your blank and assign a Cricut pen color.Also, you must Mirror your design.Then, browse all materials and then choose Copy Paper.Insert your Infusible Ink Pen into Clamp A and hit the flashing Go button.Once the design is done, you can unload the mat.Read more: install cricut design space app
Source: how to use Cricut Maker


Sign in to leave a comment.