When designing and building a new home, most homeowners focus on aesthetics, layout, and energy efficiency. But one often-overlooked factor that can make or break your home’s safety is radon protection.
Radon mitigation in new construction isn’t just a smart precaution—it’s a long-term investment in your family’s health and your property’s value. This invisible, odorless gas is one of the leading causes of lung cancer, and the best time to prevent it from entering your home is before the foundation is poured.
In this guide, we’ll explore what radon is, how it affects your health, and how to effectively integrate radon-resistant features into new home construction to ensure safe, clean indoor air from day one.
What Is Radon and Why Is It Dangerous?
Radon is a naturally occurring radioactive gas produced by the decay of uranium in soil, rock, and groundwater. It moves upward through the ground and can easily seep into homes through small cracks in the foundation, floor joints, sump pumps, or crawl spaces.
Because radon is colorless and odorless, most homeowners have no idea it’s there—until a test reveals dangerously high levels. Prolonged exposure to radon increases your risk of lung cancer, especially for smokers or those with prolonged indoor exposure.
According to the Environmental Protection Agency (EPA), radon causes an estimated 21,000 lung cancer deaths each year in the United States. The EPA recommends mitigation for any home testing above 4 picocuries per liter (pCi/L).
Why Include Radon Mitigation During New Construction?
Adding radon mitigation during construction—often referred to as Radon-Resistant New Construction (RRNC)—is one of the easiest and most cost-effective ways to ensure long-term indoor air safety.
1. Lower Installation Costs
Installing mitigation systems during construction is far cheaper than retrofitting an existing home.
- During construction: typically $500–$1,500
- After construction: $1,200–$3,000
By planning ahead, you save both time and money while ensuring optimal system performance.
2. Seamless System Integration
When a radon system is added during the build, all the piping and venting can be neatly installed within walls or chases. This not only keeps your system out of sight but also ensures a more effective design that integrates with the home’s structure.
3. Better Air Quality and Health Protection
A radon-resistant foundation protects your family from harmful gases from the moment you move in. You won’t have to worry about testing later only to discover elevated radon levels that require disruptive retrofitting.
4. Boost in Property Value
Today’s homebuyers are increasingly aware of health and environmental concerns. A radon-resistant home stands out in the market and offers peace of mind to future buyers.
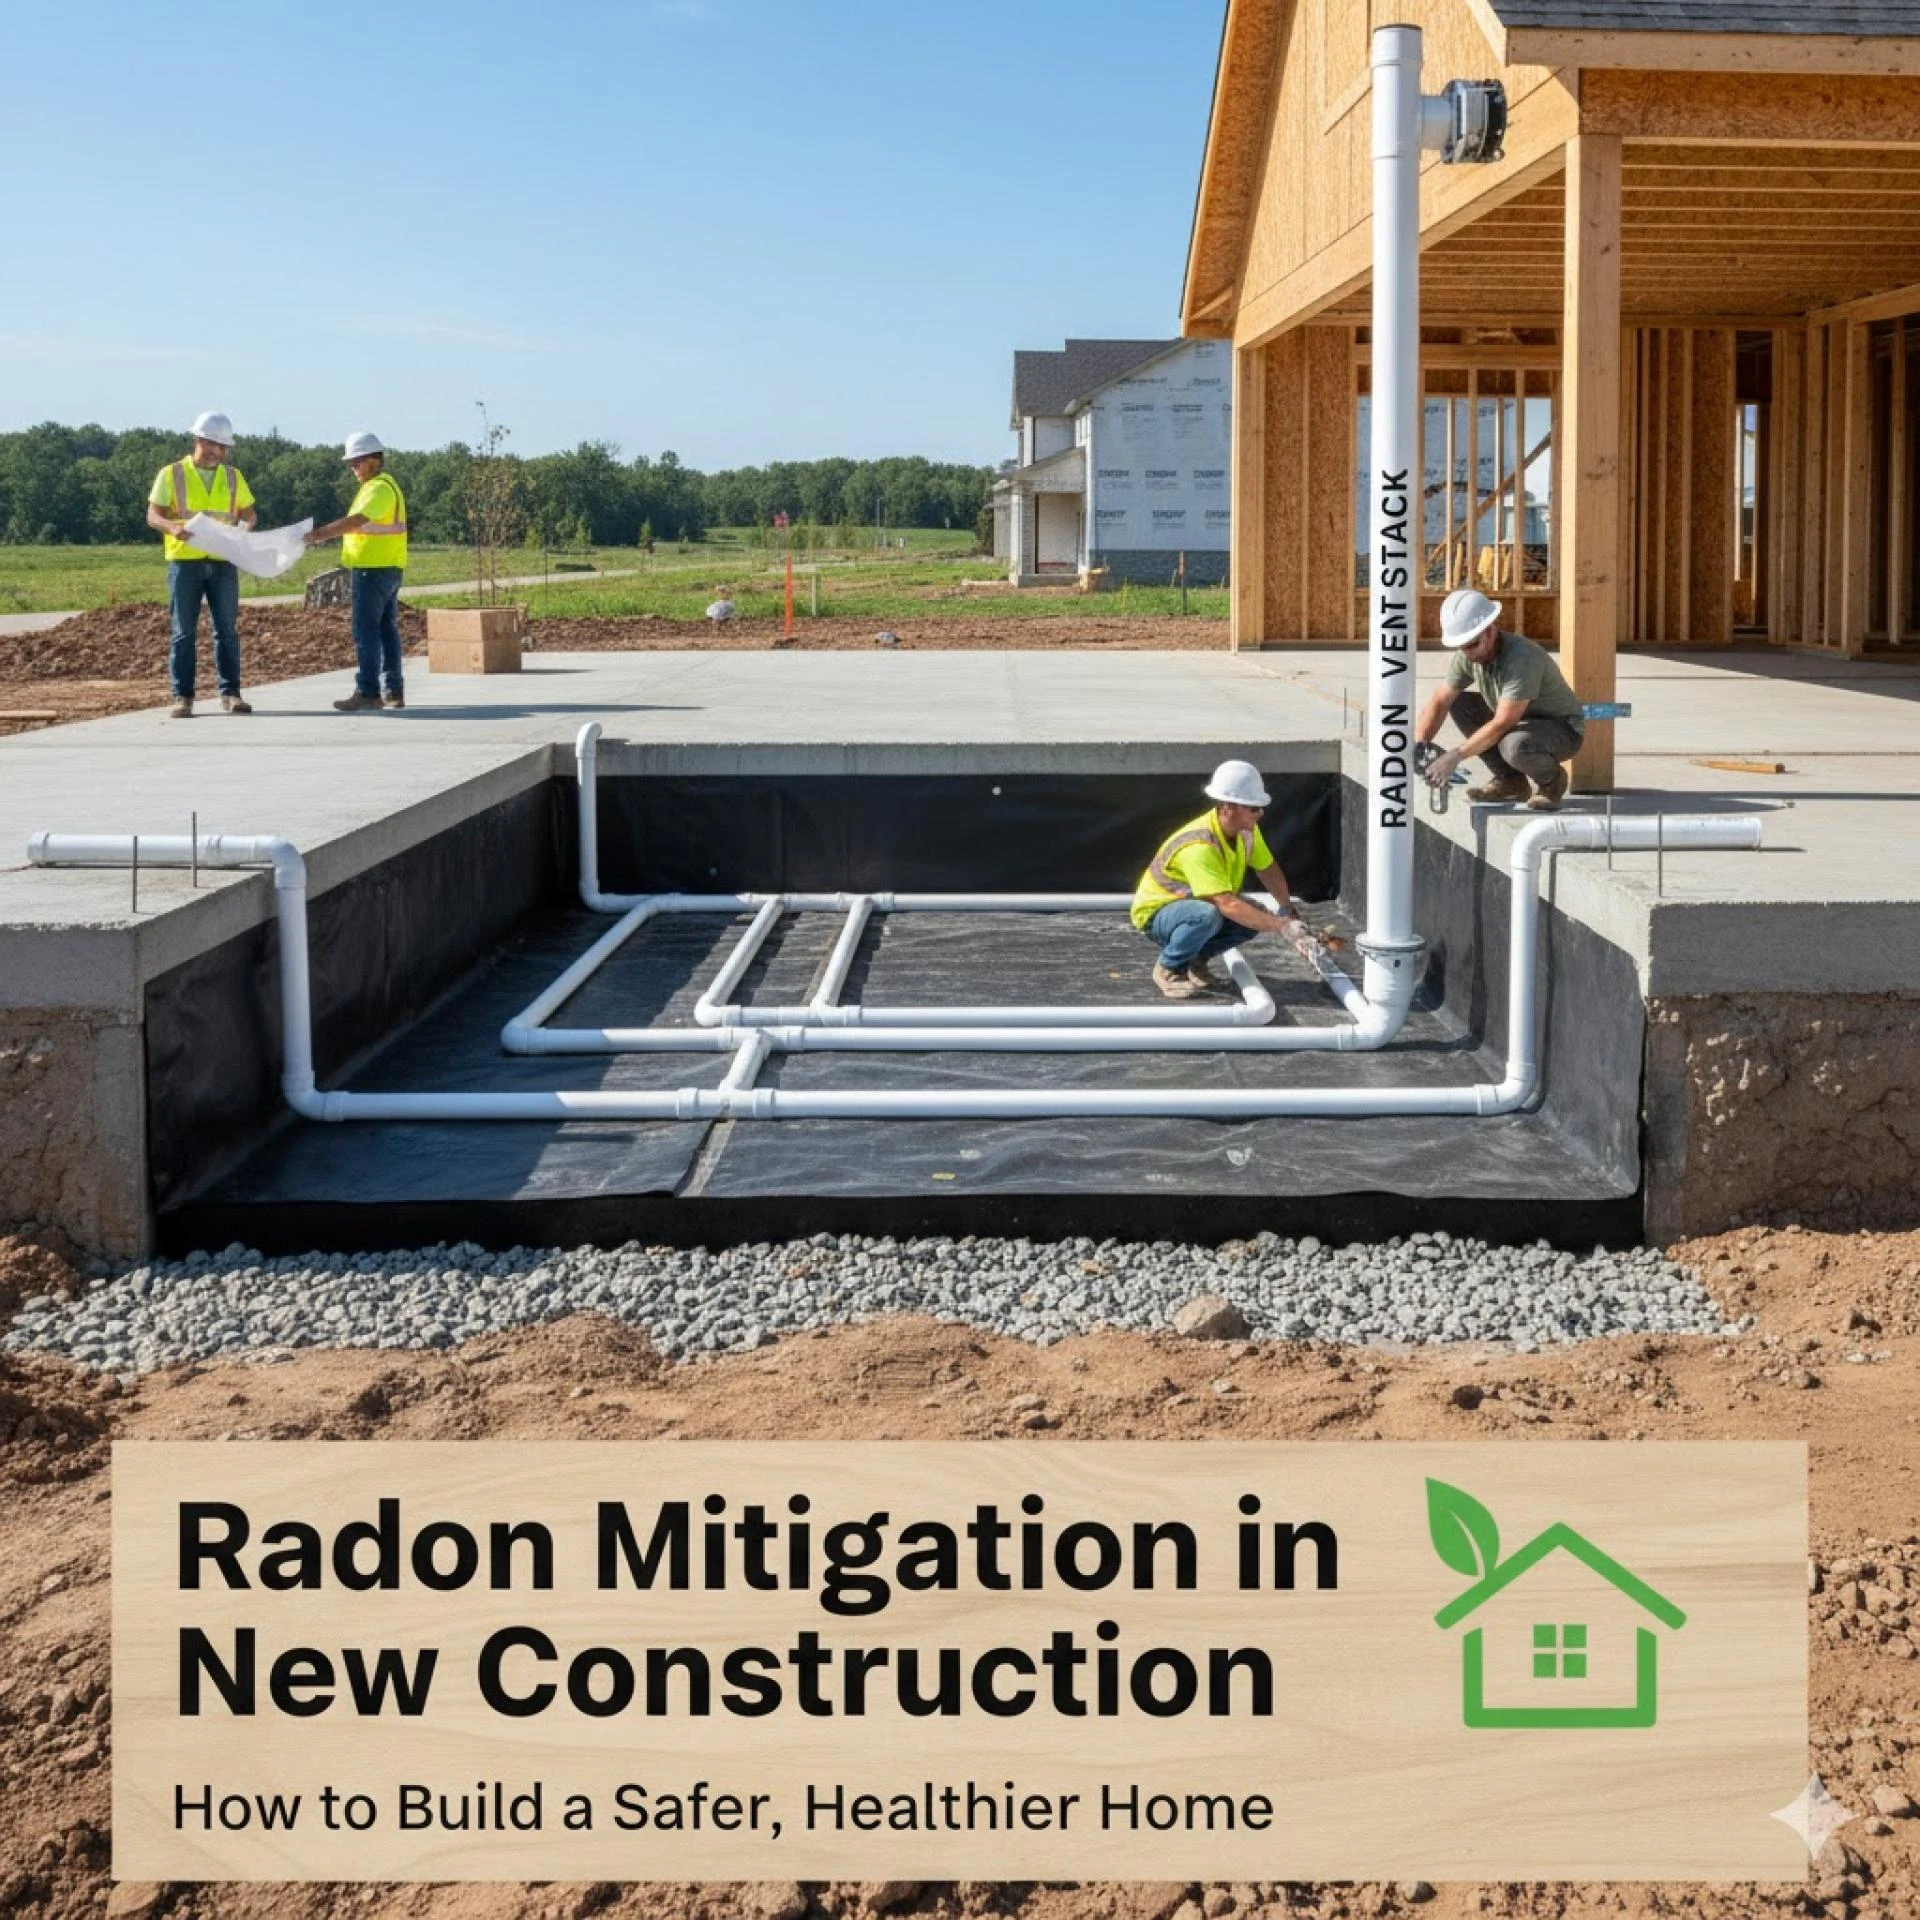
How Radon Mitigation Systems Work in New Construction
A radon mitigation system works by collecting radon gas beneath your home and venting it safely outside before it can enter your living space.
Here’s a breakdown of how it’s done during new construction:
1. Gas-Permeable Layer
Builders add a layer of gravel or aggregate (4 inches thick) beneath the foundation slab. This allows radon gas to move freely beneath the home instead of becoming trapped.
2. Plastic Sheeting (Vapor Barrier)
A plastic membrane is placed over the gravel before the concrete slab is poured. This helps prevent radon and moisture from seeping into the home.
3. Sealing and Caulking
All foundation cracks, seams, and openings are sealed to stop radon from entering through tiny gaps.
4. Vent Pipe Installation
A PVC vent pipe is installed vertically from the gas-permeable layer through the house and extends above the roofline. This creates a pathway for radon gas to escape safely.
5. Electrical Junction Box for Future Fan
Even if you start with a passive system, an electrical junction box is installed near the vent pipe. This makes it easy to upgrade to an active system later by adding a radon fan.
Passive vs. Active Radon Mitigation Systems
There are two main approaches for radon mitigation in new construction: passive and active systems. Let’s compare how they work.
Passive Radon System
A passive system uses natural pressure differences between indoor and outdoor air to vent radon through the pipe system.
Pros:
- No electricity required
- Completely silent operation
- Low maintenance
- Cost-effective
Cons:
- May not be effective in high-radon areas
- Performance depends on soil conditions and home design
Active Radon System
An active system includes an electric radon fan that continuously pulls radon gas from beneath the slab and vents it outdoors.
Pros:
- Highly effective—reduces radon by up to 99%
- Works in all soil and climate conditions
- Provides consistent performance year-round
Cons:
- Slightly higher cost ($1,200–$2,500)
- Requires electricity and occasional fan replacement
Many builders start with a passive system and design it for easy activation if testing later reveals higher-than-expected radon levels.
EPA Guidelines for Radon-Resistant New Construction (RRNC)
The EPA’s Radon-Resistant New Construction guidelines, detailed in their publication Building Radon Out, provide a clear framework for builders. The recommended system includes:
- A gas-permeable layer under the foundation
- Plastic sheeting over the gas-permeable layer
- Sealing and caulking of all openings
- A vent pipe routed through the house and vented above the roofline
- An electrical junction box for fan installation if needed
These steps create a foundation for long-term radon protection that can be easily enhanced later.
Local Building Codes and Requirements
Many states and municipalities have incorporated radon control requirements into their building codes, especially in high-radon zones (Zone 1 areas as defined by the EPA).
Before beginning construction, always check with your local building department to confirm:
- Whether radon-resistant construction is required
- If post-construction testing is mandated
- Whether certified professionals must install the system
Following these standards not only ensures compliance but also protects your future investment.
Testing Radon Levels After Construction
Even if your new home includes radon-resistant features, testing is still essential.
After construction:
- Conduct a short-term radon test (2–7 days) once the home is complete and occupied.
- If levels are near or above 4 pCi/L, perform a long-term test (90+ days) for more accurate results.
- If necessary, activate your system by installing a fan.
Testing ensures your mitigation system is functioning as expected and provides baseline data for future monitoring.
Cost Comparison: Installing Now vs. Retrofitting Later
Installation StageAverage CostMaintenance NeedsDuring Construction$500 – $1,500Minimal (testing only)After Construction$1,200 – $3,000Fan maintenance + repairs
It’s clear that incorporating radon mitigation during construction saves money and simplifies your home’s long-term safety plan.
Choosing a Qualified Radon Professional
To ensure proper installation, always work with a certified radon professional. Look for certifications from:
- National Radon Proficiency Program (NRPP)
- National Radon Safety Board (NRSB)
Certified experts follow EPA-approved practices and use high-quality materials to guarantee your system works efficiently for years.
Long-Term Maintenance Tips
Radon systems require minimal upkeep, but you can extend their life and maintain performance by:
- Testing your home’s radon levels annually.
- Checking the vent pipe for blockages or condensation buildup.
- Monitoring fan operation (for active systems) using a manometer gauge.
- Replace the fan every 5–10 years, as needed.
These small steps ensure your system keeps working effectively over time.
Environmental and Health Benefits
By reducing radon entry, you’re not only protecting your family’s health but also contributing to a healthier indoor environment overall. Radon mitigation also helps improve air quality, reduce moisture buildup, and prevent foundation deterioration caused by soil gases.
Conclusion
Including radon mitigation in new construction is one of the most effective and affordable ways to safeguard your family’s health. By building radon resistance into your home’s foundation, you’re creating a safer, more energy-efficient, and more valuable property from the start.
Whether you choose a passive system or an active one, integrating these features early saves time, money, and worry. Don’t wait until after you move in to address radon—build prevention into your plans with help from Fort Collins Radon Mitigation and enjoy peace of mind knowing your home’s air is clean and safe.


Sign in to leave a comment.