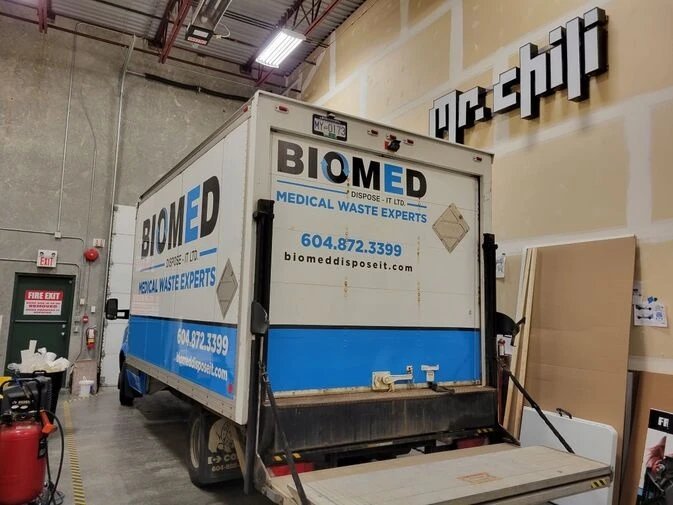
In today’s fast-paced marketing world, businesses are constantly looking for creative ways to increase brand visibility. One of the most effective and affordable advertising methods is commercial vehicle wrapping. With a professionally designed wrap, your fleet turns into a moving billboard—promoting your business 24/7 wherever it goes. But have you ever wondered what goes into installing a commercial vehicle wrap? The process is more intricate than it appears. Let’s walk through the step-by-step journey of how a plain vehicle is transformed into a branded masterpiece.
Step 1: Consultation and Design Brief
Every great wrap begins with a clear understanding of the brand. The first step is a detailed consultation between the client and the wrap company. During this stage, designers gather crucial information about your business, target audience, and marketing goals.
You’ll discuss things like:
- The message you want the wrap to convey
- Your preferred colors, logos, and design elements
- The type and number of vehicles being wrapped
Photographs and measurements of each vehicle are taken to ensure the design fits perfectly with the contours and features of the model. This helps avoid issues later during installation. The designer then uses vehicle templates to begin crafting a design that aligns with your brand identity.
Step 2: Custom Design Creation
Once the design brief is ready, the creative process begins. Using professional design software, the wrap team creates a digital mock-up of the vehicle wrap. This allows you to visualize how the final design will look from every angle.
At this point, revisions are common. You may want to tweak text placement, adjust color shades, or modify the size of the logo for better readability. The goal is to ensure the wrap is eye-catching, easy to read, and brand-consistent.
Once the design is finalized and approved, it’s time to move from the computer screen to the print shop.
Step 3: Printing the Wrap
The approved design is printed on high-quality vinyl wrap material using large-format printers. These printers use durable, weather-resistant inks that maintain color vibrancy and clarity under harsh outdoor conditions.
Before printing, the wrap team ensures:
- The artwork is in the correct resolution (typically 150 DPI or higher)
- The vinyl roll is clean and dust-free
- Proper color calibration for accurate brand hues
After printing, the vinyl sheets are left to dry and then laminated with a protective layer. Lamination is a crucial step—it guards against UV rays, scratches, and daily wear and tear, extending the wrap’s lifespan.
Step 4: Vehicle Preparation
Before installation begins, the vehicle must be thoroughly cleaned and prepared. This step ensures that the vinyl adheres properly and lasts longer.
The process includes:
- Washing the exterior to remove dirt, grease, and wax
- Wiping down the surface with isopropyl alcohol to remove any residue
- Removing accessories like mirrors, emblems, handles, and lights (if required)
Even the tiniest dust particle can create bubbles or uneven surfaces, so attention to detail is critical here. The vehicle must also be completely dry before the vinyl is applied.
Step 5: Installation
Now comes the most technical and time-consuming step — the installation. Skilled wrap installers use precision tools such as squeegees, heat guns, and blades to carefully apply the vinyl onto the vehicle’s surface.
The process usually starts from one section (like the hood or side panels) and progresses gradually. The installers heat the vinyl to make it more flexible, allowing it to stretch smoothly over curves and edges.
Techniques like post-heating are used to ensure the vinyl adheres firmly to corners and recesses. This prevents peeling or lifting over time.
Depending on the size of the vehicle, installation can take anywhere from a few hours to a full day. Professional installers ensure there are no bubbles, wrinkles, or seams visible in the finished wrap.
Step 6: Quality Check and Finishing Touches
Once the wrap is fully applied, it undergoes a comprehensive quality inspection. The team checks every inch for imperfections, misalignments, or air bubbles. Edges and corners are carefully sealed to prevent future lifting.
Accessories like mirrors, lights, and trims that were removed earlier are reattached. Finally, the vehicle is cleaned again to remove fingerprints and debris, revealing a polished, professional look.
Many wrap shops recommend keeping the vehicle indoors for 24 hours post-installation to let the adhesive fully cure.
Step 7: Delivery and Aftercare
The final step is vehicle delivery and client orientation. The installer walks you through proper wrap care and maintenance tips, such as:
- Hand wash your vehicle with mild soap instead of using high-pressure washes
- Avoid harsh chemicals or abrasive brushes
- Keep the vehicle out of prolonged direct sunlight when possible
- Remove any contaminants (like bird droppings or tree sap) promptly
With regular care, a high-quality commercial wrap can last anywhere from five to seven years, maintaining its color and finish beautifully.
Wrapping It Up
Installing a commercial vehicle wrap is a meticulous process that combines creativity, precision, and technical expertise. From the initial consultation to the final polish, every step is crucial in transforming an ordinary vehicle into a powerful marketing tool.
A well-designed and properly installed wrap not only boosts brand visibility but also leaves a lasting impression wherever your business travels. Whether you run a single service van or a large delivery fleet, investing in a professional vehicle wrap can take your brand’s visibility—and credibility—to the next level.
If you’re considering wrapping your commercial vehicles, choose a reputable sign company that specializes in design, printing, and installation. Their expertise ensures your wrap looks stunning, performs well, and keeps your business rolling in style for years to come.


Sign in to leave a comment.