
Introduction
Well-finished plastered walls and ceilings remain smooth and last longer. Appropriate approaches require durability, beauty, and rigidity. In this guide, we will walk through some essential plastering techniques used by professionals. Readers will be able to learn about the processes that convert a coarse surface into an even and aesthetic finish. This is invaluable knowledge for homeowners and property managers who want to understand genuine plasterwork.
1. Surface Preparation
Preparation is one of the cornerstones of correct plastering. All surfaces to which the material is applied must be clean and free from dust, grease, and loose material. Hiring professionals for plastering in Ashford Kent ensures that cracks and holes are properly filled, creating a smooth base to work with. The surface can dry more quickly than the inner layers, resulting in cracks; therefore, moistening the surface keeps it damp and prevents rapid drying. A well-prepared wall or ceiling bonds better and will look smoother in the end.
2. Mixing Materials
Consistency in mixing is key to achieving a reliable finish. Plasterers measure water and powder accurately, preventing lumps and uneven setting. Proper blending, often with mechanical mixers, creates a smooth, workable paste. Allowing the mixture to rest briefly enables trapped air to escape. The right blend ensures easy application and helps avoid surface imperfections. Quality mixing reduces waste and minimises the need for corrective work later.
3. Application Methods
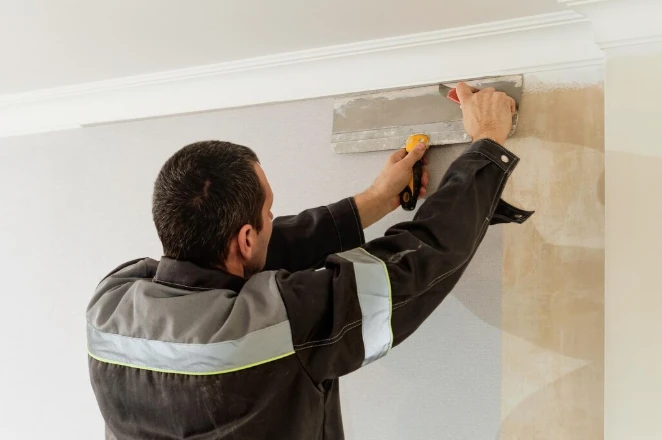
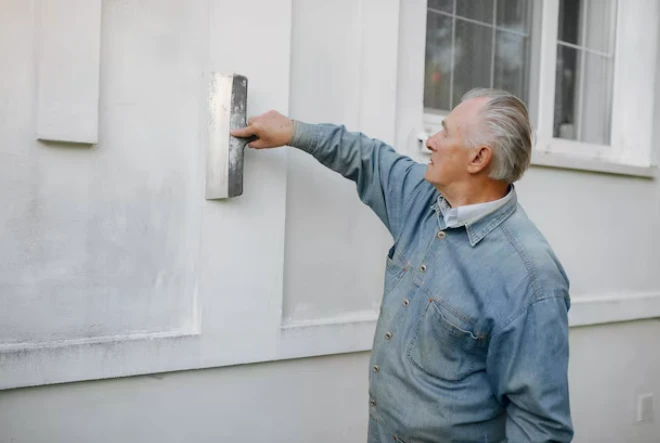
Skill and precision come into play when applying plaster. A steel trowel is typically used for even spreading. The plasterer starts from the top, working downwards in controlled, sweeping motions. Overlapping strokes ensure that all areas are fully covered. The first layer, known as the scratch coat, helps subsequent layers to grip. The second layer, called the brown coat, is applied once the first has partially dried, adding thickness and reinforcing the surface. Finally, a top coat provides smoothness and a refined finish.
4. Trowelling and Smoothing
Smoothing the surface is a skilled process. The professional continues to run the trowel over the applied plaster, using just enough pressure to keep it workable. This smooths out ridges and imperfections to create a flat surface. Timing is critical—too early and the plaster may tear; too late and it becomes too firm to smooth. If additional working time is needed, lightly misting with water can help. The goal is a smooth, flawless surface suitable for painting or wallpapering.
5. Curing and Drying
Drying must occur correctly to ensure strength and longevity. Plaster should dry slowly to prevent cracking. Ventilation in the room supports the drying process, but strong draughts should be avoided. In very dry conditions, covering surfaces with plastic sheeting can help maintain sufficient humidity. Professionals advise waiting several days before decorating, allowing the surface to fully harden.
6. Repair and Maintenance
Over time, even the best plasterwork may develop minor imperfections. Small issues can become larger problems if not addressed promptly. Areas requiring repair should be cleaned and lightly moistened before applying new material. One of the most important aspects of a seamless repair is matching the original finish in both texture and colour. Periodic inspection and gentle cleaning help plastered surfaces remain fresh and last longer.
7. Safety Considerations
Safety is an essential aspect of any plastering job. Dust masks, gloves, and protective eyewear guard against inhalation of particles and skin irritation. Good ventilation reduces exposure to harmful materials. Workers should ensure that ladders and scaffolding are stable before beginning work. Implementing safe practices helps keep both the property and workers free from accidents. Following these guidelines ensures the project is completed safely and efficiently from start to finish.
Conclusion
Beautiful and durable interiors are transformed through professional plastering. By understanding each step—from preparation to maintenance—property owners can make informed decisions. Attention to detail at every stage ensures long-lasting and visually pleasing results. Experienced plasterers use proven techniques and correct safety practices to achieve the best finishes. For those seeking flawless surfaces, every step of the process is an art in itself.


Sign in to leave a comment.