
Imagine holding a 3D print that bursts with multiple colors—a detailed topographic map, a character figurine with painted-quality finish, or a functional prototype with color-coded components—all produced in a single print session without any post-processing paintwork. Multi-color 3D printing has transformed from a professional luxury into a hobbyist's playground, opening creative doors that were firmly shut just a few years ago. Yet for many enthusiasts, the path to vibrant multi-color results remains tangled in complexity, expensive hardware upgrades, and steep learning curves that discourage experimentation.
This is where QIDI Studio changes the equation. Designed with hobbyists in mind, QIDI Tech's ecosystem of affordable FDM 3D printers, intuitive software, and purpose-built accessories removes the traditional barriers standing between you and stunning multi-color creations. Whether you're new to FDM 3D printing or a seasoned maker looking to expand your capabilities, QIDI 3D printers offer a practical, budget-friendly entry point into the world of multi-color fabrication. Let's explore how you can unlock this capability and bring your most colorful ideas to life.
The Essentials of Multi-Color FDM 3D Printing for Hobbyists
FDM 3D printing works by melting thermoplastic filament and depositing it layer by layer to build three-dimensional objects. In its simplest form, a single extruder handles one color per print. Multi-color printing expands this by introducing additional filaments during the process—either through multiple extruders, filament-swapping mechanisms, or manual color changes at designated layer heights. The result is a single object featuring two, four, or even more distinct colors without any painting required.
Hobbyists are gravitating toward multi-color techniques because they dramatically elevate the visual impact of prints. Board game pieces gain instant readability, artistic models look gallery-ready, and functional parts communicate information through color coding. The creative possibilities feel almost unlimited once you move beyond monochrome constraints.
However, traditional multi-color setups have presented significant barriers. Dual-extruder printers historically carried premium price tags and demanded meticulous calibration to avoid nozzle offset errors. Filament-swapping systems required compatible 3D printing accessories that added both cost and mechanical complexity. Software workflows often assumed expert-level knowledge, leaving casual makers frustrated before their first successful print. These challenges created a gap between what hobbyists wanted to achieve and what they could realistically accomplish—a gap that newer, more accessible ecosystems are now working to close.
Why QIDI Studio is Your Affordable Gateway to Multi-Color Printing
QIDI Studio represents more than just a slicer—it's a comprehensive ecosystem that pairs hardware, software, and community support into a unified platform designed specifically for makers who want professional results without professional budgets. Where competing multi-color solutions often require piecing together components from different manufacturers and hoping everything communicates properly, QIDI Tech delivers an integrated experience where the printer, slicer, and accessories are engineered to work together from day one.
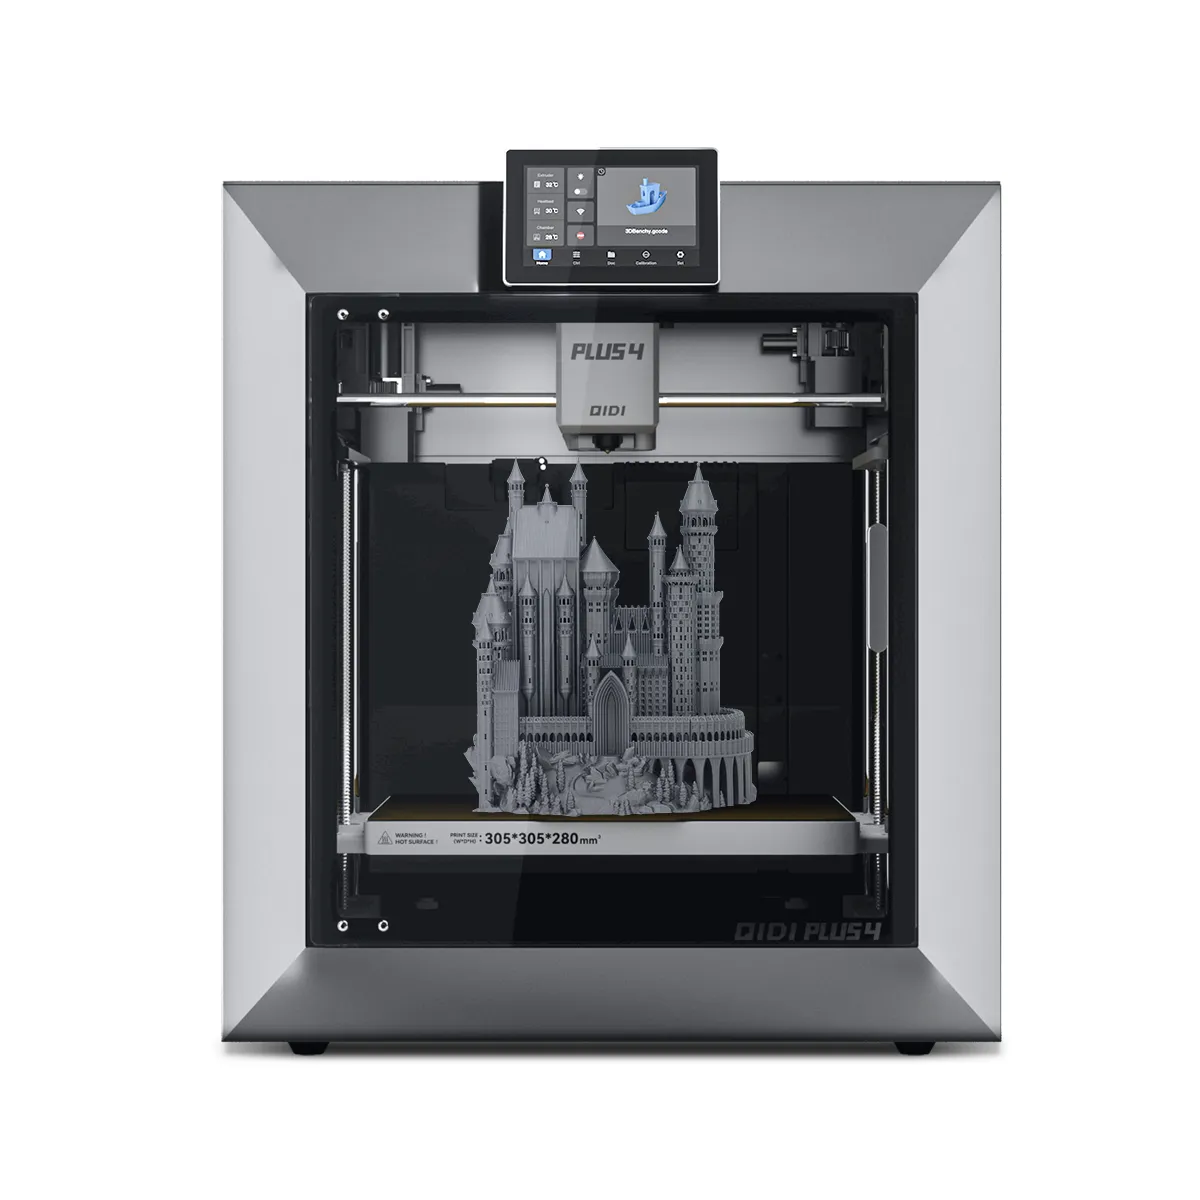
The QIDI Plus exemplifies this philosophy. Built as an affordable 3D printer with a generous build volume, it supports multi-color workflows through compatibility with filament-swapping systems and QIDI's own multi-material accessories. The enclosed chamber maintains consistent temperatures across color transitions, reducing the warping and adhesion failures that plague open-frame alternatives during extended multi-color prints. For hobbyists researching affordable 3D printers capable of handling more than single-color jobs, the Plus hits a sweet spot between capability and investment.
Compared to other market solutions, QIDI 3D printers distinguish themselves through lower upfront costs combined with a slicer that automates much of the complexity. Prusa's MMU system and Bambu Lab's AMS both deliver excellent multi-color results, but QIDI targets hobbyists who need a gentler on-ramp—both financially and technically. The QIDI Studio software includes pre-configured multi-color profiles, automatic purge tower generation, and visual previews that show exactly where each color will appear before you commit filament to a print. This means less trial-and-error waste and faster progression from concept to finished multi-color object, making it an ideal starting point for enthusiasts ready to move beyond monochrome.
Step-by-Step Guide to Multi-Color Printing with QIDI Studio
Setting Up Your QIDI Printer for Multi-Color Success
Before loading multiple filaments, ensure your QIDI 3D printer is mechanically ready for the demands of color-switching. Start by leveling your build plate using the automatic mesh leveling feature—multi-color prints are less forgiving of first-layer inconsistencies because failed adhesion compounds across every color transition. Next, install the multi-material feeding system or filament hub accessory, routing each filament path so tubes don't kink or create excessive friction. Verify that your nozzle is clean and free of residual material from previous prints, as leftover pigment will contaminate your first color change. Run a short calibration print using two colors to confirm that retraction and feeding distances are properly tuned for your specific setup.
Software Configuration and Slicing Techniques
Open QIDI Studio and import your model, then assign colors using the built-in painting tool or by loading a pre-separated multi-body STL file. Each color zone gets mapped to a specific filament slot, and the software displays a real-time preview showing exactly how the finished print will look. Under the multi-color settings panel, configure your purge tower dimensions—this sacrificial structure ensures clean color transitions by flushing residual filament between switches. Keep the tower volume as small as practical to minimize waste, but don't reduce it so aggressively that color bleeding occurs. Set transition lengths based on your filament types; lighter colors following darker ones typically need longer purge distances. QIDI Studio's pre-built profiles handle most of these calculations automatically, though you can fine-tune values after observing your first test results. Save your project before slicing so you can iterate without re-assigning colors from scratch.
Executing and Monitoring Your First Multi-Color Print
Load each filament into its designated slot, feeding material until it extrudes cleanly from the nozzle during the priming sequence. Start the print and watch the first few layers closely—confirm that color transitions on the purge tower appear crisp and that the main model shows no contamination between zones. If you notice stringing between the tower and your part, slightly increase the travel retraction distance in QIDI Studio. Monitor layer adhesion at color boundaries, since temperature fluctuations during filament swaps can occasionally cause weak inter-layer bonds. Maintaining a stable enclosure temperature throughout the session largely prevents this issue and delivers consistent, vibrant results.
Maximizing Results with QIDI 3D Printers and Accessories
The right 3D printing accessories transform good multi-color prints into exceptional ones. A filament dryer ranks among the most impactful upgrades for any QIDI 3D printer handling multiple materials—moisture-laden filament produces bubbling, inconsistent extrusion, and dull surface finishes that become especially noticeable when colors sit adjacent to each other. Running each spool through a drying cycle before loading ensures smooth, glossy transitions that make your color boundaries look intentional rather than accidental.
Hardened steel or ruby-tipped nozzles extend your material options beyond standard PLA into abrasive filaments like silk, glitter-infused, or carbon-fiber blends that add texture alongside color variation. These nozzles resist the accelerated wear that multi-color printing imposes through frequent retraction cycles and material changes. For QIDI 3D printers specifically, the direct-drive extruder design already handles flexible and composite filaments well, but pairing it with a wear-resistant nozzle means you won't sacrifice precision after dozens of multi-color sessions.
Additional accessories worth considering include a PEI-coated spring steel build plate for reliable adhesion across different filament chemistries, spare PTFE tubes cut to matched lengths for consistent feeding resistance across all filament paths, and a filament runout sensor that pauses the print rather than leaving an incomplete color zone. Together, these upgrades create a reliable multi-color workflow where your QIDI printer performs consistently across projects of varying complexity, letting you focus on design choices rather than mechanical troubleshooting.
Advanced Tips and Troubleshooting for Flawless Multi-Color Prints
Even with a well-configured setup, multi-color prints occasionally present challenges that require targeted solutions. Stringing between color zones often stems from insufficient retraction during toolhead travel—increase retraction distance by 0.5mm increments in QIDI Studio until wisps disappear without causing under-extrusion at transition points. Color mixing or muddy boundaries typically indicate an undersized purge tower; add ten to fifteen percent more purge volume for problematic color pairs, particularly when switching from dark to light shades. Temperature management matters more than many hobbyists realize—keep your enclosure closed throughout the entire print and avoid opening doors to check progress, since thermal disruptions at color boundaries create visible lines and weakened adhesion. For prints with many color changes, reduce print speed by fifteen percent to give the feeding mechanism time to fully prime each new filament. QIDI Studio simplifies ongoing optimization by letting you save custom profiles per color combination, so once you dial in settings for a specific filament pairing, those values carry forward to every future project using the same materials.
Start Your Multi-Color Printing Journey Today
Multi-color 3D printing no longer demands expert-level skills or deep pockets—QIDI Studio has fundamentally lowered the barrier for hobbyists eager to bring vibrant, multi-hued creations to life. From the accessible hardware design of QIDI 3D printers like the Plus to the intuitive software that automates purge tower calculations and color assignments, the entire ecosystem works together to turn what was once a frustrating endeavor into a streamlined creative process.
The step-by-step workflow we've covered—from mechanical preparation and software configuration through execution and monitoring—gives you a repeatable framework for tackling projects of increasing ambition. Paired with the right 3D printing accessories like filament dryers, wear-resistant nozzles, and reliable build surfaces, your QIDI printer becomes a consistent multi-color production tool rather than a source of weekend headaches. Advanced troubleshooting techniques for stringing, color bleeding, and thermal management ensure that when challenges arise, you have targeted solutions ready.
Now is the ideal time to move beyond single-color prints and explore what your creativity truly looks like in full color. Start with a simple two-color project, build confidence through the forgiving QIDI Studio interface, and gradually push into complex designs that showcase your growing expertise. The future of hobbyist 3D printing is colorful, accessible, and waiting for you to press start.


Sign in to leave a comment.