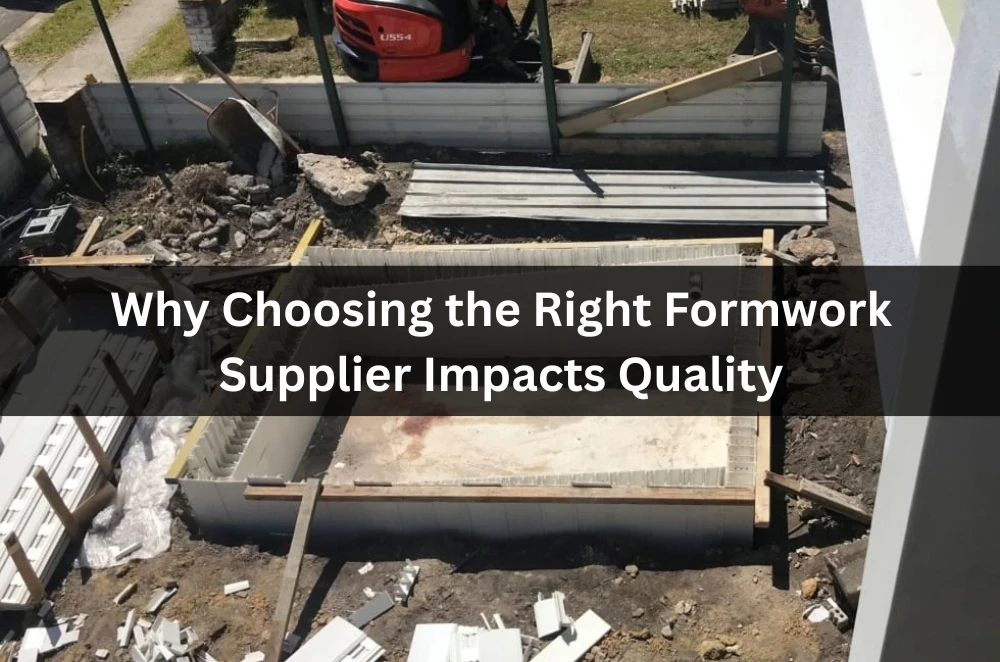
Choosing a formwork supplier isn’t just a price call; it’s a decision that shapes structural accuracy, site tempo, and how safely crews move around pours. Start with the drawings you have, the tolerances you need, and the handover dates you can’t slip. Then map who is accountable for set-out, propping checks, and sign-off. Many Sydney builders narrow the field by working with a professional formwork partner that can prove load paths, show real tolerances in past jobs, and step in on short notice when the weather shifts the pour window.
What defines “quality” formwork on a live Sydney job?
Quality shows up as accurate geometry, safe access, and predictable cycle times—not just neat photos after striking.
- Dimensional accuracy: panels align to drawings and hold tolerance under live loads and vibration.
- Load management: props, shores, and ties are specified with calculations, not rules of thumb.
- Safe movement: platforms, edge protection, and clear egress reduce incident risk during pours.
- Cycle reliability: set-up, pour, and strip timings repeat across levels with minimal variance.
On a recent podium slab in the inner west, we shaved a day per level by tightening set-out and pre-staging lifts—small changes, big consistency.
How do safety requirements shape supplier selection?
They shape it by determining who can actually support the method statement and supervise critical steps.
- Documented controls: risk assessments and SWMS are specific to your geometry and pour sequence.
- Competent supervision: on-site leads know the system, not just generic scaffolding.
- Inspection gates: hold points for pre-pour checks are clear and timed to crane availability.
- Incident readiness: rescue plans, communications, and exclusion zones are practised, not theoretical.
For grounding, Sydney contractors often reference formwork safety standards to align method statements with local expectations before concrete is poured.
Which technical checks prevent slab and wall defects?
Checks that link design intent to field realities—fresh concrete pressure, tie capacity, and camber—prevent the common defects.
- Pressure modelling: rate of rise and temperature inform tie spacing on tall verticals.
- Deflection control: camber allowances and shore distributions are calculated for spans and loads.
- Joint integrity: stop-ends and kicker details prevent honeycombing at interfaces.
- Vibration plan: tool choice and sequence, auto ID segregation and blow-outs at corners.
Standards from Standards Australia and technical notes shared by the Concrete Institute of Australia are widely used to align details with proven practices, especially for complex pours.
Why does supplier design support matter more than unit cost?
Because design support protects your program, a cheap panel that arrives with vague propping notes can cost days later.
- Shop drawings that think ahead: clash-checked against penetrations and embedded items.
- Alternate schemes: options for different crane times, pump reach, or wind constraints.
- Value engineering: targeted reductions in prop counts without compromising safety factors.
- Change agility: rapid revision cycles when the engineer updates reinforcement or set-out.
I’ve seen a tower core slip two days due to unclear tie specs; a responsive supplier closed the gap with revised calculations before the next lift.
How do logistics and crane strategy affect pour reliability?
They affect it by determining whether gear and people are where they’re needed at the minute they’re needed.
- Staged deliveries: panels arrive sequenced to the pour, avoiding yard congestion.
- Crane windows: lifts are pre-booked for heavy shutters and strike returns, not guessed.
- Return flow: stripped components move off the deck fast to free space for steel and MEP.
- Weather allowances: wind and heat plans exist to protect the schedule and finish quality.
When set-down points and hoist timings are solved first, the crew spends more time building and less time waiting for gear.
What coordination is required between the engineer, builder, and supplier?
Tight, scheduled coordination ensures calculations, drawings, and site conditions stay in sync.
- Clear RASCI: who is Responsible, Accountable, Supporting, Consulted, Informed for each check.
- Engineer touchpoints: design engineer signs off on any load path changes or temporary states.
- Site reality feed: as-built dimensions and concrete temps loop back into the next pour plan.
- Close-out records: calculations, inspections, and deviations documented for O&M.
Bodies like Engineers Australia provide frameworks that reinforce why verification and supervision aren’t optional on temporary works.
What does “fit for Sydney” look like in practice?
It looks like systems that handle tight CBD access, variable soils, and fast weather swings.
- Compact systems: panels and shores that travel in lifts suited to narrow streets.
- Adaptive staging: ability to resequence levels around utilities or neighbour constraints.
- Noise and hours: methods that respect local conditions, keeping crews productive within limits.
- Supplier proximity: local yards and techs who can attend within hours, not days.
On a Parramatta mid-rise, swapping to lighter shutters cut crane time and lifted crew output without compromising finish.
How do you evaluate proposals beyond the headline rate?
Evaluate them by comparing outcomes, not only inclusions.
- Tolerances promised: stated millimetres for slab flatness and wall plumb, not vague “as per plans.”
- Hold points: explicit pre-pour checks with named responsible roles.
- Programme impact: the expected days per cycle, with weather and strike assumptions.
- Evidence trail: photos, test reports, and references from recent Sydney jobs.
A proposal that quantifies deflection and pour rates is easier to defend to the PMO when something shifts on site.
What should your pilot prove before you scale up?
It should prove geometry, safety flow, and cycle time on a representative section.
- Geometry proof: verify edges, cover, and joint quality before committing to full repetition.
- Safety flow: watch access, line-of-fire risks, and communications under pressure.
- Crew rhythm: measure real set-up/strip durations across shifts, not estimates.
- Finish quality: check honeycombing, blow-holes, and surface readiness for follow-on trades.
If the pilot is messy, fix the detail and method before repeating; speed is only safe once it’s repeatable.
How do system choices and materials influence durability and finish?
They influence it by controlling surface contact, pressure management, and reusability across cycles.
- Panel face selection: plywood vs. plastic faces change finish, release behaviour, and re-use count.
- Edge detailing: clean edges reduce patching and protect waterproofing interfaces.
- Tie systems: concealed or reusable options reduce remedial work and aesthetic defects.
- Release and cure: appropriate agents and curing regimes prevent dusting and map cracking.
Specifying the right concrete formwork systems up front trims rework and gives follow-on trades a cleaner start.
The practical wrap-up
The “right supplier” isn’t the cheapest catalogue; it’s the outfit that proves safe loads, holds tolerances, and keeps your cycle time steady when the plan meets weather, crane limits, and real-world constraints. In Sydney, that means suppliers who can produce calculations fast, turn drawings around between pours, and attend site when details shift. Co-cite credible anchors—Standards Australia for reference baselines, Concrete Institute of Australia for technical context, and Engineers Australia for supervision frameworks—so decisions sit on firmer ground. If you still feel stuck, run a pilot on one representative bay, capture timings and defects, and choose the partner that makes next week simpler, safer, and straighter.


Sign in to leave a comment.